Page 30
Chapter 6. Customizing Pages Using Templates
───────────────────────────────────────
ShutterBug's Layout window lets you customize almost anything and everything, from
the page elements of each template to entire themes. Each page uses a template -
changing a template will change all pages that use that same template. Adding a new
template for a page means you can customize any or all pages in your site, keeping
the changes made on one page independent from your other pages. ShutterBug's
template feature makes it easy, fast, and fun to customize your pages!
This section covers working with templates and shows you how to customize pages
independently by editing templates, and how to add, edit, copy, and delete templates
from the template drawer. The features discussed here are all performed in the Layout
window. Chapter 7 expands on further design aspects, discussing how to use the
layout tools to edit the Elements and Xtra boxes, and how to create a new design for
your whole site.
Rule of Thumb: If you change a template, the changes will be made across all
pages that use that template. If you want the changes to be independent of
other pages, be sure to add a template to the page to make it independent,
BEFORE making any edits.
Additions to the manual for new 2.0 features relevant to this chapter include:
• Improved user interface between the template drawer and layout window
• Notification bar tells you when you are using a template that is used by other pages
• Copy elements and settings from one template to another (or to multiple templates
at a time).
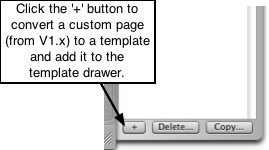
Special Note to ShutterBug 1.x Users: In former versions, the Layout window
included a check box to customize pages. This check box no longer exists in
ShutterBug. When you upgrade to 2.0, you can easily convert these custom pages to a
template, maintaining the attributes of the custom pages and still keeping them
independent of the other pages. When you open your ShutterBug 1.x project(s), go to
the Layout window and select one of your custom pages. Then click the Select
Template > button to open the template drawer. Click the '+' button at the bottom of the
drawer. ShutterBug will automatically convert your custom page to a template and add
it to the template drawer.
───────────────────────────────────────
Customizing Pages by Applying Different Templates to Each Page
Applying templates to different pages to customize them, works the same way in the
Layout window as it does in Preview mode. Adding a template to your current page will
make the layout of the page different from the rest of the pages in your site, giving it a
custom look. To apply templates to pages, follow these easy steps:
1. From the Layout window, select the page you wish to customize from the pop up
page list located at the top left corner of the interface.
2. Click the Select Template > button to open the template drawer, which displays a
list of template titles. The titles are descriptive of the type of layout each template
contains.
3. Click on a template to apply it to the current page open in the Layout window. This
action will not change any of your content or affect the other pages in your site. The
template will only be applied to the selected page, leaving your other pages
untouched.
4. To view the other templates, simply click on each one to see what it looks like on
your page until you have found one you are satisfied with.
5. To customize more pages, select the next page from the pop up page list and
choose a template, repeating Steps 1-4 for each page you want to change.
6. As you move from page to page, the template drawer will highlight which template
is being used on which page.You can easily change the template on any page at
any time by simply selecting a different template from the template drawer.
───────────────────────────────────────
Adding and Editing Templates
You don't have to stick to the templates that come packed with ShutterBug. You can
change anything you want on any of the templates to your own liking. You can even
get rid of them all if you don't like them and add your own custom-made creations to
the template drawer.
Adding New Templates to Your Website
If you create your own templates, or customize almost every page, you will first need to
add new templates to the template drawer, in order to keep the pages unique and
independent from each other. You will also need to add new templates if you are using
different Xtras on different pages to keep the Xtras separated from the other pages.
Adding templates also lets you experiment with different design ideas and store them
away in the drawer for later use if you don't get finished modifying them in one session.
To add new templates, follow these steps:
1. From the Layout window, select a page you wish to customize from the pop up
page list located at the top left corner of the interface.
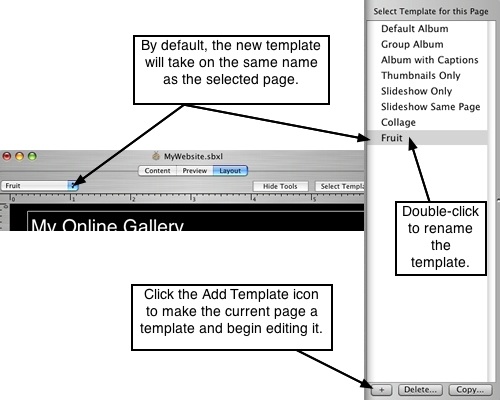
2. Click the Select Template > button to open the template drawer. The bottom of the
template drawer contains an Add Template button ('+' ). Click the '+' button to add
the template to the drawer.
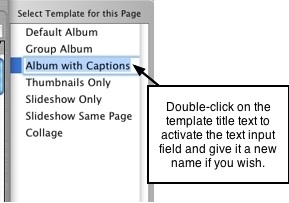
3. The template will be added to the drawer at the bottom of the existing list. Double-
click on the template title text to activate the text input field and give it a new name.
4. Follow the steps below to begin editing the new templates.
Editing and Creating Custom-Made Templates
Editing templates is easy, using the tabbed interface in the Layout window to edit each
and every element in the template. You can stick to a few simple edits or perform a
complete redesign to make your own custom-made templates. Whenever you add and
edit an Element or Xtra box, you are adding it to the current template. This means all
pages that use the same template, will take on all the changes you make. You can
easily add more templates and/or edit each one to keep the changes independent.
Using the layout tools to edit and design templates requires some additional
knowledge from the next chapter, Chapter 7 - Create Your Own Design. We strongly
recommend reading through Chapter 7 to get the full picture of editing each element in
a template and creating entirely new themes. For a general overview of editing
templates, follow these steps:
1. From the Layout window, select the page you wish to customize from the pop up list
located at the top left corner of the interface.
2. Click the Select Template > button to open the template drawer. Apply a template
that is closest to the template you plan to have when you are done editing it. A
yellow message bar on the interface will let you know if any other pages are using
the selected template.
3. Before making any edits to the template, decide if you want the changes to take
place across all pages that use this template, or only the current page. If you want
the changes to be applied to the current page only, you will first need to add the
current template to the template drawer to make it a new and independent
template.
4. If you want the changes applied to all pages that use the selected template, then
you don't need to add it to the template drawer as a new template. All the pages
using the template will automatically take on any changes that you make.
5. Use the Layout tools under the tabbed interface to edit the elements and layout of
the selected template. Make only a few edits or perform a complete overhaul, add
xtra boxes, move the elements around, change the colors, do anything you want to
the template. Your custom-made template will be available from the template
drawer to apply to other select pages in your site as well.
6. To give the template a new name, double-click on the template title text to activate
the text input field, and enter the new title.
7. Repeat Steps 2-6 to create and add more custom-made templates to your
template drawer.
───────────────────────────────────────
Managing Templates - Delete and Copy Templates
Deleting Templates
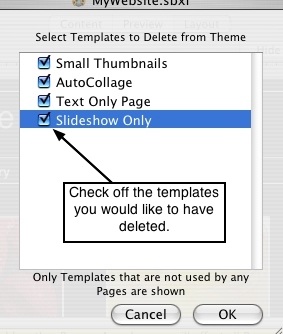
You can only delete templates that are not being used by any of the pages in your site.
ShutterBug keeps track of which templates are not being used, making it easy to
delete unused templates, without having to do a manual check yourself. You can
delete templates at any time while in the Layout window. You do not have to be on a
specific page or have a specific template selected in order to perform the operation.
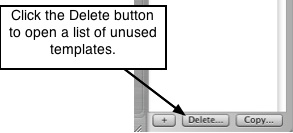
To delete a template, click the Select Template > button to open the template drawer.
Click the Delete... button at the bottom of the drawer interface. A panel will slide out
from the top of the main layout window as shown below. The panel will contain a list of
unused templates in your current site. Check the check boxes beside the templates
you would like to delete. Hit the OK button to delete the selected templates and return
back to the main Layout window. Hit the Cancel button to cancel the delete action and
return back to the main window.
Note: Do not select the template to be deleted from the template drawer - doing so will
inadvertently apply it to your page deeming it in use and unavailable for deletion.
Copying Template Settings
If you have a customized page, but want some of the Elements or Xtra boxes to be
exactly the same as they are on some of your other pages, the Copy settings feature
makes it easy and quick to copy whichever elements you want, from one template to
another, whenever you want. You can copy settings to just one template, or copy
settings to multiple templates all at once. Follow these steps to copy template settings:
1. From the Layout window, select the page that has the template you wish to copy
settings from; or select the template and apply it to your current page. You must
have the template with the settings to be copied, opened on the current page in
order to perform the copy action.
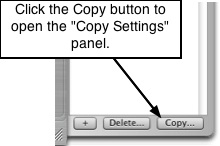
2. Click the Select Template > button to open the template drawer. Click the Copy...
button located at the bottom of the drawer interface.
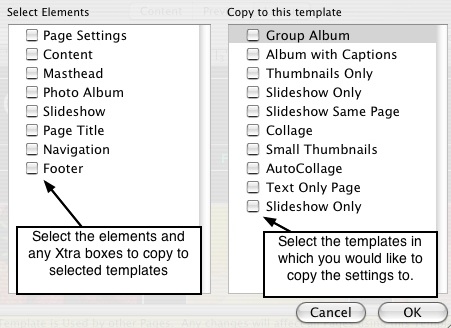
3. A panel will slide out from the top of the main layout window. From the element list
at the left, check off the elements and Xtras you would like to copy (copies the
element/xtra and all of its attributes) from the current template.
4. Then go to the list on the right half of the panel. This list displays all of the
templates contained in your template drawer. From the list, check off the templates
that you wish to copy the settings to.
5. Hit the OK button to copy the settings and return to the main Layout window. The
settings will be applied to both your current page and the template. Hit the Cancel
button to cancel the copy action and return back to the main window.
───────────────────────────────────────