

Page 28
5.2 Web Host Locations
ShutterBug supports .Mac accounts, WebDAV and FTP/SFTP hosting. You can also
export the site to a folder on your computer. This page outlines some key points to
keep in mind when exporting and setting your user specific information for a particular
web host account, as well as how to export to a folder on your computer.
Note on FTP/SFTP:
ShutterBug V2.0 & 2.1 requires Cyberduck or Transmit for FTP/SFTP uploading.
Instructions follow below.
ShutterBug V2.2 and later contains built-in FTP/SFTP support and no longer
requires Cyberduck or Transmit. Please click here to see the helpful instructions at
our support board to learn more about using the current FTP/SFTP export feature.
───────────────────────────────────────
Exporting to a .Mac Account
• Dot Mac accounts use two different URLS: one for uploading to, and a second one
for viewing. The URL for uploading to a dot Mac account will look like this:
idisk.mac.com/username/Foldername (i.e. Pictures, Sites, etc.). The URL for viewing a
site located at a dot Mac account will look like this: homepage.mac.com/username/
foldername
• You do not need to enter the URL - only the Folder name where you want the site to
go. When entering the Folder name, do not include "Sites" in the directory - ShutterBug
will automatically append this extension to the folder name you input. If you leave the
Folder field blank, ShutterBug will upload the site to your Home folder, which may
interfere with other content you have at your Home folder.
• For added convenience, ShutterBug Preferences offers the option to have
ShutterBug automatically open your default browser at the correct URL for viewing,
after your site is finished exporting (available for .Mac uploads only).
───────────────────────────────────────
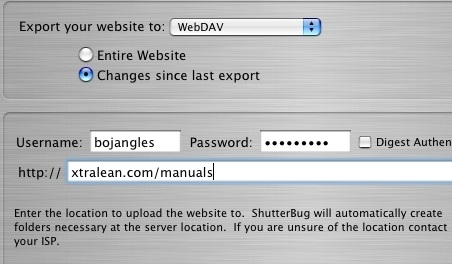
Exporting to a WebDAV Host
• WebDAV is short for Web-based Distributed Authoring and Versioning, also referred
to as World Wide Web Distributed Authoring and Versioning. WebDAV extensions use
the http:// prefix for transferring data from the client (your computer) to the server (your
web host) and is a very reliable method of data transfer.
• The URL for uploading and viewing is the same. Do not enter the http:// prefix in the
location directory box of the Export window - ShutterBug automatically appends it for
you. The location of your web host space will be your domain name, plus the folder
you are exporting to (if you are uploading to a specific folder off of your main domain
index page): xtralean.com/foldername. If you are uploading to your index page, then
you only need to enter your domain name.
• If you are exporting to a folder, there is no need to create the folder on the server
first - ShutterBug will automatically create any new folders necessary at the server
location. If your web host requires Digest Authentication, check the box; otherwise just
leave this box blank.
───────────────────────────────────────
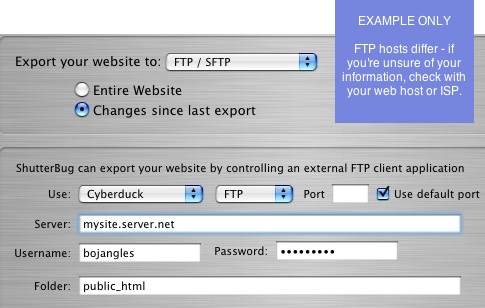
Exporting to a FTP/SFTP Host
Please check your ShutterBug version number:
V2.2 or greater - If you are using Version 2.2 or greater, the FTP/SFTP instructions
below do not apply. V2.2 and greater has built-in FTP/SFTP functionality and no longer
requires CyberDuck or Transmit. Please click here to view the instructions at our
support board on using the built-in FTP/SFTP feature.
V2.0 & V2.1 - If you are using Version 2.0 or 2.1, please continue to follow the
instructions below:
ShutterBug Version 2.0 adds the ability to export to a FTP or SFTP (Secure FTP) web
host using Cyberduck or Transmit. You will need to have CyberDuck or Transmit
installed on your computer. You can download Transmit from the developer website,
Panic Inc., at www.panic.com/transmit. You can download CyberDuck from the
developer website, David V. Kocher, at http://cyberduck.ch. Simply enter your user
information into ShutterBug's export window, and upon export of the site, ShutterBug
will connect to your chosen FTP client and automatically upload your web pages.
• To export your ShutterBug website using FTP, select FTP/SFTP from the pop up
list in the Export window.
• Next select your preferred FTP client from the two options: Transmit or Cyberduck.
• Select the type of transfer you require: FTP or SFTP.
• If you are not using your computer's default port, enter the Port number you wish to
make the transfer through. Otherwise, check the Use default port box.
• Enter the URL location of your web space into the Server text field. FTP locations
look something like this: ftpservername.com/foldername (you don't have to enter
the ftp:// prefix.
• Next enter your Username and Password in the fields provided, as well as the
Folder name if needed.
• Hit Export. After ShutterBug's activity log is completed, your chosen FTP client
application will open and will automatically begin uploading your files.
Notes:
• Sometimes, but not always, the URL for viewing with FTP hosts is different from the
URL for uploading to. This depends on how your ISP or web host manages the web
space. If you are unsure of your FTP information, check with your ISP to find out the
correct user specific information for your account.
• We cannot support problems that result from using the wrong web host information.
We'll try our best to help you figure out the correct URL directory based on the info you
give us - but we can't guarantee we'll know as the information is user specific to the
account you have with your ISP. This is private information that only you and your ISP
have access to. If you are unsure of your information, ask your ISP to forward it to you
and store it in a safe place for future reference.
───────────────────────────────────────
Exporting to a Folder
To export a web site to a folder on your computer, follow these steps. To export only
changed pages to an existing folder, see the Note below.
1. Select File-->Export Website from the Main Menu.
2. Select Folder from the pop up list in the Export window.
3. Click the radio button labeled Entire Website.
4. When the Export window is set to Folder, it will display the folders on your
computer. Select the destination folder on your computer to export to.
5. Click the Export button to send your site to the selected folder.
6. If you want to create a new folder to send your site to, first select the
location on your computer where the new folder should be saved to. Then
click the New Folder button.
7. A panel will slide out from the top of the main window. Enter the name for
the new folder and click Create. The folder will now appear in the list of
folders in the Export window.
8. With the new folder selected, click the Export button. Your site and all of the
site files will be exported to the newly created folder.
Note: If you plan to export the same project to the same folder for all future changes
and updates to the site, then you will only need to hit Send from the Preview window,
to export the changes in the future. The changed files will overwrite the old ones
keeping your folder up to date. There is no need to go into the Export window each
time you want to export changes, unless you need to export to a different folder.
To export changes to another folder, select File-->Export Website from the Main Menu.
Select Folder from the pop up list in the Export Window. Click the radio button labeled
Changes since last export. Select the folder to export to and hit the Export button to
send the changes.
───────────────────────────────────────