
Page 9
2.2 Setting User Preferences
Before you import any photos or start building
any pages, go to ShutterBug Preferences from
the Main Menu. The Preferences window
contains a few options you should set before
getting started with your pages. The window will
open with the General tab selected.
───────────────────────────────────────
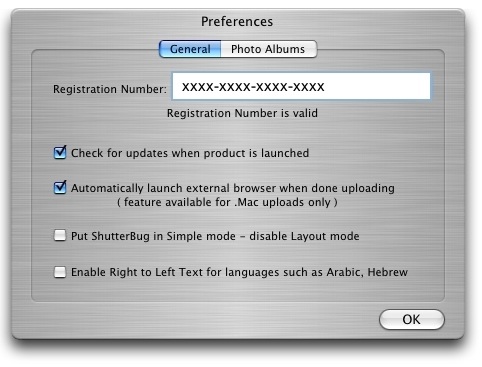
General Tab
Note to ShutterBug V2.3 and above users: The Preferences pane has changed
from the instructions outlined here. Please see the 2.3 Release Notes at our support
board for details on the new preference pane and new image processing. For users of
version numbers before 2.3, please continue to follow the details outlined here.
The General tab contains the field for entering your registration number, as well as a
few other handy user preferences.
Registration Number
Enter your registration number in the field provided. This will remove the demo
watermark from your uploaded pictures. Make sure the message below your entered
number changes to say "Registration Number is valid." Do not hit the space bar after
entering your registration number - this will yield an invalid number as an extra space
will be added to the end of the number.
Check for updates when product is launched
Check this box to have ShutterBug automatically notify you when an update is
available.
Automatically launch external browser when done uploading
This option is specific to .Mac accounts only. If you plan to export your site to a .Mac
account, checking this box will make your default browser automatically open at the
URL for viewing your site, after the upload is complete. This option provides added
convenience as the URLs for exporting to .Mac accounts are not the same as the
URLs for viewing.
Put ShutterBug in Simple Mode
This option is designed for those who do not want to modify the themes and templates
in any way, or for those who plan to share the site file with others, but do not want the
layout and design to be touched or accessible by others. Checking this box will
automatically make the Layout tab and window invisible on the interface, leaving only
the Content and Preview windows available for use. Simple Mode is especially useful
for designers who want to pass the file off to their clients so that the client may
maintain the text content of the site on his/her own, without inadvertently ruining any
portion of the layout or design elements.
Enable Right to Left Text for languages such as Arabic, Hebrew
This feature was added for users who require right to left text handling on their web
sites. Check this box to make the text automatically flow from right to left on the page.
Note: Right to left text handling is not supported by OS X 10.3. You must upgrade to
10.4 in order to utilize this feature.
───────────────────────────────────────
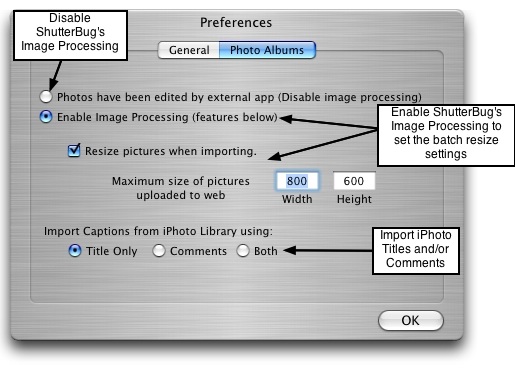
Photo Albums Tab
The Photo Albums tab contains the options for image processing on import and upload
of the photos, as well as iPhoto title and comment importing options.
Photos have been edited by external app
Click this button to disable ShutterBug's image processing. This option is useful for
those who edit and optimize their photos in an external application and want to keep
the compression quality at 100% of the original. Note: photos at 100% will take longer
to upload, as well as to load on your web pages when viewing, because they are much
larger in size.
Enable Image Processing
If you would like your photos automatically sized down (recommended) for faster
upload and faster viewing on the web, click this button to activate ShutterBug's image
processing. ShutterBug will batch process the photos when they are imported and
uploaded. Check the Resize pictures when importing box to have ShutterBug
automatically size down your photos when you import them. ShutterBug will scale the
photos no larger than the maximum size you specify and maintain the aspect ratio.
Use the Width and Height fields to specify the dimensions to which the photos should
be sized down to when they are imported. These values are also the dimensions that
ShutterBug will use when uploading the photos to the web. ShutterBug will
automatically resize your photos no larger than the maximum size specified in the
width and height boxes. This will only apply to any photos that are larger than your
maximum values; any photos smaller than those values will remain at their original
size.
Import Captions from iPhoto Library using:
ShutterBug can import the titles or comments from your iPhoto library, or import both.
When your photos are imported into ShutterBug, the titles and/or comments will be
automatically imported along with the photos. Select the Title Only option to have
ShutterBug import iPhoto titles as the caption; select the Comments option to have
ShutterBug import your iPhoto comments as the caption; select Both to import both the
titles and comments as the photo caption. Any photo or folder of photos not in your
iPhoto library will import the filename as the caption.
When you are finished setting your user specific options, click the OK button to return
to the main window.
───────────────────────────────────────