ImageWell can Watermark your image by placing either text or a graphic on top of your
final image. Watermarking is a great way to protect your images by indicating a
copyright, website URL or a logo graphic. It's like branding your images before they leave
your computer.
Watermark Tab
Clicking on the Watermark tab reveals the options -
a popup list with various styles of watermarking, a
text entry box and below that, some formating
options - alignment, font selection and color.
Selecting 'image' for the watermark style reveals a
small image well for setting the watermark graphic
and an opacity slider.
Feel free to type in some text and select the various styles from the popup list. To
disable the watermark feature, simply select 'None' from the pop up list.
Adjusting the Text Styles
The font family and font size appear in the text entry box exactly as it will be on your
image. For example, if you use Helvetica 12 point, then the watermark text will be that
size regardless of the size of image. Perhaps you want a different font or different size.
Activate the standard OS X font panel by clicking this button.
Using the font panel you can change all the text by selecting all the text and then
changing the font attributes in the font panel. To change just one word or only a portion
of the text, select the word or portion of text you wish to change and set the attributes
in the font panel. Feel free to mix and match styles.
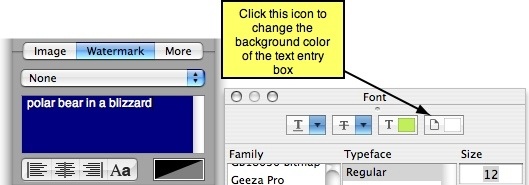
White text on a white background! I can't see the words!
By default the text entry box has a white background, so if you set your watermark text
to white you just can't see the 'polar bear in a blizzard'. No worries, you can change the
background color of the text entry box.
Click the icon button shown above in the Font Panel, then select a color in the Color
Picker Panel. The background of the text entry box will change - now you can see the
'polar bear in a blizzard'.
Changing the background color of the watermark
The color well in the bottom right corner allows you to change the
background color of the watermark. You can select any color from the
Color Picker Panel and adjust the opacity of the color - this will create
a semi-transparent background.
Adding Graphic Watermarks
By selecting one of the 'Image' options from the
popup list you can use a graphic as the watermark
for your images. The UI below the popup list
changes to show a small image well (drag and drop
your graphic into this well) and an opacity slider.
Any kind of image can be used, including images
with transparent backgrounds.
All of these features are standard and available in both the free version of ImageWell
and the paid ImageWell Xtra upgrade.
Now it's time to Send your images - Click here.