Page 14
3.1 Page Titles & Text Contents
Both the group and album pages have an area to add a page title and a text
description for each page. The content window lets you focus on your content without
having to worry about the design. It will help you to get your text and page titles in
quickly and easily, so that you can maintain a fast work flow, and move smoothly from
one page to the next.
The amount of text that can be entered for your page descriptions is unlimited. You will
be able to layout the text box and/or wrap the text and make other design decisions
later on in the Layout window. The page titles are unique to each page and can say
whatever you want them to say. The titles can be as long as you want them to be. As
with your other content, design decisions for the page title, such as font and position
on the page, are made later in the Layout window.
Click the Content tab to open the content window and get started building the content
for your site. Note: The page you are reading right now utilizes all of the text editing
options discussed here.
───────────────────────────────────────
Adding Page Titles
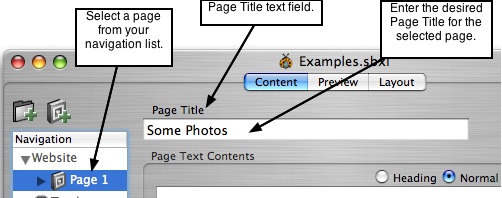
1. Select a page from your navigation list.
2. A text field labeled Page Title will appear at the top of the content window and to the
right of the navigation list. By default, the page title text field will contain the words
"Some Photos".
3. Click inside the text field and give the selected page a new title.
4. If you don't want to include a title for the page, leave the text field blank, or highlight
the existing title text and delete it.
5. Continue down your navigation list, repeating Steps 1-3 to give the rest of your
pages a unique page title. Tip: You can use the arrow keys on your keyboard to
move up and down the pages in the navigation list.
Notes:
• There are no editing options for the page title fonts in the Content window; all editing
options for the title are available from the Layout window.
• The page title cannot include a link.
───────────────────────────────────────
Adding Text Content to a Page
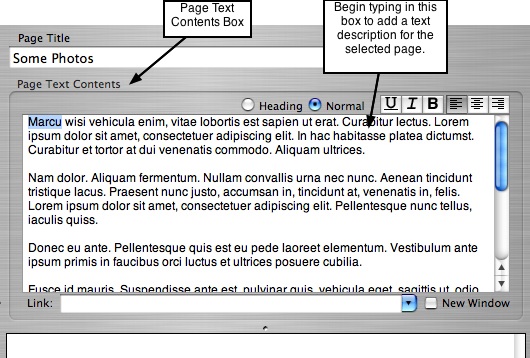
1. Select a page from your navigation list.
2. Just below the Page Title text field, is a larger text field area labeled Page Text
Contents.
3. Click inside the Page Text Contents field to begin entering some text. You can input
as much or as little text into this box as you want. It can be whatever you want it to
be, a brief description that introduces the pictures, a description about the context
of the photos, or an entire story, timeline, or journal about the pictures.
4. To not include any text at all, simply leave the text contents box blank.
5. To have a text-only page, enter the text in the text contents box, but do not include
any photos for this page. Remember that you can adjust the sections of the
content window. So if you are creating a text-only page, it's very handy to expand
the text contents window for more area to type in your text.
Editing the Text Contents
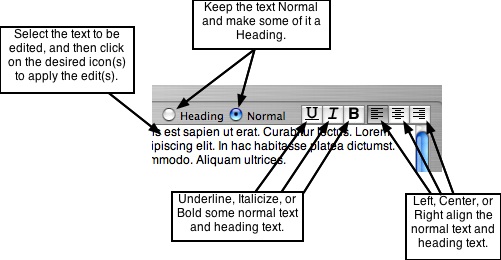
The Content editor lets you do some quick and basic edits to your text contents for
each page. These editing options include text alignment, bold, italicize, and/or
underline the text, and make some of the text be a heading or keep it normal. Also
note that the spell checker is available.
1. To align the text, click anywhere in the text box and click the corresponding icon at
the top right corner of the text contents box. Choose from one of the left, center, or
right align icons. You do not have to select and highlight the text for the alignment to
be applied.
2. To make different lines of text align differently, include a carriage return between the
lines. Then click anywhere on the separated line of text, and click the desired
alignment from the icons.
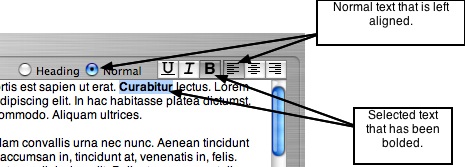
3. To underline, italicize, or bold some text, select and highlight it with your mouse
and click the corresponding icon located at the top right corner of the text contents
box.
4. You can add headings to your text contents as well. Click on the line of text you
would like to make a heading, and then choose the radio button labeled Heading
located at the top of the text contents box.
5. You can underline, italicize, bold, or align headings the same way you do with
normal text as outlined in Steps 1-3.
6. To make this text normal again, click on it with your mouse and select the radio
button labeled Normal.
───────────────────────────────────────
Inserting Links into the Text
You can link any of your text to another page in your website or to an external website,
and choose to have them open in a new browser window or the same browser window.
You can also include email links.
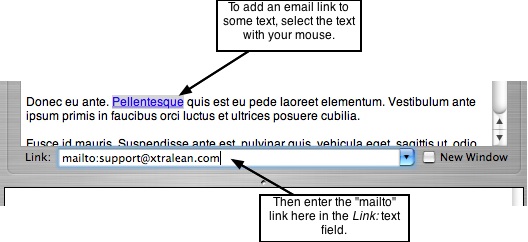
Inserting an Email Link:
1. To link some text to an email address, select the text with your mouse by clicking
anywhere on it. Note: To link more than one word, you have to select and highlight
all of the desired text with your mouse. To link just one word, you only need to click
anywhere on the word.
2. With the text still selected, go to the text field labeled Link: located just below the
text contents box. Enter the email address and be sure to include the mailto: prefix.
For example, mailto:myemail@address.com. Do not include any spaces between
the characters.
3. This text will now link to the specified email address, opening the person's email
program when they click on it.
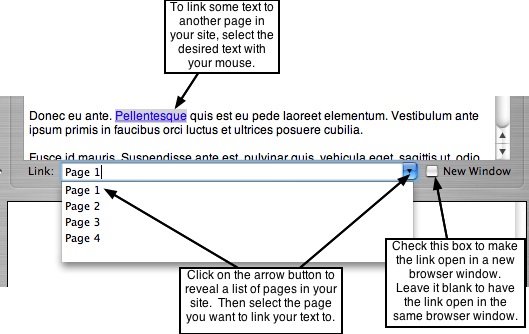
Linking Text to Another Page in Your Website:
1. To link some text to another page in your website, select the text with your mouse
by clicking on it. Note: To link more than one word, you have to select and highlight
all of the desired text with your mouse. To link just one word, you only need to click
anywhere on the word.
2. With the text still selected, go to the text field labeled Link: located just below the
text contents box, and click the blue arrow button to reveal the drop down list of
pages in your site.
3. Select the desired page to link to from the list. The text will now link to the selected
page when clicked on.
4. To make this link open the selected page in a new browser window, click the
checkbox labeled New Window, located at the right side of the Link box field. To set
it back to open in the same browser window, click the New Window checkbox to
uncheck it.
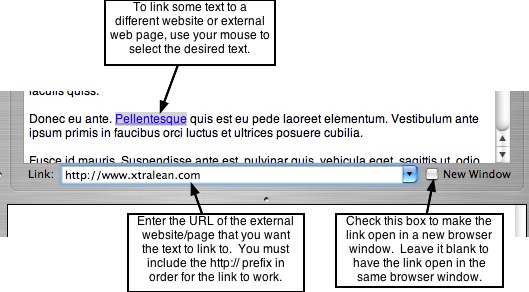
Linking Text to an External Website:
1. To link some text to an external web page or another website, click on the text you
would like to link. Note: To link more than one word, you have to select and
highlight all of the desired text with your mouse. To link just one word, you only
need to click anywhere on the word.
2. With the text still selected, go to the Link: text field box located just below the text
contents box. Type the URL you would like to link to and be sure to include the
http:// prefix.
3. To make the external link open in a new browser window, click the checkbox labeled
New Window, located at the right side of the Link box field. To set it back to open in
the same browser window, click the New Window checkbox to uncheck it.
───────────────────────────────────────