
Page 30
6.6 Slideshow Tab
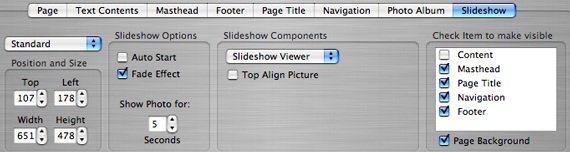
Click the Slideshow tab to reveal the editing options for your slideshow. At the top left
corner of the tabbed pane, there are two main options to start from: Standard or
FreeStyle. The Standard slideshow option keeps the slideshow pictures and labels
bound together in a format that is more constrained than FreeStyle. The FreeStyle
option separates all the items included in your show, and lets you edit and position the
labels, captions, and slideshow as independent items. The purpose of the two different
options is to provide you with a quick way to get a slideshow up, and an alternative way
to make the slideshow more customized when you want to spend a few more minutes
with more detailed edits.
───────────────────────────────────────
Using the Standard Slideshow Option
Properties Pane
1. Select Standard from the drop down list at the top left corner of the pane, if it isn't
already selected.
2. Use the spinbox controls or grab the slideshow bounding box in the viewer window
with your mouse to resize it and position it.
3. To have your slideshow automatically start, check off the Auto Start check box under
Slideshow Options. To include a fade transition between each slide check off the Fade
Effect check box. To disclude either one of these features from your slideshow, leave
these boxes blank.
4. To create a timed delay between slides, enter the number of seconds you would like
to show each slide for. This is only applicable when the Auto Start or Play button is
activated. If viewers are using the Next and Previous buttons, they will naturally be
viewing the slides at their own pace.
5. Next you can select which Slideshow Components to display and use for your
slideshow. Each component has its own editing options.
6. Select Caption from the drop down list. To
display the caption with your slideshow, check
off the Show check box. Then select the font
style, size and color for the caption text. If you
are using multiple line captions, you can choose
to increase the line spacing. Then select the
alignment for the caption: left, center, or right
align. These settings will not affect the caption
settings for your photo album, the two are
independent items.
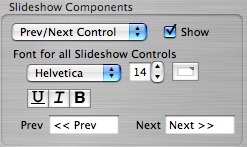
7. The next three items in the list are the Slideshow Controls or Labels that people will
use to navigate through your show for viewing. They all share the same traits except
for the names that you assign for each label. The font type, size, color, and underline,
italicize, and bold that you choose for one control label will also be automatically
applied to the other control labels.
8. Select Prev/Next Control from the drop down list. Choose whether to include these
labels/controls for your show by checking or unchecking the Show checkbox. Select
the font type, size, color, and whether you would like the label underlined, italicized,
and/or bolded.
9. Sticking on the Prev/Next control, input the text you would like to display for this
control. It can be any text you want. The default for most of the themes will have it set
to <<Prev and Next>> or something very similar to that. You can change this text to say
anything you want, such as Previous Image, Next Image, Back, Forward, etc. You can
insert special characters for arrows, or remove the text arrows completely.
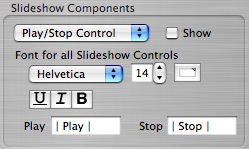
10. Select Play/Stop from the list. Choose to Show or not Show these controls in your
slideshow and input or change the desired text for these labels. Note: Auto Start does
not require the Play/Stop controls to be included in the slideshow; AutoStart works on
its own regardless of whether or not you have included the Play/Stop controls. Select
Back to Album from the list, and repeat the same steps.
11. The next component in the list is called Background Box. The background box is
the box that surrounds the slides. This box is used for adding an outside frame or
background color to the slideshow (not the same as adding a frame to the slide, but
rather synonymous to the background and border for the photo album). You can
choose to show or not show this box by checking or unchecking the Show checkbox.
We'll get to borders and margins later. For now, move on to the next component in the
list.
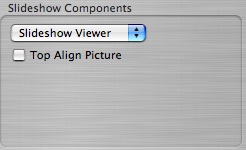
12. The last component, called Slideshow Viewer gives you the option to top align your
pictures so that they all line up at the same top position. This is handy when you have
a variety of portrait and landscape pictures in the same slideshow. It keeps them all
aligned from the top instead of making them display at different top positions. To
activate this feature, check the box labeled Top Align Picture. Note: This feature will not
work if you do not have "Enable Image Processing" turned on in your user
preferences.
13. The last section on the interface allows you to select which elements to include on
the page with your slideshow. Any elements that you have on the normal view for
each page can also be displayed for the slideshow. This allows you to further
customize the display of your slideshows. Including the elements means you will have
to position your slideshow around the other elements accordingly. The slideshow and
its labels are the only editable items when in slideshow mode. Check or uncheck the
corresponding check boxes to show or not show the elements you have included in the
normal view of your web page.
14. Page Background applies to an image background, but not the color of the page
background. If you have used an image or tiled an image in the page background for
normal view, it may clutter, clash or interfere with the colors and options you choose for
the slideshow. This checkbox gives you the option to shut off such images for the
slideshow view, giving you the best of both worlds, instead of making you choose
between one or the other. Check the box to make the page background show for your
slideshow view; leave the box blank to make the page background invisible during
slideshow view. Note: Making the Page Background invisible will NOT remove or
change the page background color; this option only applies to an image background.
───────────────────────────────────────
Using the FreeStyle Slideshow Option:
The editing options for FreeStyle are exactly the same as they are for the Standard
Slideshow. Select FreeStyle from the drop down list located at the top left corner of the
pane, to reveal the editing options. The difference between FreeStyle and Standard is
FreeStyle breaks the slideshow elements apart allowing you to position them anywhere
you want, independent of each other. The Freestyle feature means you can put
captions, labels, and controls at the side, bottom, top of the picture, and align them
however you want with total freedom. Use your mouse to select each component in
the viewer window and move them around on the canvas. Use the grab handles to
resize them each component. All other options are used exactly the same as they are
in standard mode.
───────────────────────────────────────
Borders Pane
The editing options under the Borders pane are the same for both Standard and
FreeStyle slideshows. Click the Borders button to reveal the options available from the
borders pane.
Picture Frame:
To give your slideshow pictures a frame, click the Picture Frame button. The border
style, size, and color works exactly the same as it does for all the other elements.
Simply select the style from the drop down list, choose the colors and use the spin box
controls to increase or decrease the size of the border for each side of the picture. To
include an inside margin to serve as a matte, increase or decrease the inside margin
values, and select the background from the Background list.
Slideshow Background Box:
If you formerly chose not to show the background box when you were in the Properties
section, then the options under the Background Box button do not apply. To add a
border and margin to your slideshow pictures, click the Background Box button. The
style, color, and size, as well as the inside margins work the same way as the other
elements. These options are applied in addition to the borders and margins that you
specified for the image itself.
───────────────────────────────────────
Click the Preview tab at the top of the main application window to preview your
slideshow.
This completes the section on editing each element in the Layout window. If you've
just created something you like while going through this chapter, and want to save it for
future use, export the creation to a folder on your computer for safe storage. It can
always be built upon further or edited again in the future. To learn how to export the
new creation, before going any further in this manual, go to Chapter 8. Importing &
Exporting Themes. If you don't care to save it, move on to the next chapter.
───────────────────────────────────────