
Page 15
3.2 Photos, Captions, & Watermarks
The interface for importing photos is much the same as it is in iPhoto. When you
import photos, they will line up horizontally in the album window of the interface. You
can drop multiple photos or a folder of photos into ShutterBug's album window. They
can be reordered using your mouse to drag and drop anywhere in the album window.
The import feature will also automatically import the original file name as the caption.
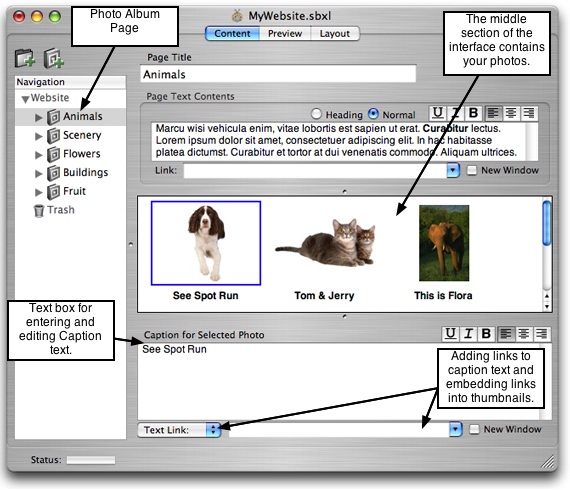
This page discusses your photos in relation to album pages and the corresponding
interface with the album window. Photos in relation to the Group page interface is
different and is discussed on the next page (Photo Albums & Groups). Design aspects
such as thumbnail sizes, photo frames, drop shadows, caption font colors, etc. are
carried out in the Layout window, or determined by the theme you choose in the
Preview window. These aspects are all covered in later chapters. For now, focus on
your photos and editing them in the photo album window under the Content Tab.
───────────────────────────────────────
Importing Photos
You can import photos from iPhoto or from any other folder on your computer. The
import feature uses simple drag and drop functionality. Drop entire folders at a time, a
selection of multiple photos at a time, or a single photo.
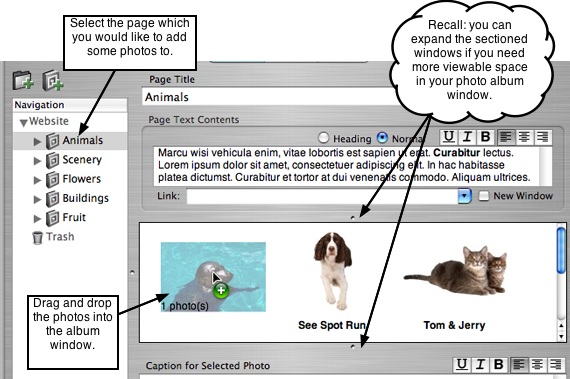
1. Select an album page from your navigation list. The album window will appear at
the middle section of the main window and to the right of the navigation pane.
2. Drag and drop individual photos or a folder of photos into the album window. Your
photos will also be available under the album page in your navigation list.
3. ShutterBug will automatically import the filename of the photo as the caption.
Note: Alternatively, you can drag and drop photos via the navigation pane. Simply
drop the photos into the destination page in your navigation list. As you do this, the
photos will also appear in the album window.
───────────────────────────────────────
Adding & Editing Captions
1. Below the photo album window, there is a text box, labeled Caption for
Selected Photo, for entering the desired caption for each photo. If your photos
already have a file name, you will see the name appear in the caption text field.
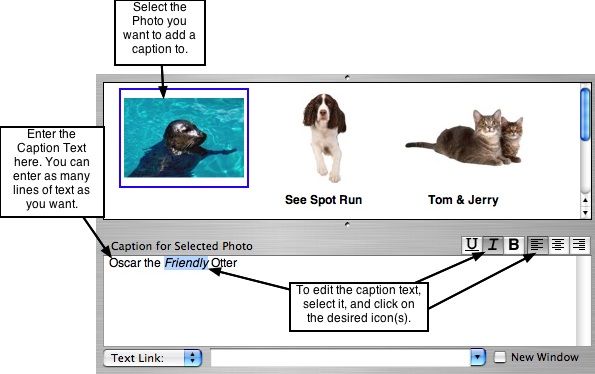
2. Select a photo from the album window. The selected photo will have a blue outline
to let you know which photo is currently selected.
3. Enter the caption text for that photo in the caption text box. You can enter as much
text as you want, the number of lines and characters are unlimited.
4. To align the caption text, click anywhere on the text and select from the left, center,
and right align icons located at the top of the caption text box.
5. To underline, italicize, or bold any of the caption text, select and highlight the text
with your mouse. Click the appropriate icon located at the top of the caption text
box.
Notes:
• If you need to edit all the captions for alignment, underline, italics, and bold, don't
bother doing it now in the content window. Wait until you move into the Layout window.
The caption editing tools will allow you to change these settings for all photos in one
swoop, whereas the content window will only let you do it one photo at a time.
• If you want to include multiple lines in your captions, but are worried about what it will
look like in thumbnail view, don't worry about that now. Go ahead and add the multiple
lines of text - the tools in the layout window will allow you to later adjust how many lines
you want to be displayed with the thumbnails, giving you the option to display the first
line only, no caption text at all, or to display all of it. Regardless of which option you
choose, all of your caption text will appear with the slideshow or larger picture view.
• Alternatively, the theme selected when in the Preview window, will have presets for
the captions which you may like and may not want to edit at all.
───────────────────────────────────────
Adding Links to the Caption Text and Thumbnails
You can add links to the caption text or embed the links in the photo, or do both. The
links can be linked to another page in your website or to an external web page or web
site. They can have them open in a new browser window or open them in the same
browser window.
Insert a Link into the Caption Text:
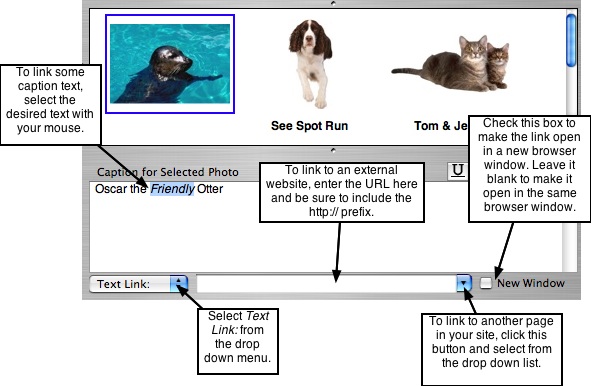
1. To insert a link into some text in your caption, click anywhere on the desired text
with your mouse. If it is more than one word that you wish you to link, select and
highlight the text with your mouse.
2. Below the caption text box, a drop down menu with a text input field is available
for your links. Make sure you have Text Link: selected from the drop down menu.
3. To link the caption text to another page in your website, click the blue arrow button
to reveal the drop down list of your pages. Then select the desired page to link to
from the list.
4. To link the caption text to an external web page, enter the URL to link to into the text
input field. Be sure to include the http:// prefix in the URL.
5. To make the link open in a new browser window, check off the New Window
checkbox. To make it open in the same browser window, leave the checkbox blank.
Embed a Link into the Photo:
1. To embed a link into a photo, click on the desired photo to select it.
2. Below the caption text box, a drop down menu with a text input field is available for
your links. Click on the spin box control and select Image Link: from the drop down
menu.
3. To link the photo to another page in your website, click the blue arrow button to
reveal the drop down list of your pages. Then select the desired page to link to from
the list.
4. To link the photo to an external web page, enter the URL to link to into the text input
field. Be sure to include the http:// prefix in the URL.
5. To make the link open in a new browser window, check off the New Window
checkbox. To make it open in the same browser window, leave the checkbox blank.
───────────────────────────────────────
Adding & Editing Watermarks
Watermarks get applied to either all photos in an album or all photos in your entire
website, but cannot be applied to individual photos. The watermark feature is available
from Tools on the Main Menu (former versions included the watermark feature on the
main application window).
1. From the Navigation list, select the album that contains the photos you would like to
watermark.
2. Go to Tools-->Add/Remove Watermarks from the main menu. The watermark menu
will slide out from the top of the main application window.
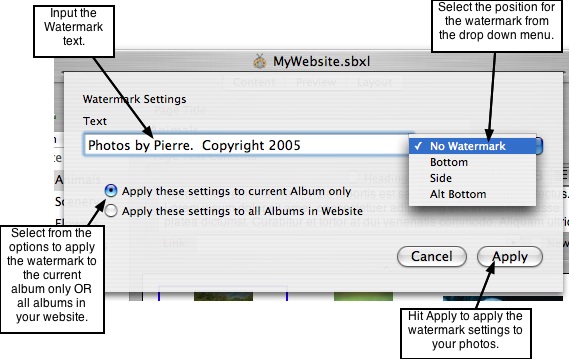
3. Enter the watermark text into the text input field and select the position for the
watermark from the drop down list at the right.
4. Select the desired option for applying the watermark to the pictures: apply to
pictures in the current album only, or apply to all pictures in your website.
5. Click the Apply button. The watermark will be applied to your pictures. Note: the
watermarks are only visible on the big picture view; they do not appear in thumbnail
view and can only be seen in Preview mode.
6. To apply watermarks to photos in other albums, repeat Steps 1-5.
7. To edit the watermark, repeat Steps 1-5, inputting the new text and selecting the
new position from the options in the watermark menu. Hit the Apply button to apply
the changes to your photos.
Removing Watermarks
1. From the navigation list, select the album that contains the watermarks you would
like to remove.
2. Go to Tools-->Add/Remove Watermarks from the main menu. The watermark menu
will slide out from the top of the main application window.
3. To remove the watermark from your pictures, either select No Watermark from the
drop down list, or highlight and delete all of the text in the text field to make it blank.
4. Make sure the desired option is selected: if you want to remove the watermarks
from the current album only, choose the first option; if you want to remove the
watermarks from all of the pictures in your website, choose the second option.
5. Hit Apply. The watermarks will be removed.
Notes:
• New pictures that are imported after adding watermarks, will not take on the
watermark. You will have to follow the same steps above to give newly imported
pictures a watermark.
• ShutterBug will rebuild your photos after you have specified to add or remove
watermarks. If you're working with a large number of photos on each page, it make
take a bit of extra time to rebuild the photos if you have chosen to apply the watermark
to all albums in the site.
───────────────────────────────────────