Page 11
2.5 Arranging Pages & Organizing Site Files
In the Content window, ShutterBug lets you arrange and reorder the pages in your
navigation list by simple drag and drop functionality. Additionally the handy Navigation
Options make it easy to organize, name, and save your site files, as well as being able
to hide pages from your navigation menu. It's worth the small effort that it takes to
organize the pages and files in your site. It only gets quicker and quicker in the future
when you need to do some housecleaning with your site.
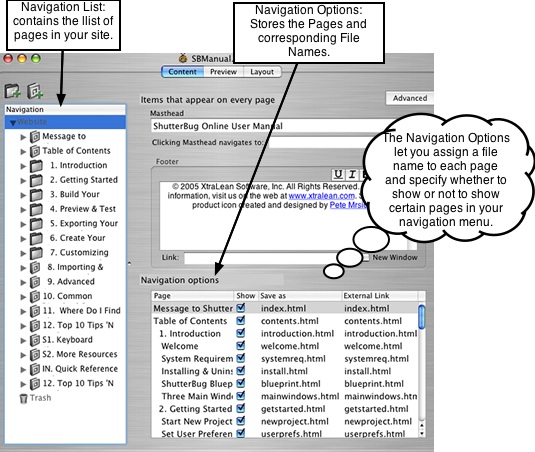
Before going on, view the following diagram to make sure you understand the
distinction between the Navigation List and Navigation Options.
───────────────────────────────────────
Arranging Web Pages in Your Navigation List
You can move all of your pages up and down in the navigation list, dragging and
dropping them wherever you want. To rearrange the order of your pages, or move a
page to a new position, in the navigation list, follow these easy steps:
1. Select the desired group or album page with your mouse and drag it to its new
destination in the navigation list.
2. To move an album into a group page, select it with your mouse and drag and
drop it on top of the desired group page. The group's disclosure triangle will turn
blue and open up. Your album will be dropped to the first position in the group.
3. To move an album into a specific position in the group's list, click on the group's
disclosure triangle to reveal the albums in that group. Then select the album you
would like to add, and drag and drop it into the desired position in the list of albums.
A black guideline will appear to show you where your album will be dropped. You
can move albums up and down within the group, dropping them wherever you
desire.
4. To remove an album from a group, select the desired album and drag and drop it
into any position in the navigation list, or drop it into another group.
───────────────────────────────────────
Organize Your Site Files with the Navigation Options
Ever seen a URL in an address bar that goes something like this:
http://www.shutterbugland.com/vacations/page1.html? The creator of the website has
not named or defined the files in his/her website, and hence the reason it gets
uploaded at the program's default name for the particular file. What about wanting to
keep certain pages in your website but not wanting them to appear in your main
navigation menu?
The navigation options help you complete both of these tasks, plus a few more
organizational gems. These options keep track of page name changes and are all
located under an area in the Content window called Navigation Options. Each time
you change or add a page name in the Navigation List, ShutterBug will automatically
apply the changes to the files in your Navigation Options list, as well as in the drop
down list for the Link box.
Select the Website heading in the navigation list to reveal the Navigation Options pane.
The navigation options pane will appear at the right lower half of the main window.
There are four options: Page, Show, Save As, External Link. The first three are
editable and the last one is automatically defined by the Save As entry. Each column in
the Navigation Options can be adjusted for width. Use your mouse to increase or
decrease the width of a column for more or less viewing space. Follow the steps below
to set the navigation options.
Page Option:
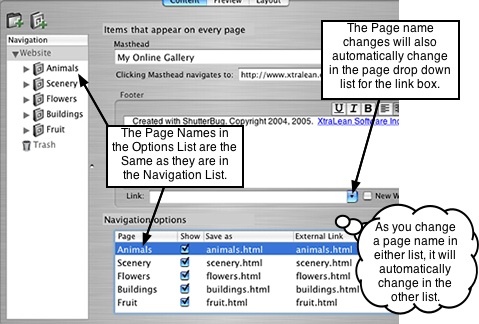
The Page option keeps track of the page order and page names that are in your
navigation list. As you can see, they hold the same names and order that you assigned
in your navigation list when you were adding and naming pages. As you change the
names of your pages, they will also change automatically in the navigation options list.
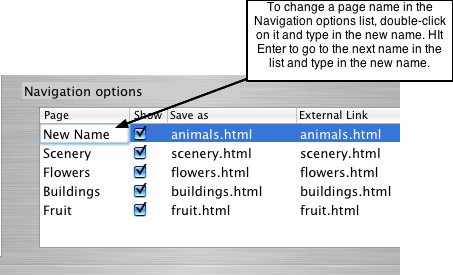
Alternatively, you can change the name of a page in the navigation options list. To
change a page name in the Navigation Options list, follow these steps:
1. Double-click on the page name to activate the text field.
2. Enter the new text and hit the Return or Enter key on your keyboard. The name will
automatically change in your navigation list.
3. To change another page name, enter the new text, and hit Enter. Each time you hit
Enter, your cursor will go to the next page in the list automatically highlighting the
text field so that you don't have to use your mouse to highlight it. Continue down the
list, inputting the text and hitting Enter, until you are done.
Show Option:
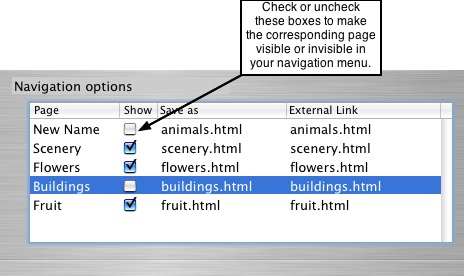
The second option, called Show, contains checkboxes for each one of your pages. The
Show option lets you turn pages on and off in the navigation menu. An exception exists
with Album pages contained in a Group: pages inside of a group will never show up in
the main navigation, even if you have specified them to Show. ShutterBug's navigation
was intentionally designed to not show these pages in order to implement a second tier
navigation feature which we will discuss later in Chapter 6. To assign the Show settings
to your pages, follow these steps:
1. Check the checkbox to make the corresponding page show up in your navigation
menu.
2. Leave the check box blank to keep a page from showing up in your navigation.
3. Uncheck the check box to remove a page from the navigation menu.
Note: These actions do not remove any of the pages from your website. You have to
delete pages to remove them from your site.
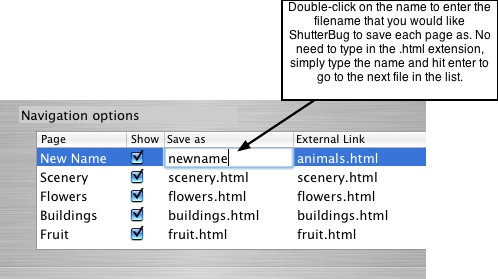
Save As Option:
The third option, called Save As lists the file names associated with each one of your
pages. The file name is the HTML page name that ShutterBug uses to link pages
together. The name assigned is the file name that gets saved and uploaded with your
project. ShutterBug does not automatically change this name, but rather keeps the
default of the page names (i.e.page1.html). It's good practice to give these site files a
specific name in order to keep things tidy as well as to be consistent with the page
name-file relationship. If you ever have to examine the package contents of your
project or the exported folder, you will be happy that you took the time to give these
files an identifiable name that you will recognize in the relative context of your entire
website.
As an example, let's say I call my first page in the navigation list Welcome. The file
name for that page will be listed as page1.html in the navigation options. This will
show up in the browser's URL address bar as: www.xtralean.com/page1.html. To
change this and assign file names, follow these steps:
1. To change the filename from the default name, select it with your mouse and
double-click to activate the text field area.
2. Enter the new file name text. You don't have to enter the dot html extension -
ShutterBug will automatically add the extension for you.
3. Then hit Enter or the Return key on your keyboard to go to the next filename in the
list.
4. Enter the new file name text. Hit Enter to go to the next item in the list.
5. Continue steps 1 through 4 until you are finished.
Note: The Save As option will also prevent you from inadvertently giving files the same
name and accidentally overwriting files. If you try to assign a filename that is already
being used by another page, it won't "stick."
External Link Option:
You can ignore this option as its purpose has been replaced by the Save As option.
Currently the External Link option has no meaning in ShutterBug but was originally
included in preparation for adding external links to the navigation menu.This feature
has been reconsidered and will become a Paradise feature. Future builds of
ShutterBug will have this option removed from the interface.
───────────────────────────────────────
Congratulations fellow ShutterBugs! You have just constructed your very own linked
navigation menu for your website.
───────────────────────────────────────