

Page 27
6.3 Masthead, Page Title, & Footer Tabs
The Masthead, Footer, and Page Title tabs all have two sub-setting buttons:
Properties & Borders. The Borders section acts exactly the same as it does for the
Text Contents tab, and performs the same actions. Therefore we will not repeat the
Borders features here, and will focus only on the editing options available in the
Properties pane. To read about borders, you can refer back to the Borders instructions
for the Text Contents box, as they also apply directly to the Masthead, Footer, and
Page Title boxes.
───────────────────────────────────────
Masthead & Page Title Tabs
The Properties for the Masthead and Page Title offer the same options. Therefore we
will cover them both together in one swoop. Click the Masthead tab to view the editing
options. Then click the Page Title tab to see that the options are the same. The editing
options under the Masthead and Page Title tabs allow you to edit the following
properties:
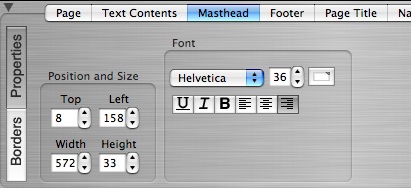
Position and Size of the Masthead and Page Title Boxes
You can position and resize these boxes by either grabbing them with your mouse in
the layout viewer window, or by using the spinbox controls to move them over, up,
down, or to adjust them for width and height.
Edit the Font used for the Masthead and Page Title
You can edit these fonts for type, size, color, alignment, as well as underline them,
italicize or bold them. The font section contains a drop down list of available fonts in
ShutterBug. Click on the spin box control to reveal the list and select the desired font
type to change it. Increase or decrease the font size by clicking on the font sizing spin
box control. Click the color well to change the font color in the color palette. Select
from the icons to underline, italicize, or bold the font, as well as to choose the
alignment of the text inside of the masthead and page title boxes. The inside margins
under the Borders pane can be adjusted to move the text in from the edges of the
masthead and page title boxes.
───────────────────────────────────────
Footer Tab
The Footer tab contains the tools for editing the footer text that you input while in the
content window. You can edit the font, edit the links, reposition and resize the footer
box on the page, as well as offset the footer box from the content in the body of your
page. The editing options under the footer tab allow you to edit the following
properties:
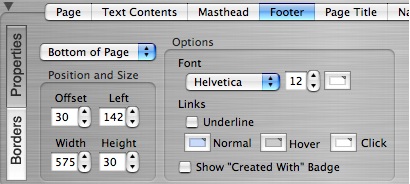
Position and Size of the Footer Box
Clicking the first spin box control (at the top left corner of the tabbed pane) will reveal
two main options for positioning the footer box relative to the other content on your
page: Bottom of Page and Absolute.
Bottom of Page: Bottom of Page will automatically move the footer box to the bottom
of your page, positioned after your content (text, photo albums, slideshows). The
"bottom" of the page is determined by where your content ends. This option will make
the footer always automatically position itself beneath your content. If you add more
text or photos making the content taller or the height higher, it will automatically push
the footer down to adjust for the increase in content, ensuring the footer does not end
up overlapping or lying on top of your content. This saves you the step of manually
moving the footer box around every time you add more content.
Absolute: Absolute will release the footer box from any automatic positioning. When
you select absolute, the footer box will jump to the top of the page. You can grab it
with your mouse and move it to wherever you want on the page, including overlapping
other elements if you so desire. Using Absolute means that the footer box will not
automatically adjust when more content is added. You will have to reposition it yourself
or select Bottom of Page to make it jump back down to the end of the content. The
primary purpose of the Absolute option is to give you an extra box to use on your page
for some other reason than as a footer. For example, you may want to use it to add to
the design of your theme, or to add a sub title that is separated from the Masthead and
Page Titles and appears on every page the way the Masthead does. Or you just may
prefer to have copyright information at the top of the page.
Offset Value: The Offset control allows you to increase or decrease the amount of
space between the footer box and the bottom of the text content and photo album
boxes (Bottom of Page setting); or the amount of space the footer is from the very top
of the page (Absolute setting). When set to Bottom of Page, Offset refers to the footer
box's position relative to the end of the content in the body of your page. It will be
offset by the amount of pixels you select by increasing or decreasing the offset value,
and will always jump down by that value as the content grows taller. When set to
Absolute, the Offset value is the number of pixels the footer box is from the top of the
page. It will always stay there regardless of where the other content and elements are,
unless you move it yourself or change the offset value.
Other Sizing & Positioning Controls: The Left, Width, & Height controls are like all
the other sizing and positioning controls for the other elements. They allow you to
move and resize the footer box by clicking the spin box controls to increase or
decrease the values. Alternatively, you can grab the footer box in the viewer window
and reposition it by dragging and dropping it, and drag the grab handles to resize it.
Note: If the Footer is set to Bottom of Page, you will not be able to drag it above the
content on your page.
Font & Link Editing options for the Footer
Like the other elements, the font used for the footer text can be edited for type, size,
and color, as well as for the colors of any links included in the footer text.
Edit the Font: Click the spin box controls to select the font type from the drop down
list of available fonts. Increase or decrease the value in the font size controller to
change the font size, and click the color well to change the color of the font in your
footer.
Edit the Link Colors: The Links section lets you select the colors for the different
states of any linked text in your footer. You can make the linked text be distinct or
stand out from the normal text or underline it by checking the Underline check box.
The Normal color is the color of the linked text in its normal state or its regular state.
The Hover color is the color that will display on the text when someone rolls their
mouse over it. The Click color is the color that will display when the linked text is
clicked with the mouse.
Include the "Created With" Badge on Your Site: If you would like to include the
Created With ShutterBug badge on your website, simply click the check box beside the
label "Show Created With" Badge. The badge will be automatically centered on the
page below your footer. If the footer is used in the Absolute position, the badge will still
be centered at the bottom of the page below your other content. The badge does not
display in Preview mode, but you can see what it looks like here. If you are a Paradise
beta user, the Created With Paradise badge is here for your viewing convenience as
well.
───────────────────────────────────────