Page 22
5.1 Exporting Your Site
There are two menus to go through when exporting your website: the web host type
and the password, username, and destination that your site is to be exported to. The
export feature is available from the Preview window and from the Main Menu.
Additional information on exporting to a .Mac account or WebDAV host specifically is
covered on the next page in this chapter.
───────────────────────────────────────
Export the Site for the First Time
1. To export your site, hit the Send button from within the Preview window, or
File-->Export Website from the Main Menu.
2. The export window will slide out from the top of the main application window.
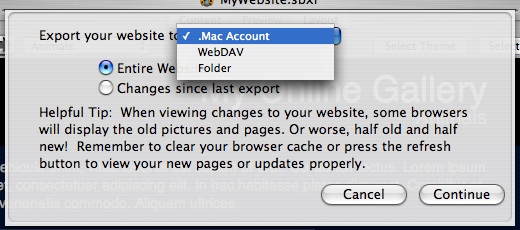
3. From the drop down list, select the destination you want to export to: dot Mac
account, WebDAV, or to a folder on your computer.
4. Click the radio button labeled Entire Website. Then click the Continue button to go
to the next menu.
5. The next menu contains the fields for entering your username, password, and
directory for your web host space.
6. Enter the username and password given to you by your web host provider. Then
enter the URL where your web space is located. If you are unsure, contact your
ISP to find out what your user specific information is.
7. Hit the Export button to upload your website to your web space.
Note: After you hit Export, a small ShutterBug progress menu will appear that allows
you to watch the status of the upload.
───────────────────────────────────────
Export Changes to Your Site - Incremental Upload
After the first export, ShutterBug will save and store your web host information. You'll
never need to go through the Export menus again unless you have to change your
web host information and upload to a different location. Each time you make a change
or update your site, all you have to do is hit the Send button from within the Preview
window or File-->Send Changes from the Main Menu. ShutterBug automatically
calculates your changes and uploads only those changes. You can view the changes
that are being uploaded in the small ShutterBug progress menu that appears after you
hit Send.
Note: You do not have to upload the changes right away. ShutterBug will always
remember the changes and save them for upload at a later date.
───────────────────────────────────────
Changing Your Web Host Information
To change your web host information, you will need to access the Export menus:
1. Go to File-->Export Website from the Main Menu.
2. From the slide out window, select the new web host location or the host that you
need to change the information for. If it is still a .Mac account, but your user
information has changed, select .Mac from the list; if you are changing to a non-
FTP provider, select WebDAV.
3. Hit the Continue button. The next menu contains the information for the former web
host you were using.
4. Enter the new information for your username, password, and directory path for
uploading your website to.
5. Hit Export and your site will be uploaded to the new web space location. Your new
web host information will be saved and you will not have to access the export
menus again unless you have to change your web host information again.
Note: Currently, this is the only way to change your information. Therefore, it's best to
wait until the next time you need to upload your site, to change the new web host
information. If you hit Cancel in the final export window, the changes will not stick and
the information will revert back to your old web hosting information.
───────────────────────────────────────