Page 17
3.4 Editing Your Photos
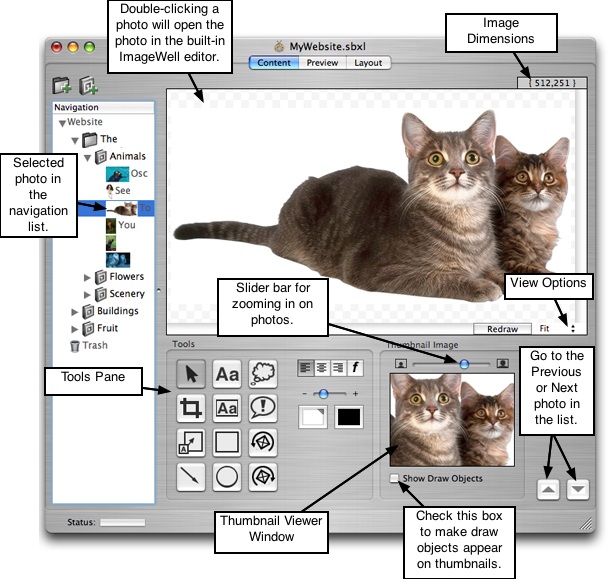
Our popular image editing tool, ImageWell, is built-in to ShutterBug to help you make
quick and easy edits to your photos, so that you don't have to open up multiple
applications. The ImageWell editor can be accessed from all three windows at any time
(Content, Preview, Layout). While in content mode, for both album and group pages,
simply double-click on the photo to open it in the ImageWell edit window. Alternatively,
select the photo from the navigation list. While in preview or layout mode, Control-Click
the photo to open it in the ImageWell edit window.
The edit window will display the photo at its original size in the top half of the window. It
will also show the photo's dimensions and allow you to display the photo at different
sizes on the canvas for easier editing. The bottom half of the window contains the
Tools pane. The tools pane provides the tools needed to crop, rotate, add draw
objects, labels, zoom and reposition the thumbnail for the thumbnail view. Recall that
compression options for the pictures are available from the Preferences pane, and
sizing for the large picture display and thumbnail display are available in the layout
window (discussed later in Chapter 6).
We used the ImageWell editor to add the labels to all of the screen shots in this
manual. If you are already familiar with ImageWell you may want to skip the following
section and move on to Chapter 4. Preview & Test Your Site.
───────────────────────────────────────
Using the Photo Editing Tools
NOTE: If you add draw objects to your photos, you must check the Show Draw
Objects checkbox to make them appear on your thumbnails. With this box checked
off, you will also be able to see the objects in the thumbnail viewer window of the
ImageWell editor. You can uncheck this box at any time to make them invisible on your
thumbnails, but they will still show up on the larger view of the photo. To remove the
draw objects completely, simply select them with your mouse and hit the Delete key on
your keyboard.
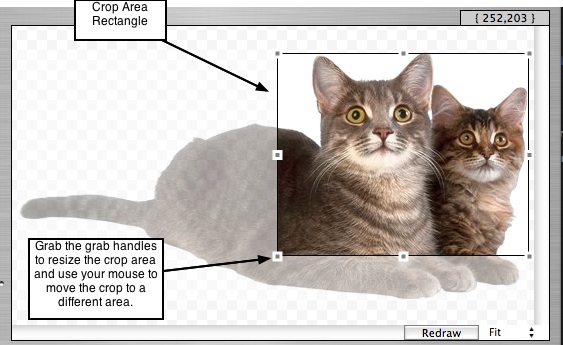
Cropping a Photo: Indestructible Crop
Indestructible crop means you can crop a photo without making it a permanent crop.
You can go back at any time and adjust the crop box to make the cropped area bigger
or smaller, or delete the crop box to return to your original uncropped picture.
To Crop a Photo:
1. Select the crop button.
2. Click on the picture in the viewer window and drag your mouse over the area you
wish to crop. A crop area rectangle with 8 grab handles will appear.
3. Click and drag the grab handles to adjust the rectangle or click anywhere inside
the rectangle and drag it with your mouse to move it.
4. Click the Select button to crop the photo. Hit the delete key on your keyboard to
cancel the crop action.
To Change or Remove the Cropped Area:
1. Double-click on the thumbnail to open the photo in the ImageWell edit window.
2. Click the Crop button to display the crop area rectangle. Your entire original
image will appear with the cropped off portions faded out.
3. Click and drag the grab handles to adjust the cropped area, or hit the delete key
on your keyboard to remove the crop completely.
4. Your original picture will then appear, without anything cropped off.
Rotating a Photo
1. To rotate the photo 90 degrees counter-clockwise, click the the button with the
arrow curving to the left. To rotate it counter-clockwise another 90 degrees,
simply click the button a second time.
2. To rotate the photo 90 degrees clockwise, click the button with the arrow curving
to the right. To rotate it clockwise another 90 degrees, simply click the button a
second time.
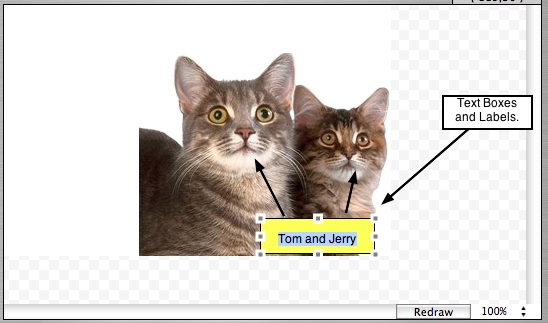
Adding Text, Text Boxes, and Text Labels to Your Photos
1. To add straight text, without a bounding text box around it, click the Text button.
2. Click on the photo to activate the text tool.
3. Double-click the default text to select it and enter your own text. A bounding box
with grab handles will appear to serve as a guide, but is not visible after you click
off of it.
4. To add text with a bounding box, select the Text Box button.
5. Click on the photo to activate the text box.
6. Double-click the default text inside the box to select it and enter your own text. The
bounding box will remain visible with your text on top of the photo.
7. To add a label to your photo, select the Label button.
8. Click on the photo to activate the label box.
9. Double-click the default text inside the box to select it and enter your own text. Use
your mouse to grab the yellow handle at the end of the arrow to move and point the
arrow to the right place on the picture.
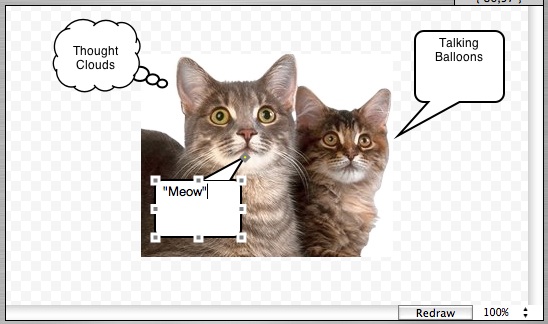
Adding Thought Clouds and Talking Balloons to Your Photos
1. To add a thought cloud above someone in the photo, click the Thought Cloud
button.
2. Click on the photo to activate the thought cloud.
3. Double-click the default text inside the cloud to select it and enter your own text.
4. Use your mouse to grab the yellow handle at the end of the cloud pointer to move
and point it to the right place on the photo.
5. To add a talking balloon, click the Talking Balloon button and repeat Steps 2-4.
Adding Circles, Squares, and Arrows to Your Photos
1. To add a square to your photo, select the icon containing a square.
2. Click on the photo to activate the square.
3. To add a circle to your photo, select the icon containing a circle, and repeat Step 2
above.
4. To add an arrow to your photo, select the Arrow icon.
5. Click on the photo to activate the arrow tool. Your cursor will become a cross-hatch
tool.
6. Click and drag your mouse to draw the arrow.
Note: The square and circle tools do not contain text or any color fill; they only have
outline borders. Their intended use is for circling areas in a diagram or highlighting
specific areas.
Resizing and Moving Draw Objects
Draw Objects include all of the above mentioned objects: text, text boxes, labels,
thought clouds, talking balloons, squares, circles, and arrows.
1. To resize a draw object, click the Select tool and then click on the object with your
mouse.
2. Grab handles will appear around the object. Use your mouse to grab and drag the
handles in or out to the desired size.
3. To reposition an object, select the center of the object with your mouse and move
your mouse to drag and drop the object to the desired position. You can position
objects outside of the photo boundaries as well.
4. Arrows are an exception to the above rules: to resize an arrow, select it with your
mouse.
5. Then select the yellow grab handle at the end that has the pointer/arrow. Use your
mouse to drag the arrow larger or smaller.
6. To reposition the arrow, select the yellow grab handle at the opposite end (or the
tail end) and drag your mouse to move it.
Editing Draw Object Borders and Color Fills
1. To change the color of an object's borders, select the object with your mouse.
2. Then select the color well on the right side, to open the color palette. Select the
desired color. Use this color well for circles, squares and arrows also.
3. To change the color fill of an object, select the color well on the left side, and
choose the desired color from the palette.
4. To adjust the size of the border widths of an object, first select the object.
5. Then use the slider bar to increase the border size by moving it to the right, or to
decrease it by moving the slider bar to the left.
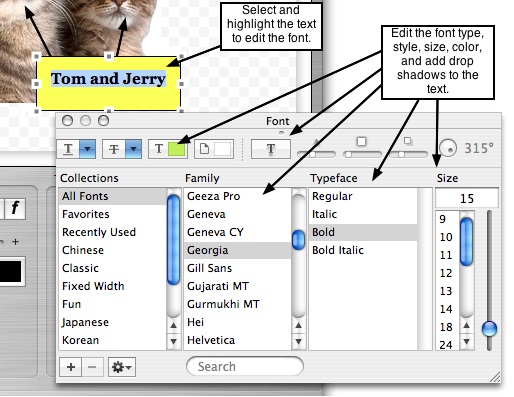
Editing Fonts in Draw Objects
1. To left, center, or right align the fonts in a draw object, double-click to select and
highlight the text with your mouse.
2. Click the desired alignment icon to align the font: left, center, or right.
3. To edit the font for color, size, and style, double-click to select the text.
4. Click the Font button (f) to open the font menu. Make the desired selections.
Deleting Draw Objects
To delete any of the draw objects, simply select the object with your mouse and hit the
delete key on your keyboard. The changes are reflected in the thumbnail viewer when
you click on the photo inside the viewer.
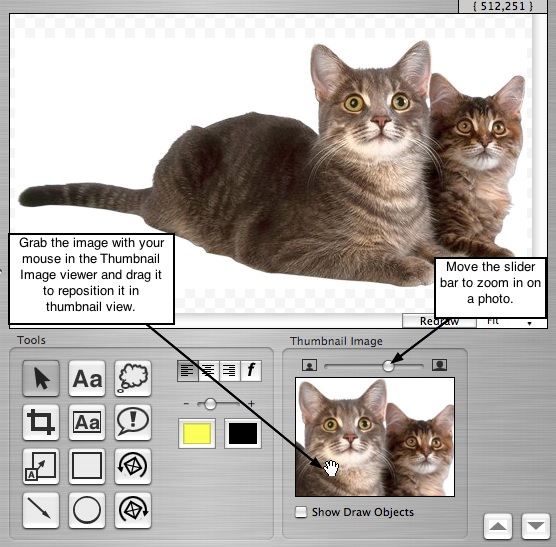
Using the Thumbnail Zoom Tool
1. To zoom in on a photo, use your mouse to move the slider bar to the right.
2. To reposition a photo inside of the thumbnail view, or the way it will be displayed in
the photo album page, grab the thumbnail with your mouse inside the small viewer,
and drag it to the desired position.
3. Draw objects will automatically be displayed on the large picture. You can choose to
have them show up on the thumbnails as well, by checking the check box below the
thumbnail viewer called Show Draw Objects. Leave it unchecked to hide draw
objects in thumbnail view.
───────────────────────────────────────