Page 34
7.3 Theme & Template Customization
Creating your very own theme is the same thing as creating your own design. When
you create your own design, you can give it a name and export it as a theme. How to
create your own design was covered in Chapter 6. You can modify only a few things or
redesign the entire theme. The WYSWYG layout editor makes it very easy to
customize or design your own look.
Additionally, the theme library contains an almost completely blank theme for those
who want to create their own theme from scratch. This theme is located in the "Photo
Albums" group of the theme library, and is the last one listed, called "Blank Canvas." It
does not come packed with any templates, except for one default template to help get
you started.
Once you have a theme you like, you may want to create or customize the templates
to suit your needs. You can include as few or as many different templates as you want,
or not include any at all. The choice is yours, whatever best suits your needs. Keep in
mind, the template changes you make, are automatically packed in with the current
theme you are using and will be exported with the theme. These will be the templates
available to you the next time you use that theme or import it into a different
ShutterBug file. More specifics on creating themes and templates are covered in the
───────────────────────────────────────
Template Customization
Customizing templates involves various different options for added flexibility. At times,
it may seem a bit confusing, but after you've tried out the steps listed here and have
had a chance to become acquainted with how it all operates, customizing templates
will seem easy. Managing the templates in the template drawer is a different topic and
covered on the next page. This page covers how to customize existing templates in a
theme and how to create your own.
If you are not in the Layout window, click the layout tab to open the layout window.
Before starting, first make sure you are using a theme that contains templates (not the
Blank Canvas theme). Follow the steps below to begin customizing templates.
To Customize an Existing Template:
1. Select a page in your site from the drop down list at the top left of the interface.
2. Click on any template thumbnail in the drawer to try it out on your page. Click the
Select Template button to open the template drawer.
3. Choose a template that is closest to the template you plan to have when you are
done editing it.
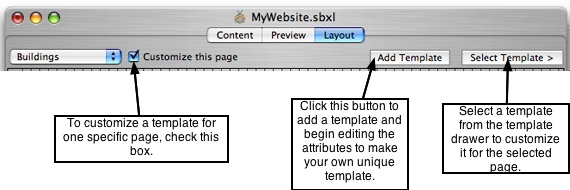
4. Before making any edits to the template, decide if you want these changes to take
place across all pages that use this template, or only the current page. If you want the
changed template applied to only the current page, check off the Customize this page
checkbox before doing anything. If you do not check off the customize this page box,
all pages that use the same template that you are editing will be affected and take on
the changes.
5. Use the layout tools to edit the elements and layout of the chosen template.
6. These changes will take effect immediately in the template inside of the template
drawer as well as on all pages that use this template.
7. To edit more templates, repeat Steps 2-5.
8. When you are finished editing templates, go through the pages in your site and add
the new templates to the desired pages. The Customize this page box does not have
to be checked off while applying different templates. As long as pages use templates
for customization they will be different according the template you have used on each
page.
To Add a New Template:
1. To create a template from scratch, select a page from the drop down list.
2. Click on the "Add Template" button. A new template will be added to the end of the
list in the template drawer.
3. You will notice the newly added template will take on the same name as your web
page. The name can be edited as discussed on the next page, Managing Templates.
4. You can now begin editing this new template.
───────────────────────────────────────
Handy Tools for Editing Templates
Copy Settings
This feature is available from the main menu only and is only available when you are in
the Layout window. If you have a customized page, but want some of the elements to
be exactly the same as they are on some of your other pages, Copy Settings makes it
easy and quick to copy whichever elements you want from one template to another.
While in Layout mode, go to Main Menu-->Tools--> Copy Settings... A window will slide
out from the top of the main application window. From the Item list, check off the
elements you would like to copy (copies the element and all of its traits), and then
select the template that you are copying the settings to and from. Click OK to return to
the main layout window. The element settings will be applied to your current page and
the template.
Convert Custom Page to Template
This feature is also only available from the main menu and is available only when you
are on a Customized page in the layout window. If the Customize this page box is not
checked off, the feature is not applicable and therefore "greyed-out" in the main menu.
Convert Custom Page to Template is exactly the same as the Add Template feature. It
is just an alternative way of creating a new template from a page that you have already
customized without the edits affecting the other pages in your site.
With a customized page selected in Layout mode, go to Main Menu-->Tools-->Convert
Custom Page to Template. The page and its settings will be immediately added to
your template drawer and the customize this page box no longer be checked. This is
because the page is now using a template instead of custom settings and therefore
does not require the customize attribute any longer.
───────────────────────────────────────