Page 32
7.1 Simple Page Customization
Simple page customization is the same thing as adding different templates to different
pages when in the Preview window. This was covered in Chapter 4, Section 4.1
Themes & Templates, but we're going to repeat it here for convenience.
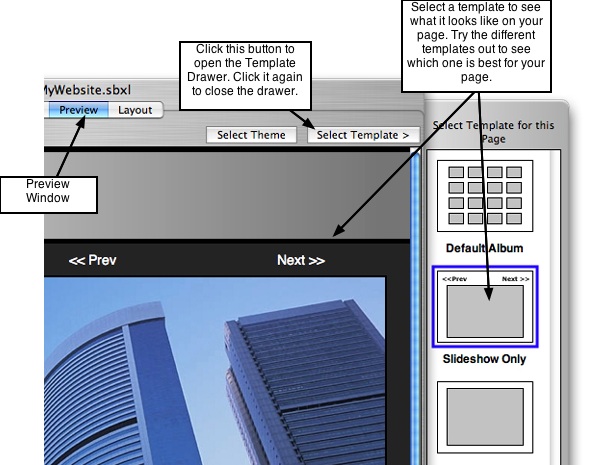
Customizing pages the simple and fast way is available in the Preview window. To get
started, click the Preview tab to open the preview window. Select a theme from the
theme library, if you haven't already done so. The theme contains the layout of the
elements that will be common across all of your pages: masthead, page title,
navigation menu, and footer. The layout of the content on each page — text
description, photo albums, and slideshows — is determined by the template that you
select for a particular page. NOTE: Customizing pages using this method does not
allow for changing style traits such as font colors, link color, menu animation, custom
thumbnail sizes, etc.
───────────────────────────────────────
Customization Using Built-In Templates
Each ShutterBug theme contains 5 different template styles to choose from to quickly
customize different pages in your site. Templates get applied to specified pages in your
site without affecting the other pages. Templates are a faster alternative to customize
pages, for people who don't want to alter the design or don't have time to move things
around in the Layout window. However, if you like the website with the chosen theme
exactly the way it is and do not want to customize any of the pages, then do not apply
any of the templates.
Selecting & Applying Templates to Different Web Pages:
1. To select a template for a page, first select the page you wish to change from the
page list drop down menu.
2. Then Click the Select Template > button to open the template drawer. This drawer
will slide open from the side of the main application window, displaying a list of
template thumbnails.
3. By default all of your pages will have the first template applied to them, called
Default Album.
4. Click one of the template thumbnails to apply it to the current page open in your
preview window. Don't worry, this action will not change any of your content or affect
the other pages in your site. The template will only be applied to the selected page,
leaving your other pages untouched.
5. To view the other templates, simply click on each one to see what it looks like on
your page, until you find the one that is most appropriate for the purpose of that page.
For example, you may want your home page to serve as a welcome page to your
website, in which case you might find the template that contains only one picture
(somewhat enlarged), with some text to be most suitable.
6. To give different pages a different template, select the next page in the drop down
list and choose another template from the drawer. Repeat these steps for each page
that you want to customize.
7. When you are done customizing pages, navigate through your entire site to review
the layout for each page.
8. You can easily change the template for any page at any time by simply selecting a
different template from the template drawer. If you are satisfied with the changes,
you're done and are ready to export.
───────────────────────────────────────