Page 29
6.5 Photo Album Tab
The Photo Album and Slideshow tabs contain a variety of editing options to help you
present your pictures the way you want. Everything from custom thumbnail sizes,
collages, freestyle slideshows to drop shadows, multiple line captions, and much more.
The Photo Album tab contains the editing options for your thumbnails and the
Slideshow tab (covered on next page) contains the options for the full size versions of
your photos. There are a wealth of tools under the photo album tab, which we'll show
you how to use and what to use them for. More specifics are covered in the
───────────────────────────────────────
Properties Pane
Click the Photo Album tab to reveal the editing options for your thumbnails. Select the
Properties button to edit the thumbnail properties of your albums. There are 3 main
options that determine or "set the stage" for the other options available, depending on
how you choose to place or position your thumbnails. To stay organized, use these
tools from left to right as they appear on the interface. Start with the positioning of your
album before worrying about the other options. Decide whether you would like to keep
the album Absolute, After the Text contents box, or FreeStyle. The very first drop down
menu at the top left corner of the photo album pane contains these positioning options.
Get Acquainted by Starting with Absolute Positioning
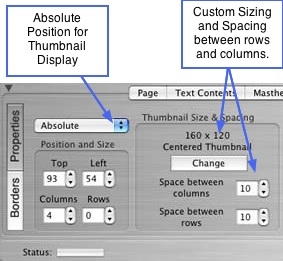
Select Absolute from the drop down menu if it isn't already selected. Absolute lets you
place your album wherever you would like, including overlapping other elements. An
absolute album position means your album will stay where you place it regardless of
the placement of other elements. The text will wrap around or adjust to the placement
of your album, but everything else will remain in its current position on the page. The
options available for editing the attributes of an Absolute positioned album are
displayed on the rest of the pane.
Using the Absolute Editing Options
1. Go to the Position and Size options just below the drop down menu. Either use the
spinbox controls to place your album in the desired position on the page or use your
mouse to grab it in the viewer window and move it to the desired position. Don't spend
too much time with the perfect placement right now, as you will probably have to come
back to this for final tweaking after setting some of the thumbnail options.
2. Select the number of Columns and Rows you would like to display in your album. To
display all of the photos in your album, set the Rows value to '0' - this will make the
number of rows unlimited and saves you the trouble of determining how many rows
you will need to display all of the photos (especially helpful for very large albums). To
display a limited number of photos in the thumbnail view, select the desired value for
Rows. If you only want to show 4 rows of pictures, then use the spin box button to
increase or decrease the value to '4'. For example, if your Columns value is set to '3'
and with Rows at '4', the thumbnail album will display only the first 12 photos in your
album. All of the photos get displayed in the Slideshow. If your columns value is set to
'3' and with Rows at '0' the thumbnail album will automatically display as many rows
that are needed to display all of your photos.
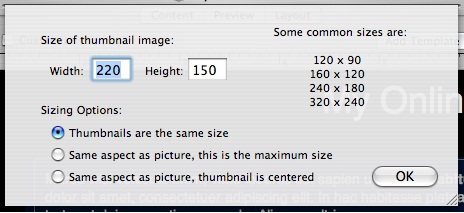
3. Go to the next section on the interface, labeled Thumbnail Size & Spacing. Click the
Change button to reveal the sizing options for your thumbnails. A window will slide out
from the top of the Layout window. This window allows you to set the size for your
thumbnails and select from 3 aspect ratio options. In the Width and Height text fields,
enter the desired size for your thumbnails (you can specify any size you would like). A
list of sizes commonly used is shown at the right side of the window for added
convenience. Keep the window open for the next step.
4. With the thumbnail sizing window still open, choose from the three Sizing Options to
set the aspect ratio for your thumbnails:
• Thumbnails are the same size: this option will make all of your thumbnails the size
specified in the width and height boxes, but will disregard the aspect ratio of each
picture.
• Same aspect as picture: this option will display your thumbnails at their different
aspect ratios while remaining within the constraint or size that you have specified
for the width and height.
• Same aspect as picture, thumbnail is centered: this option will render the same
results as the second option, but offers a different display for how the picture is
centered inside of a picture frame. If you aren't using a picture frame, you won't be
able to see the difference between this option and the second one. This option will
keep the pictures at their same aspect ratios, while centering them inside of the
picture frames, and keeping the picture frame the same size. It creates a very stylish
and elegant visual presentation for your thumbnails. When using frames with the
second option, the pictures frames take on the same aspect ratio as the pictures,
whereas this option keeps the frames the same size while keeping the pictures at
their different aspects.
5. Click the OK button to return to the main Layout window.
6. Below the Change button, are the options to set the spacing between your columns
and rows of thumbnails. Simply click on the spin box controls to increase or decrease
this space. You can see the changes happening on the canvas as you adjust the
values.
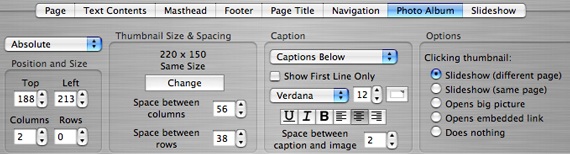
7. The next section of the Properties pane, contains the settings for the Caption text
that you input while in the Content window. First select from the drop down menu
whether to place the captions above or below the thumbnail, or to shut them off and
make them invisible. The slideshow has separate caption settings, giving the option of
making them invisible for your thumbnail album view, but making them appear for the
slideshow or larger picture view.
8. The checkbox beneath the caption placement list, pertains to albums where multi-
line captions have been used. Check this box to display only the first line of the
caption in thumbnail view. The entire caption will still show in the slideshow view. To
show all of the lines in the caption for the thumbnail view, leave this checkbox blank.
9. Next select the font type, size and color for your caption text. Again, there are
separate settings for the slideshow caption display, giving you the flexibility to use
different font settings for the two different views, if you choose to do so. You can also
set the alignment and underline, bold, italics for the thumbnail captions independent of
the slideshow caption settings. These later settings are also available from the Content
window. However, the settings you choose in the Layout window will override those in
the Content window. This serves the purpose of giving you a way to edit the captions
all at once, instead of one at a time.
10. Next you can adjust the amount of space between the caption and the thumbnail.
Use the spin box control to increase or decrease the value to the desired spacing. You
can also set the value to a negative value in order to make the caption sit inside of a
photo frame or on top of the photo.
11. The last section on the Properties pane offers a list of alternative actions that can
occur when someone clicks on your thumbnails. Select the desired option from the list:
• Slideshow (different page): clicking the thumbnail will activate the slideshow on a
different page than the thumbnail album.
• Slideshow (same page): the slideshow is displayed on the same page as the album
(and the rest of your elements) and clicking the thumbnail will activate the slideshow
on the same page.
• Opens big picture: clicking the thumbnail will not activate a slideshow, but will rather
open the larger image of the thumbnail in a separate browser window.
• Opens embedded link: clicking the thumbnail will take you to the link which you
specified while in the content editor. To choose whether to have the link open in the
same browser window or a new browser window, you have to specify this in the
content editor.
• Does nothing: clicking the thumbnail will do absolutely nothing.
After Text Positioning
After Text positioning works in the same way that Absolute positioning does, except
that it will always automatically keep the photo album below the text contents
description on your page. Whenever the text contents becomes larger or smaller in
height, or the text box is repositioned, the photo album will automatically adjust
downwards or upwards saving you the trouble of manually moving it every time you
add or delete text, or move the position of the text contents box. The same editing
options are available for After Text positioning as for the Absolute positioning options,
outlined above. When using After Text, just follow the steps above to edit the attributes
of your photo album.
Note: the Top value for the top position of the photo album is locked into place and
basically doesn't bear any meaning when using After Text positioning. The top of the
album determines its position based on the bottom value of the text contents box. Even
if you try to adjust the top of the photo album or try to move it up, it will not go above or
on top of the text contents box. In contrast, the Top value for Absolute positioning
means the number of pixels the photo album is from the top of the page.
FreeStyle Positioning
FreeStyle positioning offers some added flexibility and additional creative tools for
presenting your images. Often in the case where you want to quickly get a photo
album together, you may just stick with a canned theme and an absolute positioned
photo album. However, there are many cases where having total freedom over the
individual pictures, where they are placed on the page, and how big or small they are,
can accentuate any presentation of visuals and text, and reinforce the areas you want
to emphasize on your page.
The options that differ between FreeStyle and Absolute are the Sizing, Position, and
Collage options. Otherwise, the other features are all the same for any one of the three
positioning options. In other words, the caption features and thumbnail click options
remain the same for all three positioning options. Therefore this section will cover how
to use the options that are unique to FreeStyle thumbnails and will not repeat the other
options already outlined in the above sections.
Using the FreeStyle Options
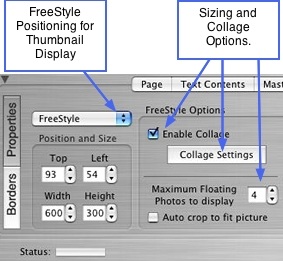
1. Select FreeStyle from the drop down menu to reveal additional options available for
your thumbnails.
2. The only section that differs between Absolute and FreeStyle is the Thumbnail Size
and Spacing portion of the interface. FreeStyle gives you the ability to have total
control over each thumbnail as independent items so that you can give each thumbnail
a different size and place them anywhere you want as separate items. This opens the
door to create different types of collages as well. View the pictures below and note the
differences in thumbnail options:
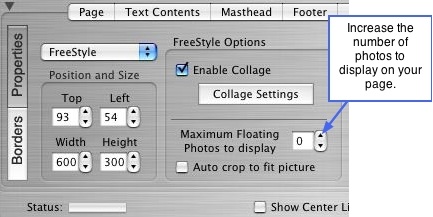
3. After selecting FreeStyle, ShutterBug will default to show '0' photos on your canvas.
This in turn, will give the appearance that your photo album has disappeared. Don't
panic, as they say "things are not always as they appear to be." Your photos are
actually still there. We will come back to this in a moment.
4. There are 2 ways to create a collage: automatic collage settings to choose from, or
floating photos that can be moved around and sized with your mouse. We'll cover the
later method first.
5. Go to the option called Maximum Floating Photos to Display as shown in the picture
below. Use the spinbox control to increase the value and you will see your pictures
appear one by one until you have reached the desired number of thumbnails to display
on your page (this setting does not affect the slideshow, all photos in your album will be
shown in the slideshow).
6. Set the value to 5 photos just to try it out. You can set it to anything you want. Go to
the viewer window and use your mouse to select a photo. Drag it to another position
on your canvas. Use your mouse to grab the grab handles and resize it to whatever
size you would like. The position and size values will change accordingly in the Position
and Size fields on the interface.
7. Select the next picture on your canvas using your mouse and repeat Step 6. Do the
same with the rest of the pictures. Try making them all different sizes and overlapping
them to create an interesting floating collage.
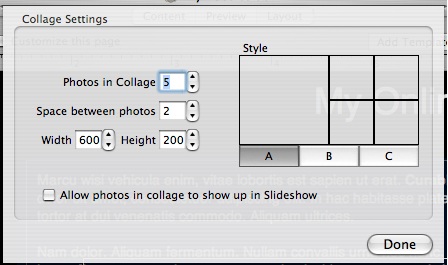
8. Next, try out the Automatic Collage settings. Under FreeStyle Options, click the
Collage Settings button. A window will slide out from the top of the Layout window.
9. You can select from 3 main collage styles (A, B, C), and adjust the width and height
of the collage box, the spacing between the photos, and the number of photos to
include in the collage. These settings warrant some experimentation to see the
different results that you can get from using different combinations. Try using different
values for each setting to see what it looks like. Including many photos can bear a
completely different result than using only a few. The thumbnail in the window lets you
preview the layout for the different settings. Keep this window open for the next step.
10. To make these photos display in the slideshow view, check off the box at the
bottom of the window - Allow photos in collage to show up in Slideshow. If you leave
this box unchecked, the thumbnails contained in the automatic collage will not be
clickable or show up in your slideshow. Click the Done button to return to the main
window.
11. Below the Collage Settings button you can add some additional floating thumbnails
to the automatic collage display. Increase the value for Maximum Floating Photos to
Display and then arrange them around your collage. Or leave the value set to '0' to not
show any floating photos.
12. Auto crop to fit picture means the picture will be automatically cropped to fit the
surrounding box. For example, if you have a portrait picture and have resized the box
surrounding it during freestyle mode, you can check off this button to make the picture
fill the entire area of the bounding box. The same is true for a landscape picture - if
you made the surrounding box tall and thin, you can check off this option to make the
picture fill the area of the box, making it appear as a portrait-oriented picture, but
losing some of the edges from the thumbnail view. It is basically another way to
change the orientation without losing too much off the sides of the picture, as well as a
way to create a variety of interesting squares and rectangles to display your
thumbnails with.
───────────────────────────────────────
Borders Pane
The Borders button contains the same editing features as the other elements, and
behaves the same way. It is divided into two sections: 1) Picture Frame and 2) Photo
Album. You can apply borders and margins to the thumbnails to achieve a picture
frame and matte appearance. You can also use a background image for the frame or
inside margins of the pictures. The background color is the color that will appear as
your inside margin. This is also the place to add a drop shadow to your thumbnails.
The drop shadow is not editable.
The photo album is the surrounding box that encompasses all of your pictures. You
can add borders, margins, and background images as well. Using a background color
will fill the entire album background with that color, setting it apart from the background
color of the page.
To review Using Borders, Margins and Backgrounds, go back to the Text Contents
───────────────────────────────────────