

Page 10
2.4 Adding, Naming, & Deleting the Pages in Your Navigation
Now that you have set some general preferences and properties for your project, you
are ready to start adding the pages for your website. These operations are performed
in the Content window as well, so make sure you have the the Content tab selected in
order to follow along in the correct window.
Everything you do in ShutterBug can be changed and edited, nothing is set in stone.
So don't worry if you are not 100% decided on the website name or page names, it's
easy to change them later. You can add two different types of web pages to your site:
Album pages and Group pages.
Album pages contain your photo galleries of thumbnails and Group pages contain
multiple albums that you want to group into the same category heading such as
Vacations or Special Occasions. You can also use an Album page or Group page as a
text-only page by entering text and not including any pictures. As you add pages,
ShutterBug automatically creates the links for your navigation menu. These pages,
their order, and their names form the base for your navigation menu. But before going
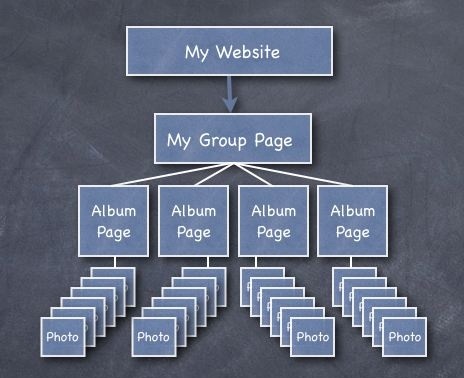
any further, take note of ShutterBug's hiearchy for web pages:
The above illustration shows the general hiearchy, but there are certainly many
variations for pages. You don't have to include a Group in order to have an album. You
can go straight to an album page and skip the group. Additionally, you do not have to
add any photos to your album pages; you can create text only pages and have these
as part of a group or on their own, whatever best suits your needs. More about content
building is covered in the next chapter; this chapter focuses on getting the first
necessary building blocks into place before inserting any other content. Adding the
pages and naming them is the framework for your navigation.
───────────────────────────────────────
Adding an Album Page
An album page is the lower level building block for your website that can contain as
much text content and as many photos as you want. When you open a new project, by
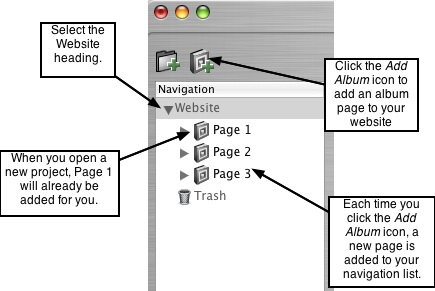
default the navigation pane is set to the Website heading. Also by default, an album
page will already be added for you to help get you started.
To add an album page to your website, follow these 4 easy steps:
1. Select the Website heading.
2. Click on the Add Album icon to add an Album page. Alternatively,
from the Main Menu, click on Tools->Add New Album.
3. A new album page will be added to your list with a default name of Page 2 (Page 1
was already added for you when you opened the project).
4. You can also add album pages when you have other album pages selected. But
note, they will be added to your navigation list as separate items; you cannot add
an album to an album, or in other words, you cannot stick an album page inside of
another album page.
───────────────────────────────────────
Adding a Group Page
A group page is the higher level building block that can contain several album pages
and everything in those pages. You can include as much text content and as many
album pages in one group as you want.
To add a group page to your website, follow these 4 easy steps:
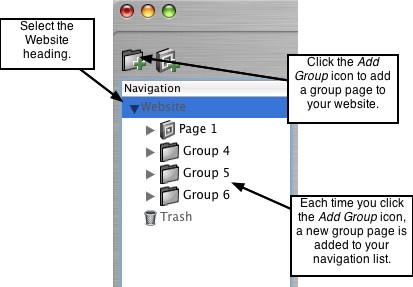
1. Select the Website heading.
2. Click on the Add Group icon to add a Group page. Alternatively,
from the Main Menu, click on Tools->Add New Group.
3. A new group page will be added to your list.
4. You can also add group pages when you have other group or album pages
selected. But note, they will be added to your navigation list as separate items;
you cannot have a group within a group, nor can you insert a group into an
album. However, you can put albums into groups as discussed next.
───────────────────────────────────────
Adding Album Pages to Groups
You can easily add as many album pages to group pages as you want. Simply follow
these 4 steps:
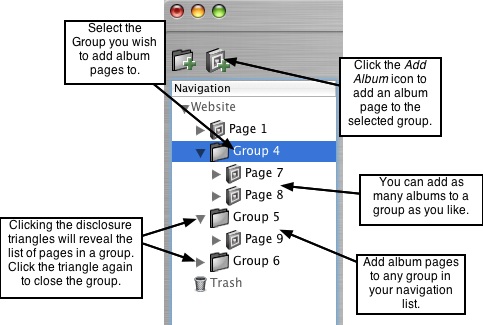
1. Select the desired Group page in the navigation list, in which you want to add an
album page.
2. Click on the Add Album icon. The album page will be added to the selected group
page.
3. Continue clicking the Add Album icon until you are finished adding pages to the
group.
4. To add album pages to another group, repeat steps 1- 3.
───────────────────────────────────────
Naming your Web Pages
Each time you add an album or group, ShutterBug will assign a default name to each
one in the order in which they were added: Page 1, Page 2, Group 3, Group 4, Page 5
and so on. These names are the names or words that will show up in your navigation
menu, and are easy to edit and change. To name your web pages, follow these 5
steps:
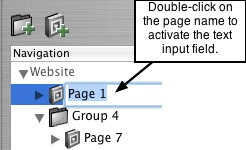
1. Select any page in your navigation list.
2. Double-click on the default text area to highlight the text field.
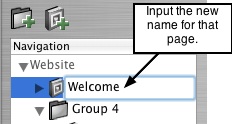
3. Type in the name you would like to have for that particular page.
4. The albums and groups in the navigation pane are automatically linked to their
corresponding pages and form the navigation menu for your website.
5. To edit the name for any page, simply double-click on the page name text field and
enter the new name.
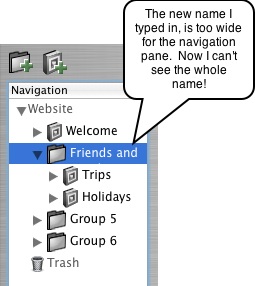
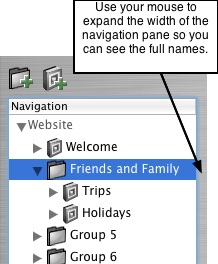
Reminder: If your page names span further than the navigation pane window, you can
adjust the width of the navigation pane using your mouse and moving it left or right to
decrease or increase the viewable area. This will enable you to see the entire name for
each page.
───────────────────────────────────────
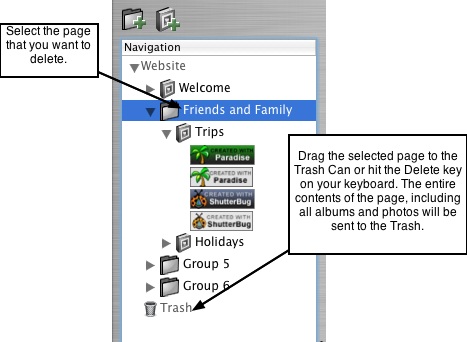
Deleting Web Pages
ShutterBug's Trash Can holds onto the deleted items so that you may recover them in
case you change your mind or delete an item by accident. The Content window is the
only place where you can delete content (and recover it).
1. To delete a page from your navigation list, select the desired page in the navigation
pane.
2. Use the delete key on your keyboard to send it to the trash, or alternatively drag the
page to the Trash Can at the bottom of the list. The page plus everything contained
within it will be deleted from your website and moved into the trash can.
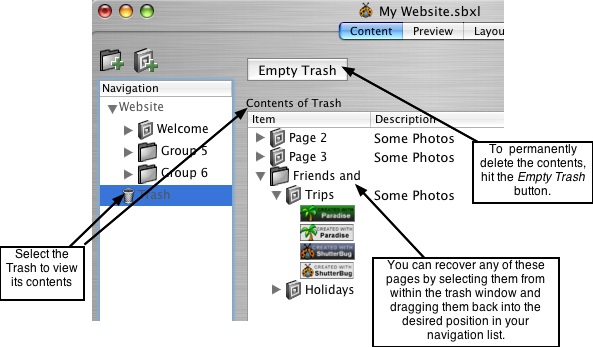
3. To view the deleted content, select the Trash located at the bottom of your
navigation list. A window on the right side of the interface will show you the list of
items that have been deleted.
4. To recover an item from the trash, simply select it with your mouse and drag and
drop it back to the desired location in your navigation list.
5. To permanently delete the contents of the trash can, select Trash from the
navigation list, and simply hit the Empty Trash button. All items in the trash will be
permanently deleted from your website. You cannot recover them after
emptying the trash.
───────────────────────────────────────