
Page 41
8.1 Add Xtra Text Boxes
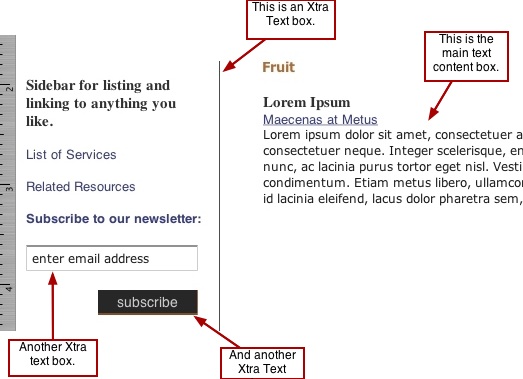
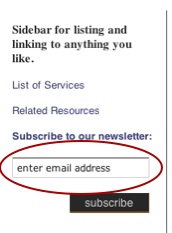
Sometimes one text box is just not enough for what you want to do. Some examples of
how Xtra text boxes could be used include: adding a sidebar to the page, adding
columned text, placing a snippet of text elsewhere on the page, or for any other reason
that may arise while you are constructing your pages. Xtra text boxes are unlimited;
you can add as many as you want. Remember to add a template for the page you are
working on, if you want to keep the Xtra text boxes unique to your current page only.
Otherwise the Xtra text box will be added to all pages that use the same template.
View the following picture to see some ways in which Xtra text boxes can be used:
───────────────────────────────────────
Adding Xtra Text Boxes
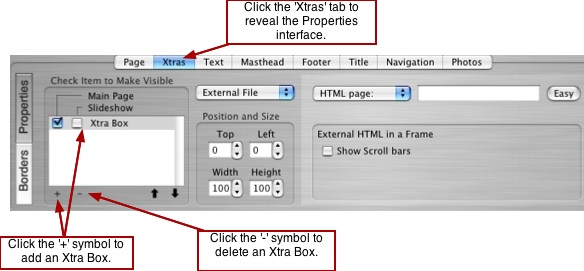
Click the Layout tab to open the Layout window. Then click the Xtras tab and follow
these steps to add Xtra text boxes:
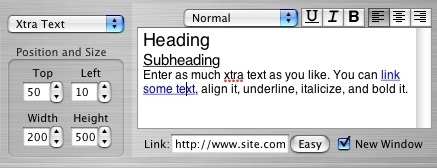
1. Click the '+' symbol to add an Xtra box as shown in the picture below. The box will
appear in the xtra box list window as well as in the viewer window (default position in
the top left corner).
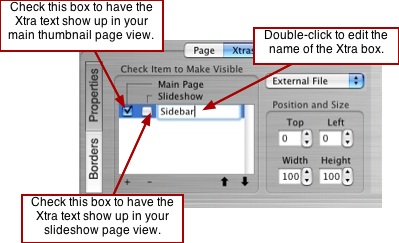
2. Double-click the "Xtra Box" text field to rename the box to a name you can identify
easily. Do you want the xtra text to appear in your main thumbnail view only, in the
slideshow view only, or in both views? From the Xtra Box list, check the appropriate
check boxes to have the xtra text appear in the desired views. By default, "Main Page"
will already be selected. Uncheck the check boxes to make the xtra text invisible for
one, or both of the views.
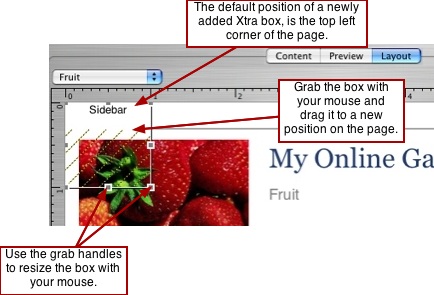
3. Grab the box in the viewer window and drag it to the desired position on the page.
Then use the grab handles to resize it.
4. Select Xtra Text from the pop up list of Xtra types, as shown in the picture below.
Input your text into the text input field that appears at the right side of the interface.
You can input as much text as you like. You will see the changes appear in the viewer
window as you make them. Note: using the tab key with text in an Xtra Text box, will
not insert a tabbed space, but rather a single space the same way the space bar
works.
───────────────────────────────────────
Editing the Text and Adding Links
Editing text and adding links are done in the same way as you did when editing and
linking your main text content from within the Content window.
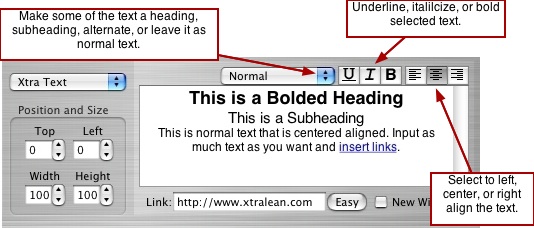
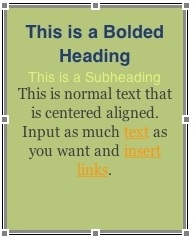
1. You can make some of your text be a heading, subheading, alternate text, or keep
it as normal text.
2. Select whether to left, center, or right align the text. You can align different lines of
text differently or align all of it the same. Then select from the icons to bold, italicize,
and/or underline the desired text.
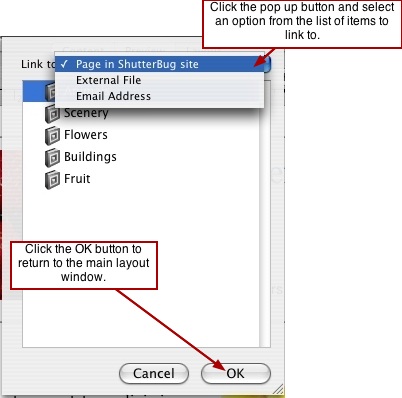
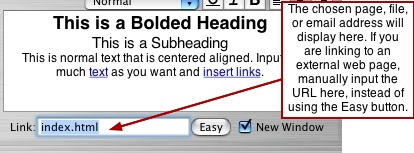
3. To link some text, select the text to be linked, then click the Easy button. A panel will
slide out from the top of the main application window. From the pop up list, select to
link to another page in your site, an email address (ShutterBug will automatically
encrypt the address), or to a file that you've added to the Files list in the Content
window. To link text to an external web page, or in other words, another website, do
not use the Easy button. Simply input the URL into the Link: text field. Include the
"http://" prefix.
4. To have the link open in a new browser window, check the New Window check box.
To have the link open in the same browser window, leave the check box blank.
───────────────────────────────────────
Editing the Fonts
The Xtra text boxes use the same font settings as the main text content. There are
four font selections: Normal, Heading, Subheading, and Alternate. You can utilize all
four inside of your Xtra text boxes. If you decide to edit the font settings for your
Xtra text box, be aware that these settings will also change the fonts used in
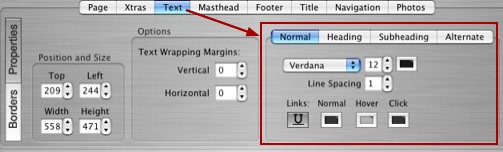
your main text contents box. To edit the fonts, click on the Text tab. From the
Properties interface, select the font type you wish to edit, as shown in the following
picture. Click anywhere in the viewer window to see the changes applied.
───────────────────────────────────────
Adding Borders, Margins, and Background Color or Background Image
Borders, margins, and backgrounds are used the same way as they are for the other
elements on your page. Select the Xtra text box which you would like to add borders
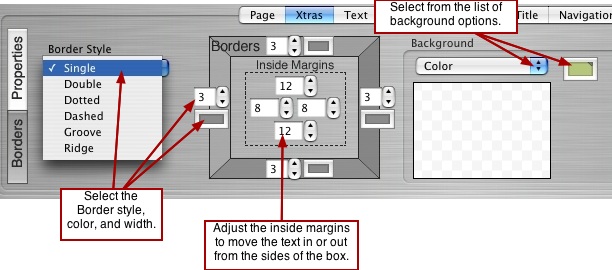
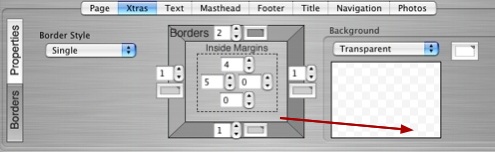
to. Then click the Borders button on the tabbed interface. Select a border type from the
pop up list and set the width and color for each side. Adjust the inside margin values to
move the text in or out from the edges of the Xtra box. Select a background color or
image for the box background or leave the background transparent. View the pictures
below to get an idea of different ways in which borders can be used to achieve
different results:
───────────────────────────────────────