Page 19
3.4 Adding & Editing Watermarks
Watermarks get applied to either all photos in an album or all photos in your entire
website, but cannot be applied to individual photos. The watermark feature is available
from Tools on the Main Menu and is only available when in Content mode:
1. From the Navigation list, select the album that contains the photos you would like to
watermark.
2. Go to Tools-->Add/Remove Watermarks from the Main Menu. The watermark panel
will slide out from the top of the main application window.
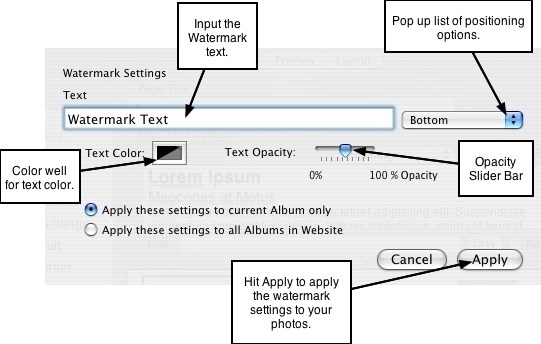
3. Enter the watermark text into the text input field and select the position for the
watermark from the pop up list at the right. Positioning options include:
• Bottom - bottom left corner (horizontal)
• Alt Bottom - bottom right corner (horizontal)
• Side - right side (vertical)
• Diagonal - centered diagonally from left bottom corner to right top corner.
• Diagonal Repeat - diagonal repeating across the photo.
4. To select the color for the watermark text, click the color well labeled Text Color to
open up the color palette.
5. To set the opacity/transparency for the text, use your mouse to adjust the Text
Opacity slider bar. Make the text more transparent by sliding the bar towards 0%.
Increase the opacity, or make it less transparent, by sliding the bar towards 100%.
0% = completely transparent (invisible); 100% = completely opaque (solid).
6. Select the desired option for applying the watermark to the pictures: Apply to
pictures in the current album only, or Apply to all pictures in your website.
ShutterBug will batch watermark all photos either in the current album only or to
all albums in your site, depending on the specified selection.
7. Click the Apply button. The watermark will be applied to your pictures.
8. To edit the watermark, repeat Steps 1-5, inputting the new text and changing the
text settings for color, opacity, and position. Hit Apply to apply the changes to your
watermarks and return to the main window.
Note: watermarks will only appear on the slideshow pictures (but do not appear on the
"big picture" image), and can be previewed in the ImageWell edit window, as well as in
Preview and Layout modes but you cannot view them in the album window of Content
mode). To have the watermarks appear on the thumbnail images, you must do the
following three things:
• Check the Show Draw Objects check box located in the ImageWell edit window.
• Leave the Thumbnail Zoom (located in the ImageWell edit window) zoomed out.
• Set the thumbnail sizing to the Same Aspect in Layout mode.
───────────────────────────────────────
Removing Watermarks
1. From the navigation list, select the album that contains the watermarks you would
like to remove.
2. Go to Tools-->Add/Remove Watermarks from the Main Menu. The watermark panel
will slide out from the top of the main application window.
3. To remove the watermark from your pictures, either select No Watermark from the
pop up list, or highlight and delete all of the text in the text field to make it blank.
4. Make sure the desired option is selected: if you want to remove the watermarks
from the current album only, choose the first option; if you want to remove the
watermarks from all of the pictures in your website, choose the second option.
5. Hit Apply. The watermarks will be removed.
Notes:
• New pictures that are imported after adding watermarks, will not take on the
watermark. You will have to follow the same steps above to give newly imported
pictures a watermark.
• ShutterBug will rebuild your photos after you have specified to add or remove
watermarks. If you're working with a large number of photos on each page, it may take
a bit of extra time to rebuild the photos if you have chosen to apply the watermark to all
albums in the site.
───────────────────────────────────────