Page 24
4.1 Applying Themes & Templates
ShutterBug's Theme Library offers 26 customizable themes to select from. Each theme
contains 4-6 templates, depending on the theme. From within the Preview window, you
can easily try out the different themes and use the various templates to quickly
customize individual pages in your site. 28 additional themes are available for free
download from shutterbugland.com, plus another 33 themes that were packed into
former versions of ShutterBug's library.
Note: You don't have to stick with any of the canned themes - ShutterBug's themes
and templates are fully customizable, from only minor modifications to a complete
redesign, to even deleting unused or unwanted ones completely. This makes it easy to
create your very own design and and then save it to your theme library if you like. The
"how to" of modifying or creating your own themes and templates is discussed later in
Chapters 6 and 7.
───────────────────────────────────────
About ShutterBug Themes and Templates
ShutterBug themes are a collection of templates that are 100% customizable. A theme
gets applied to your entire website which determines the overall look of your site. The
templates contained within each theme can be applied to individual pages for quick
page customization. You can apply different templates to publish a variety of different
pages in your site such as, a welcome page, a group page, a photo album or portfolio
page, a text page, and a contact page. Alternatively, if you wanted to keep every page
the same, such as displaying the same thumbnail layout on each and every page, then
you would use the same template across every page in your website.
At the click of a button, you can replace a theme entirely, or you can add the templates
from a selected theme, to your existing theme. ShutterBug themes offer a lot of
flexibility and control over the look and layout of your site, allowing you the choice
between quick application and page customization, or a complete redesign of the
templates for your own unique look and feel. And it doesn't stop there, you will be able
to add, delete, and share themes and templates as well. More on using the features
available from the theme library is covered in Chapter 9. For now, focus on using the
features available from the Preview window.
───────────────────────────────────────
Apply a New Theme to Your Site
When you first open the Preview window, a default theme will already be applied to
your web site. It's quick and easy to change out the theme - there are more than two-
dozen themes to choose from.
Select & Apply a Theme to Your Website:
1. Click the Preview tab to open the Preview window containing the built-in web
browser.
2. To select a theme, click the Select Theme button to open ShutterBug's theme
library window.
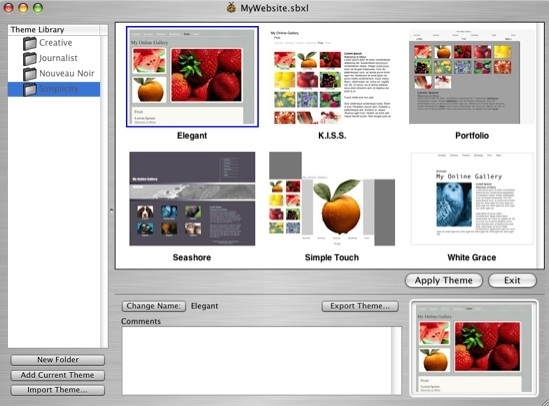
3. The theme library contains 4 main folders of built-in themes listed in the left
panel of the window: Creative, Journalist, Nouveau Noir, and Simplicity. The library
will open with the first folder - Creative - selected.
4. Click on any folder to view the enclosed themes. The themes will be displayed as
thumbnails in the main portion of the window. Some are designed for photo albums,
others for text and photos, while others are set up for photo journals, travel logs,
and news stories.
5. To apply the desired theme to your website, select the theme thumbnail with your
mouse and hit the Apply Theme button. A panel will slide out offering two options -
you can either replace your existing theme with the newly selected theme, or add
the new theme and its templates, to your current theme.
6. To replace your current theme, select Replace Theme. You will be returned to the
Preview window and the new theme will be applied to all pages in your website.
To add the selected theme and its templates to your current theme, select Add
Templates. You will be returned to the Preview window and the selected theme and
its templates will be added to the contents of your template drawer.
7. If you change your mind after entering the Theme Library window, simply hit the
Exit button to return to the Preview window and no changes will be applied to your
current theme.
See Chapter 9 - Theme Library, to learn more about using the features and options
available in the Theme Library, as well as more information on how and where to get
more ShutterBug themes. If you are using a built-in theme from V1.2, but you don't see
it in V2's theme library, not to worry - all V1.2 themes are available from ShutterBug
Land. However, it's much faster to simply add the theme you are using to the new
theme library (discussed in Chapter 9).
───────────────────────────────────────
Customize Your Pages Using Templates
Each ShutterBug theme contains various template styles to choose from to quickly
customize different pages in your site. Templates get applied to specified pages in
your site without affecting the other pages. Templates are a faster alternative for
customizing pages for people who don't want to alter the design or don't have time to
move things around in the Layout window. However, if you like the website with the
chosen theme exactly the way it is and do not want to customize any of your pages,
then do not apply any of the templates. More extensive customization of templates and
pages can be easily accomplished in the Layout window, discussed later in Chapters 6
and 7.
Select & Apply Templates to Your Web Pages:
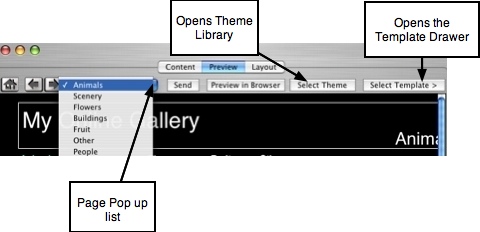
1. Click the Preview tab to open the Preview window.
2. To select a template for a page, first select the page you wish to change from the
page pop up list located at the top left corner of the interface, or click through your
navigation to select the page.
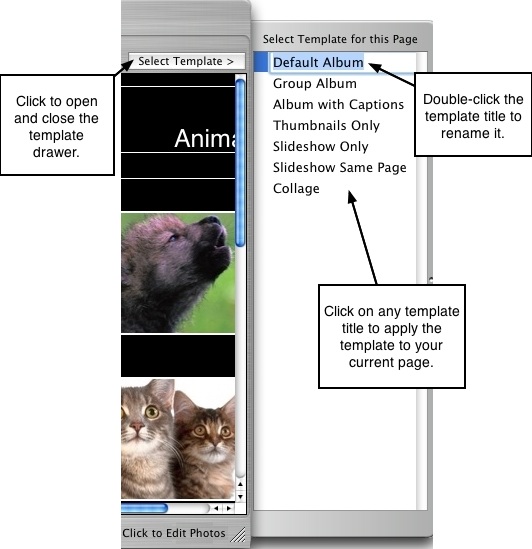
3. Click the Select Template > button to reveal the template drawer. The template
drawer will slide open from the side of the main application window, displaying a
list of template titles. By default, the first template in the list will be applied to all of
your pages.
4. Click one of the templates to apply it to the current page open in the Preview
window. Don't worry, this action will not change any of your content or affect the
other pages in your site. The template will only be applied to the selected page,
leaving your other pages untouched.
5. To view the other templates, simply click on each one to see what it looks like on
your page until you have found one you are satisfied with.
6. To give more pages a different template, select the next page from the page pop
up list and choose a template. Repeat these steps for each page that you want to
change.
7. Navigate through your entire site to review the layout for each page. As you move
from page to page, the template drawer will highlight which template is being used
on which page.
8. You can easily change the template on any page at any time by simply selecting a
different template from the template drawer.
Renaming the Template Title
You may prefer to give the templates a different name - perhaps one that will better
identify the page it is being used on, or a naming style that better suits your taste.
Select a template in the drawer and double-click on the title text. This will activate the
text input field. Input the new name for the template and hit the Return/Enter key on
your keyboard to jump to the next template title. Enter the new name for the template,
and continue on down the list until you are finished. These new names will be saved
out with your project and stored that way until you change them.
───────────────────────────────────────