

Page 38
7.7 Slideshow Tab
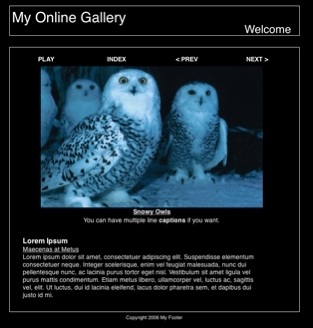
ShutterBug offers various options for creating and customizing slideshows to your
liking. You can stick with a standard slideshow format or get a little more creative and
customize each item in the slideshow. The features offer the freedom and flexibility to
achieve a high quality slideshow presentation that will render correctly in all modern
browsers on multiple platforms - and without any extra hassle to you. Click the
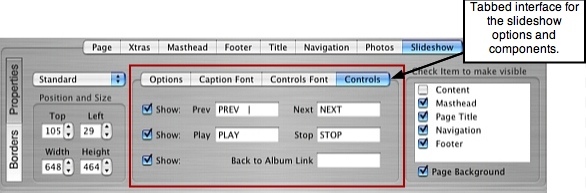
Slideshow tab to reveal the editing options for your slideshow pictures. Like the other
elements on your page, the interface is divided into two subsections: Properties and
Borders.
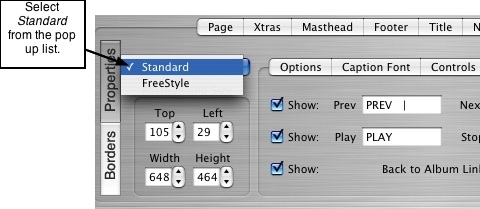
The first option at the top left corner of the Properties interface contains a pop up list of
two slideshow types: Standard or FreeStyle. Before editing any of the slideshow
attributes, choose which slideshow type you would like to use. The Standard slideshow
option keeps the slideshow pictures, control labels, and captions bound together in a
format that is more constrained than FreeStyle. The FreeStyle option breaks each
component apart, allowing you to resize and position the control labels, captions, and
slideshow pictures as independent items. Use the Standard option to create a nice-
looking slideshow, the quick way; use the FreeStyle option to tweak each component
and create something different that meets your specific needs. Follow the instructions
below to learn more about which option is best for you.
A Before/After option is also available for your slideshow pictures, however this option
must first be activated from the Preferences pane. The Before/After option requires
reading short step-by-step instructions and should only be used after reading the
instructions, which are outlined last at the bottom of this page.
───────────────────────────────────────
Using the Standard Slideshow Option
Slideshow Properties
The following section outlines how to edit the slideshow properties for a Standard
slideshow presentation. Using the Borders interface is covered at the bottom section of
this page. To begin, first select Standard from the pop up list at the top left corner of
the Properties interface, as shown in the following picture:
Position and Size of Your Standard Slideshow
1. Use your mouse to grab the slideshow bounding box in the viewer window and drag
it to the desired position on the page. Select and pull the grab handles with your
mouse to resize the slideshow box.
2. Alternatively, you can use the spinbox controls under the Position and Size heading
to position the slideshow box on the page, and adjust the width and height to resize the
slideshow box. The photo will adjust accordingly maintaining its original aspect.
Slideshow Options, Captions, and Controls
The middle section of the Properties interface contains 4 tabs that will let you edit the
caption and control fonts, add and edit the control label text, add a fade effect, top
align the photos, and many more useful items for your slideshow. The attributes for
your slideshow are independent from your thumbnail settings. Any changes made to
items in the thumbnail and slideshow views will not affect one another. As you make
your changes to the slideshow view, you can see the changes reflected in the viewer
window (with the exception of the fade effect and auto start features which you can
preview in Preview mode).
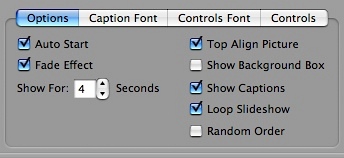
Options Tab:
• Auto Start - To have your slideshow automatically start when opened, check off the
Auto Start check box under the Options tab. To remove the auto start function,
uncheck the box.
• Fade Effect - To include a fade transition between each slide, check off the Fade
Effect check box. To remove the fade effect, uncheck the box.
• Timed Delay - The Show For option below the Fade Effect box will let you create a
timed delay between each slide. Use the spin box control to enter the number of
seconds you would like for each slide to display before the next slide is shown. A timed
delay is only applicable when the Play control is activated for viewing the show. If
viewers are using the Next and Previous controls, they will naturally be viewing the
slides at their own pace.
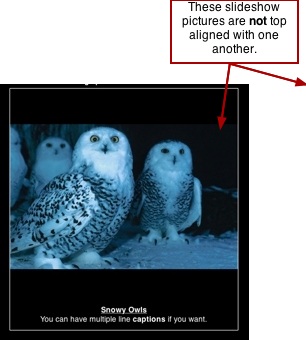
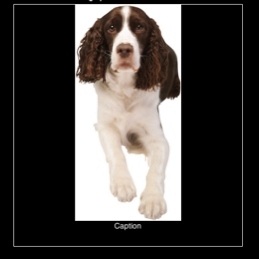
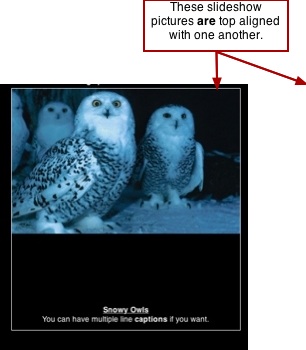
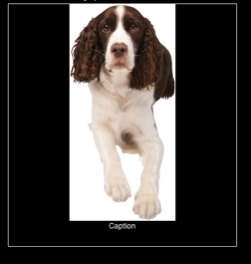
• Top Align Picture - You can choose to top align your slideshow pictures so they all
line up at the same top position. This option is handy when you have a variety of
portrait and landscape pictures, or pictures that all vary in height, in the same
slideshow. The Top Align feature will display the top of each photo at the same position
instead of displaying at different top positions within the slideshow box. To activate this
feature, click the Top Align Picture check box. You will see the picture in the viewer
window jump to the top of the slideshow box. To deactivate this feature, click the box
again to uncheck it.
• Show Background Box - The background box is the box that surrounds the slides.
This box is used for adding an outside frame or background color to the slideshow
viewer window (not the same as adding a frame to the slideshow photo). You can
choose to show or not show this box by checking or unchecking the Show Background
Box check box.
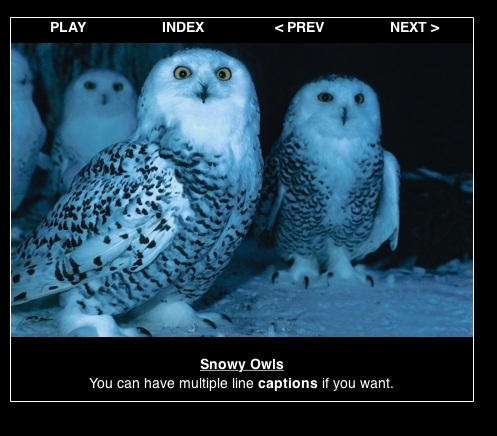
• Show Captions - Click this check box to show the captions (or iPhoto comments) with
each photo in your slideshow. If you are using multi-line captions, all lines will appear in
the slideshow. Leave the check box blank to turn the captions off for the slideshow
view.
• Loop Slideshow - Click this checkbox if you would like your slideshow to loop at the
end of the show and automatically start over again. Otherwise, leave the checkbox
blank.
• Random Order - Click this checkbox if you would like your slideshow pictures to
appear in a random order each time the show is being viewed. Leave the checkbox
blank if you want the slideshow to display in the order that you have set. Random order
will not preview in ShutterBug's preview window - To web preview a randomly-ordered
slideshow, use the Preview in Browser button in Preview mode. Other notes on
random order:
- Random Order & the Next/Previous Buttons - Random order is most fitting to a
slideshow that is set to autoplay, and hence will intentionally not work with the Next/
Previous control buttons. If the Next/Previous buttons are used with a slideshow set to
use random order, when the Next/Previous buttons are pressed, the slideshow will run
in the order that the photos are in, in Content mode.
- Random Order & Looping - Due to the very nature of "randomness", ShutterBug
cannot possibly know when the slideshow is supposed to end, therefore it will continue
looping by default, even if you have the looping option turned off. You can add Play/
Stop controls and/or the Index control, to give the viewer the option of stopping the
show or to go back to the album page, when they are done looking at the slideshow.
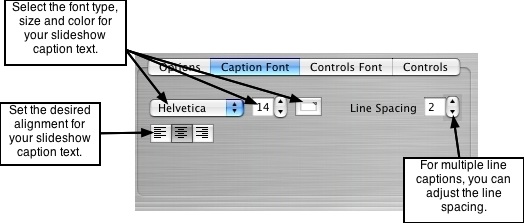
Caption Font Tab:
• Select the Font Type - Click on the first pop up list to reveal the list of fonts available
in ShutterBug. From the list, select the font type for your slideshow caption text.
• Select the Font Size and Color - Click the font size spin box control to select the font
size for your slideshow caption text. Click the color well to select the font color for the
caption text.
• Line Spacing - If you are using multiple line captions, you can adjust the line spacing
(line leading) between each line. Click the spin box control to increase or decrease the
amount of space between each line in the caption text.
• Alignment - Select from the corresponding alignment icons to left, center, or right
align the caption text in the slideshow box.
Note: Bold, Italics, and Underline for the slideshow caption text can only be applied
from within the Content window.
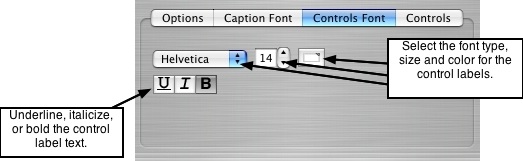
Controls Font Tab:
The attributes for the Control fonts are applied to all of the Control labels. You cannot
edit each control font separately. Controls include the Previous and Next buttons, Play
and Stop buttons, as well as the Back to Album or Index button.
• Select the Font Type - Click on the first pop up list to reveal the list of fonts available
in ShutterBug. From the list, select the font type for your slideshow control labels.
• Select the Font Size and Color - Click the font size spin box control to select the font
size for your slideshow control labels. Click the color well to select the font color for the
controls.
• Font Style - Select from the corresponding style icons to underline ( U ), Italicize ( I )
or Bold ( B ) the control text.
Note: The control labels for a standard slideshow are placed in a default position.
Therefore there are no editing options for the alignment of the control text.
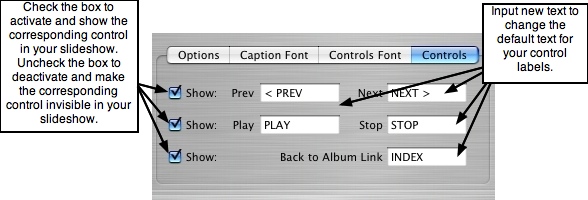
Controls Tab:
The slideshow controls are the buttons people will use to navigate through your
slideshow while viewing. These controls all share the same attributes except for the
names that you assign for each label. The font type, size, color, and style that you
previously selected under the Controls Font tab get applied to all of the controls.
• Prev and Next Controls - To show and activate the Previous and Next controls for
your slideshow pictures, click the first check box labeled Show under the Controls
interface. Each control has a text field for inputting the label or name of the control.
ShutterBug's default will have the labels set to read <<Prev and Next>> . To change
this text, click in the corresponding text field and input the desired labels for the
Previous and Next controls. To make these controls invisible on your slideshow,
uncheck the corresponding Show box.
• Play and Stop Controls - To show and activate the Play and Stop controls for your
slideshow, click the second check box labeled Show under the Controls interface. Both
controls have a text field for inputting the label or name of the control. ShutterBug's
default will have the labels set to read Play (or AutoPlay) and Stop . To change this
text, click in the corresponding text field and input the desired labels for each control.
To make these controls invisible on your slideshow, uncheck the corresponding Show
box. Note: The Auto Start feature under the Options tab does not require the Play/Stop
controls to be included in the slideshow; Auto Start works on its own regardless of
whether or not you have included the Play/Stop controls.
• Back to Album Link - To include a control that will take users back to the album's
thumbnail view when they click on it, click the third check box labeled Show under the
Controls interface. The Back to Album Link has a text field for inputting the label or
name of the control. ShutterBug's default will have the label set to read Index. To
change this text, click in the text field and input the desired label. To make this control
invisible on your slideshow, uncheck the corresponding Show box.
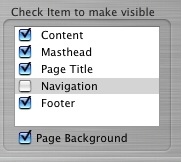
Check Item to Make Visible
The last section on the Properties interface allows you to select which items (elements)
to include on the page with your slideshow. Any or all of the elements in the list can be
displayed with the slideshow view, allowing you to further customize your slideshow
presentation. Including the other elements means you will have to position your
slideshow around them accordingly - the other elements cannot be moved around.
The slideshow picture, background box, and the control labels and captions, are the
only editable items when in slideshow mode. Check or uncheck the corresponding
check box to show or not show each element in the list. You can see these changes in
the viewer window.
Below the item list, you also have the option to show or not show the page background
in your slideshow view. Page Background refers to an image background, but not the
color of the page background. The background color of the page for your slideshow
will be the same color as the background color you selected for your pages under the
Page tab. If you have used an image or tiled image in the page background for your
site, it may clutter, clash or interfere with the colors and options you choose for the
slideshow.
This check box gives you the option to turn off such images for the slideshow view.
Check the box to make the page background appear in your slideshow view; leave the
box blank to keep the page background invisible during slideshow view. Note: Making
the Page Background invisible will NOT remove or change the page background color;
this option only applies to an image background.
───────────────────────────────────────
Using the FreeStyle Slideshow Option
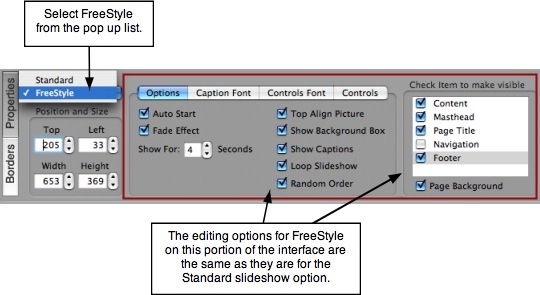
The editing options for FreeStyle are exactly the same as they are for the Standard
Slideshow, with the exception of how positioning is handled. The difference between
FreeStyle and Standard is that the FreeStyle option breaks the slideshow components
apart, allowing you to freely position them anywhere you want, independent of each
other. This means you can place the captions and controls at the side, bottom, or top
of the picture, and align them however you want with total freedom. You can also align
and resize the background box separately from the slideshow picture.
Select FreeStyle from the pop up list located at the top left corner of the Properties
interface. Click on a component with your mouse to select it in the viewer window. The
selected component will have a grab handle box. Use your mouse to drag the
component around on the page to the desired position. Pull the grab handles to resize
the component. Do the same with all of the other components in the slideshow until
you have positioned and resized to your liking. Alternatively, you can use the Position
and Size spin box controls to move and resize the components, but the drag and drop
approach is much faster. All other editing options under the Properties interface for
FreeStyle slideshows are used exactly in the same way as they are in Standard mode.
───────────────────────────────────────
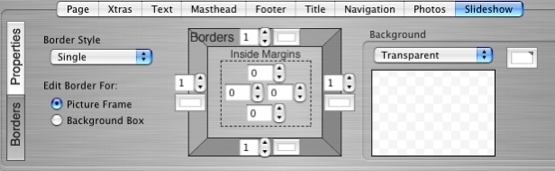
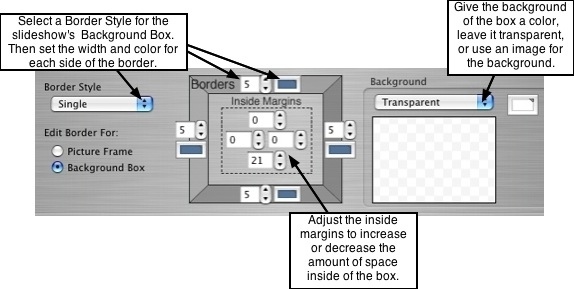
Slideshow Borders
The editing options under the Borders interface are the same for both Standard and
FreeStyle slideshows. Click the Borders button to reveal the options available for your
slideshow borders, margins, background, and background box. The interface is divided
into two subsections: 1. Picture Frame and 2. Background Box. The Picture Frame
options apply to the slideshow pictures, while the Background Box options apply to the
surrounding box that holds your slideshow pictures. If you previously chose not to
show the background box while in the Options tab under the Properties interface, the
border settings for the background box are not applicable.
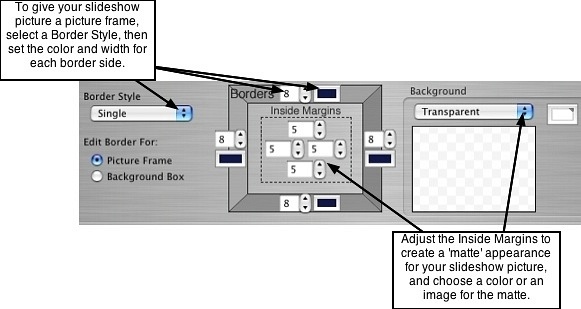
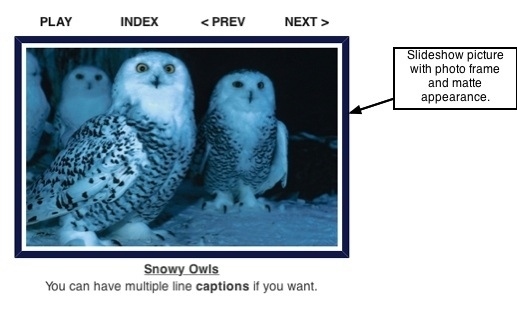
1. Picture Frame:
To give your slideshow pictures a photo frame, click the Picture Frame radio button.
The border style, size, and color settings work exactly the same as they do for all the
other elements on your page. Simply select the style from the pop up list, choose the
colors, and use the spin box controls to increase or decrease the width of the border
for each side of the picture. To include an inside margin to serve as a matte, increase
or decrease the inside margin values to the desired width on each side. Then select
the background color, leave it transparent, or select to use a background image from
the pop up list of Background options. To review how to use the border tools, please
see the Borders section on The Photos Tab page.
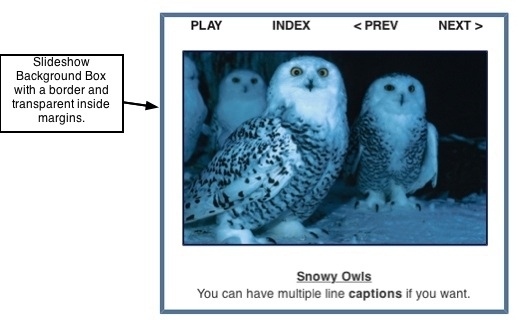
2. Slideshow Background Box:
If you formerly chose not to show the background box when you were in the Properties
section, then the options under the Background Box button do not apply. You can use
the background box to create an interesting backdrop for your slideshow pictures. To
add a border and inside margin to the background box, click the Background Box radio
button. The style, color, and width of the border options, as well as the inside margin
options work the same way as they do for the other elements, and will therefore not be
repeated here.
Now that you have finished editing your slideshow, click the Preview tab at the top of
the main application window to web preview your slideshow.
───────────────────────────────────────
The Before/After Slideshow Feature
NOTES: PLEASE READ FIRST:
• The UI for the Before/After feature is in Beta mode. This feature was
implemented from specific user requests who have a specific need for it. The portion of
the UI which offers this feature is still a work in a progress and is currently a user
preference that has to first be enabled in order to make the features and options
available from Layout mode. While the UI is a work in progress, the actual capability
and functionality of this feature is very stable. If you do plan to add a Before/After
Slideshow to one of your pages, please read through this documentation first and
foremost before proceeding.
• Do not use the Before/After feature until you have read through the help
documentation that follows here. In most cases, you will not require the Before/After
feature for your images, unless you have a very specific use for it such as in the case
of digital retouchers who want to display their work online. If all you're looking for is a
few, simple image rollovers for your page, then please use the "Clickable Image" Xtra
box instead.
───────────────────────────────────────
How the Before/After Feature Works: An Overview
Before and After Slideshows require you to use two images for each image that is
placed on the page. The first image is the Before image and the second image is the
After image. These images are side by side in Content mode. In other words, the first
before image will be image 1 in your album, the first after image will be image 2 in your
album, the second before image will be image 3 and so on. Before and After
Thumbnail Albums require 3 images side by side in Content mode, as outlined in
greater detail below.
There are three different options to choose from for adding a Before/After effect to
your pages/templates. Select the option that makes the most sense for your needs:
1. Before/After Rollovers for the Photos in the Slideshow
Using the mouse to rollover the image in the slideshow, will show the after image;
moving the mouse off the image will show the before image. You will need only 2
images side by side in content mode for each image rollover in your slideshow.
Example: Having only a Slideshow view on your page, without any thumbnails, is an
applicable scenario for selecting this option. The caption text for the Before image can
outline any details about the work done for touching up the photo, or other details you
want the viewer to know about, and/or include an instructional line of text to tell the
viewer to roll over the image to see the After picture. You can also include the Prev/
Next buttons so the viewer can easily navigate through each Before/After image set in
your slideshow.
Be sure you have an even set of images in the album window of Content mode,
otherwise the last image will be missing it's corresponding partner. If you have 10
Before/After pairs of images you want to display in your slideshow, you will need to
have 20 images in the album window.
2. Slideshow Before/After AND Thumbnail Rollovers
Using this feature will allow you to create some interesting effects for the photo album
thumbnails. You will need 3 images side by side in content mode for each thumbnail
rollover in your album - three for the thumbnails, and the first two out of those three for
the slideshow. The first image is the Before image for the first thumbnail in your album
and for the first image in your slideshow; the second image is the After image in the
slideshow and is not used in the thumbnail view; the third image is the rollover image/
After image for the first thumbnail in album view.
You can choose to have the rollover thumbnail album on the same page as the Before/
After slideshow, or you can have the thumbnails click to a Before/After slideshow on a
separate page. However, you cannot have a Thumbnail Rollover album alone, without
having a Before/After slideshow connected to it. In other words, if you set the
thumbnail click action to click to an option that is not a slideshow, the thumbnail rollover
features will be disabled, returning the thumbnail view to a normal album.
Example: Having the thumbnail album on the same page as the Slideshow view, is an
applicable scenario for selecting this option. You can create some interesting effects
for the thumbnail rollovers (such as darkened thumbnails that highlight when they are
rolled over), while having a Before/After slideshow that uses a different After image on
the same page. Clicking the thumbnails, will show the corresponding Before image in
the slideshow. Or you can use this option with a slideshow on a separate page, where
the thumbnails display their rollover images when the mouse is rolled over them, and
clicking the thumbnails takes the viewer to a separate slideshow view containing
Before/After images.
For every slide in your slideshow, be sure you have a set of three images in the album
window. For example, if you want 10 slides then you'll need to have 30 photos in the
album window of content mode (first two are for the slideshow, and the third is for the
thumbnail rollover image).
3. Before/After Controls for Slideshow View
When you select the Before/After option from the drop down list of slideshow types, a
Before/After control will be available in place of the Play/Stop controls. You can add
these controls to your slideshow, which will allow visitors to click for the After shot, and
click again to return to the Before shot. This gives visitors another viewing option, in
addition to rolling their mouse over the image. These controls are available for the
slideshow view only; they are not an option for the thumbnail images.
Special Notes About Before/After Slideshows:
• The Play/Stop, AutoPlay, and Fade features are intentionally not available for Before/
After slideshows.
• Displaying Captions: only the caption for the Before image will be displayed.
• Do not use Random Order with the Before/After feature as it will not make any
sense: the Before/After effect is based on the order of your images, therefore
selecting Random as an option would defeat the before/after effects. Just leave the
Random Order box unchecked.
───────────────────────────────────────
How to Create a Before/After Slideshow
This feature makes it easy to create some interesting effects for your slideshow
images, as well as for your thumbnail images. However, organizing the photos in the
correct order and knowledge of the settings and what they do is required before you
can begin building a Before/After slideshow. Once you understand how it works, it will
seem like a piece of cake. First, quickly familiarize yourself where the controls and
settings are located for adding a Before/After slideshow to your page(s).
User Interface Settings:
1. Preferences: To enable the options for a Before/After slideshow, you must first
select the option from ShutterBug Preferences. Check the box called "Enable Before/
After Slideshows" and then click the 'OK' button. Checking this box will make the
options become available in Layout mode.
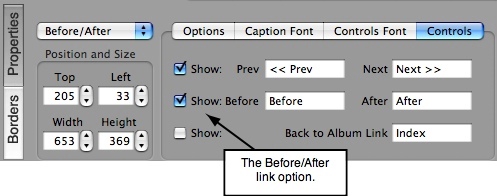
2. Layout Mode: To select a Before/After slideshow select the Slideshow tab:
3. The Before/After control for clicking a link to show the After and Before shot,
appears under the Controls tab:
Creating a Before/After Slideshow: Step By Step How To
Step 1: Go to ShutterBug Preferences and check the box called "Enable Before/After
Slideshows" and then click the 'OK' button.
Step 2: Before you drag any photos into the album window of Content mode, decide
which one of the following options you want to add to your page:
• Before/After Slideshow Only: two photos in a row in content mode for each image in
your slideshow.
• Before/After Slideshow AND Thumbnail Rollovers: three photos in a row in content
mode - three for the thumbnails, and the first two out of those three, for the
slideshow.
Step 3: In content mode, on the selected album page, drag and drop your photos into
the album window. The number of photos required and the order of each one,
depends on which one of the above options you've chosen to go with:
How to Order Your Photos for a Before/After Slideshow only:
• You will need 2 photos for every slideshow image.
• The first photo in content mode is the Before image.
• The second photo in content mode is the corresponding After image that appears
when someone rolls over the image.
• The third photo in content mode is the Before image for your second slideshow
image.
• The fourth photo in content mode is the corresponding After image that appears
when someone rolls over the image.
• And so on for each slideshow image...
• If you want to have 10 Before/After slides, you will need to have a total of 20 photos
in content mode.
How to Order Your Photos for a Before/After Slideshow AND a Before/After
Thumbnail Album:
• You will need 3 photos side by side in content mode for each image in the
Before/After thumbnail album and slideshow:
1st photo - Before picture in slideshow and in thumbnail album
2nd photo - After picture in slideshow
3rd photo - Used for mouse roll over on thumbnail image
• If you want 10 Before/After slides, then you'll need to have 30 photos in the photo
album. These photos should be ordered like this:
1st photo - 1st Before shot in slideshow and thumbnail album
2nd photo - 1st After shot in slideshow
3rd photo - thumbnail rollover for first image in album
4th photo - 2nd Before shot in slideshow and thumbnail album
5th photo - 2nd After shot in slideshow
6th photo - thumbnail rollover for second image in album
...and so on.
Step 4: Go to Layout mode to set the remaining options:
• First, be sure to add/select a new template for your page to ensure the Before/
After slideshow effects are applied only to your current page (and no other
pages in your site).
• Next, select the Photos tab and choose from the Options, whether to have your
slideshow on the same page as the thumbnail album or on a different page.
• Then select the Slideshow tab and choose the slideshow type from the drop
down menu: Before/After for a Standard Slideshow layout or B/A Freestyle for
a freestyle layout.
• Under the Options tab, check the appropriate box depending on which Before/
After option you are setting up: if you are creating a Before/After Slideshow only,
then check the "Slideshow Rollovers" box and leave the "Thumbnail Rollovers"
box unchecked. If you are creating a Before/After Slideshow and Thumbnail
Rollover album, then check both boxes.
• Select the other desired settings available from the Options tab, but leave the
Loop Slideshow and Random Order boxes unchecked.
• Adjust the Caption Font and Controls Font settings for the slideshow view.
• Under the Controls tab, select if you want the Before/After text links to appear,
as well as the Prev/Next and Index buttons.
Note on Thumbnail Rollovers: If you use thumbs that are of significantly different
aspect ratios, such as a landscape and a portrait, as the Before and Rollover images
(1st and 3rd photo in Content mode), you will need to set the thumbnail sizing (in
Layout mode) to "Same Size". Do not choose "Same Aspect" – if you do, the rollover
image will take the same aspect as the first image, making it distorted.
───────────────────────────────────────
Previewing Your Before/After Slideshow
The Before/After effects are not previewable in ShutterBug Preview mode. The
slideshow will behave as a standard slideshow. The thumbnail rollovers are not
previewable in ShutterBug Preview either. To preview the before/after effects, you
must view your pages in an external browser, or upload to the web. The Before/After
feature has been thoroughly tested and working in Safari & FireFox for OS X, and IE,
Safari, FireFox and Google Chrome for Windows.
To see how other ShutterBugs might be using the Before/After feature, please visit the
ShutterBug community at our support boards.
───────────────────────────────────────