
Page 49
Chapter 10. Adding a PayPal Shopping Cart to Your Site
───────────────────────────────────────
This feature will allow you to easily integrate PayPal with your ShutterBug site so you
can set up a store. You can also customize the look of your store pages to suit your
needs. All you'll need is a PayPal account to start selling your products/services online
via your ShutterBug site.
There are also customizable code fields that let you integrate with other shopping
carts, but will require some skill and knowledge (although tech support for this will not
be provided).
───────────────────────────────────────
Getting Started: The Basics
In general, there are four main steps involved in setting up a PayPal Shopping Cart on
your ShutterBug site. This Shopping Cart feature is for use with PayPal's "Website
Payments Standard" package, which is free to sign one up.
Step 1: Sign up a PayPal Account (if you already have one, go to Step 2)
If you do not already have a PayPal account, you will need to sign one up at PayPal's
site in order to accept PayPal Shopping Cart payments. If you are not familiar with the
Website Payments Standard package, please click here to read the overview. As with
any other payment processing company, PayPal will charge you transaction fees for
each sale you make. You can review these fees on the same overview page
mentioned above.
Step 2: Drag & Drop Photos into the Album Window
In Content mode, add a new page and drag and drop the photos you wish to use to
display the items that you are selling. Drag the photos into the album window just the
same as if you are creating a normal album page, or use the integrated iPhoto panel to
import photos from your iPhoto Library.
Step 3: Content Mode - Shopping Cart Interface and Settings
In Content mode, clicking on an album page shows a button in the top right corner
called "Shopping Cart". Clicking this button reveals the data entry fields for the
shopping cart items. Each picture in your thumbnail album will appear along the left
column of the shopping cart interface. Each picture can be used as an item in the
Shopping Cart. Note: You cannot drag and drop photos into the Shopping Cart
interface - you must do it in the album window under normal Content mode. The data
that you enter here are the details that you will later be able to customize in Layout
mode.
Step 4: Layout Mode - Customize the Appearance & Functionality
In Layout mode, you will see a tab along the bottom third of the interface called
"Shopping Cart". The options under this tab allow you to customize the appearance
and functionality of the shopping cart code that gets added to your site. You can select
which type of button to use, what details to include with the thumbnail and slideshow
views (the details that you entered in the data entry fields in Content mode), add your
own custom HTML (for HTML coders only), plus much more.
Steps 1 & 2 above do not require further explanation. Steps 3 and 4 are outlined below
in greater detail and walk you through each step from Content mode to Layout mode.
───────────────────────────────────────
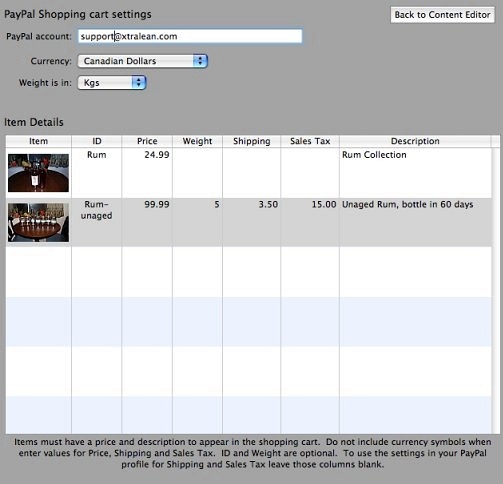
Content Mode: PayPal Shopping Cart Settings
The Shopping Cart interface makes it fast and easy to fill out the necessary data fields
for each item that you will be selling. At the top of the interface, you will see three main
data fields: enter your PayPal Account email address, the Currency you are selling
your goods in, and the unit to be used for the Weight (lbs or kgs) of the goods that
you are selling. Below that, you will see the Item Details table which offers 7 columns
for displaying the desired information for each item.
Item Details
Each photo in your photo album appears in the first column of the Item Details table as
shown in the above screen shot. There are 6 additional columns for entering data
about each item (Note: you must have data in both the price and description fields for
the shopping cart to work. All other fields are optional):
ID - Optional - This is an item ID field. You can use this field as a part number to
uniquely identify the item being purchased or leave it blank. It can include both
numbers and letters.
Price - Required - This is the price field. Enter numbers only, do not enter the
currency symbol nor any non-numerical characters. This field is required for the item to
be purchasable. If you enter anything other than numbers, the cart functionality will not
work.
Weight - Optional - You can enter the weight of the object for shipping calculation
purposes. Enter numbers only; do not enter any non-numerical characters nor the unit
of measurement. If you enter anything other than numbers, the cart functionality will
not work. If you want the unit of measurement to be displayed, you will be able to enter
it later on in Layout mode.
Shipping - Optional - This field lets you enter the shipping cost of your item. If this field
is left blank, then PayPal will use your profile settings to calculate shipping costs. Enter
numbers only, do not enter a currency symbol.
Sales Tax - Optional - This field lets you enter the Sales Tax on an item. If this field is
left blank, then PayPal will use your profile settings to calculate the sales tax. Enter
numbers only, do not enter a currency symbol.
Description - Required - This field allows you to enter a description of the item. This
field is required for the item to be purchasable.
Enter the above information for each item as applicable. Again, be sure you have the
price and description completed for each item, otherwise the purchasing process will
not work - buyers will get an error message from the PayPal gateway if you leave out
those two pieces of key information.
Troubleshooting Tip: if you have accidentally entered a space between characters in
any of the fields (excluding the description field), the PayPal gateway system will return
an "incorrect formatting" error message, when someone clicks your buy it/add to cart
buttons. If your visitors report receiving this error message, double check your input
fields for spaces between characters.
Entering the Data into the Item Details Table:
• Double-click on a field to input data. You can easily edit, add, and delete data at any
time.
• You can use the tab key to quickly move from left to right across each field in a row.
• You can use the Return/Enter key to quickly move from top to bottom down each
field in a column.
• The Description field allows for multiple lines of text.
• Be sure not to accidentally enter spaces between numerical characters, such as
5. 95 - spaces where they shouldn't be will cause a problem with PayPal formatting
and the buyer will receive a "formatting" error message from the PayPal gateway
system.
• To return to the main Content editor, click the button in the top right corner of the
interface, called "Back to Content Editor".
───────────────────────────────────────
Layout Mode: Shopping Cart Tab
Now that you have added and edited the details and settings for your shopping cart
items, you'll then need to go into Layout mode to make a few more adjustments.
Note: Before making any adjustments, you should first add a new template for your
shopping cart page. Otherwise, using an existing template will mean that the shopping
cart feature will be added to all pages that use that same template. Creating a new
template for the Shopping cart feature will also allow you to quickly customize other
newly added shopping cart pages that you add to your site in the future - all you will
have to do is add the data in Content mode, and then apply the shopping cart template
to that page.
Click on the shopping cart tab to view the options. In the top left corner you will see a
pop up list that lets you select one of four options:
1. Disable Cart - this disables all cart functionality from the template.
2. Buy It Now - this will add a PayPal "Buy Now" button to each item on your page/
template. This is a simple button that, when clicked, takes your visitor to PayPal to
purchase the item.
3. Shopping Cart - this will add a PayPal "Add to Cart" button to each item on your
page/template. This button, when clicked, will add the item to the PayPal shopping
cart. This allows buyers to add multiple items to their cart (one item at a time) before
checking out.
4. Custom Code - For Advanced Users Only - this feature lets you add custom code,
allowing for the possibility of integrating other shopping cart software programs. Please
do not add custom code unless you are well-versed and experienced in HTML coding.
Incorrect HTML code could render your pages unviewable or cause other functional
problems. XtraLean does not provide tech support on how to code in HTML. For
support on the code required for integrating another shopping cart program, please
contact the maker of the program, or the PayPal documentation on integrating a third
party cart, as well as any other "How to" help sources available on the Internet.
Select a Purchase Option for Your Shopping Cart Page/Template:
The first thing you need to do, is to decide what type of purchase button you would like
to include on your page. From the drop down list, select one of the following options:
Buy It Now
Shopping Cart
Custom Code
When you select the Buy It Now or Shopping Cart button, you can see the button's
appearance and position in the Layout window as you make your selection.
If at any time, you want to remove the shopping cart feature from your page, simply
select Disable Cart from the drop down list. This will make the shopping cart details
and code disappear from your page, while keeping the keywords/tags and other details
that you have previously entered available to you at a later date should you decide to
turn the cart back on. In other words, disabling the cart, will not delete the information
you've previously entered. It will simply "turn off" the cart.
───────────────────────────────────────
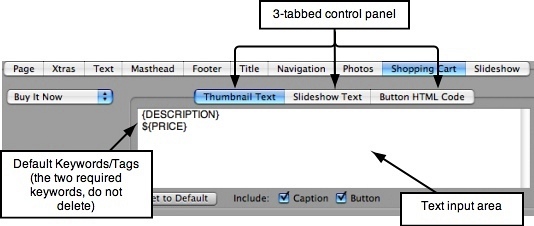
Customize the Item Details
On the interface, beside the drop down list, you will see a 3-tabbed control panel that
lets you customize the item details text for the Thumbnail and Slideshow views, as well
as the option to customize the HTML button code for the shopping cart (advanced
users only).
By using the "keyword/tags" text fields found under the Thumbnail Text and Slideshow
Text tabs, you can customize the appearance and functionality of your store. You can
choose to have limited information with the thumbnails, and more detailed information
with the slideshow; have a purchase button with the slideshow view, but not with the
thumbnails, etc.
When you go to the Shopping Cart tab for the first time, the keyword text that appears
in the text input area will show ShutterBug's default text, which is the DESCRIPTION
and PRICE keywords. It will look like this:
The above keywords will always be the default as both description and price are
required for your items to be purchasable. If you delete either one of these tags, the
buyer will receive an error message from PayPal when they click the buy button (or
shopping cart button) that will be similar to the following message:
"Return to Merchant - PayPal cannot process this transaction because of a problem
with the seller's website. Please contact the seller directly to resolve this problem."
Customizing Thumbnail Text & Slideshow Text:
Text customization for both the Thumbnail and Slideshow views are done in the same
way. The instructions and information here apply to both tabs - inputting and
customizing in the Thumbnail Text area is the same for the Slideshow Text area.
Having the two views separated by two different tabs lets you customize each one
independent of each other. What you do in Thumbnail area will not affect the
Slideshow text, and vise and versa.
The text fields use Text substitution keywords (also called Text Replacement Tags) to
substitute the keyword for the data. The keywords or tags are the text field labels from
the Item Details table in Content mode. The following is the list of the 6 keywords/tags
that you can choose to include or not include in the text that accompanies each item's
photo. Keywords are always enclosed in braces { } and you therefore must include
them when inputting your chosen keywords. Also be sure to input the keywords in All
Caps:
{DESCRIPTION} - Product description
{PRICE} - Product Price
{ID} - Product ID
{WEIGHT} - Product Weight
{SHIPPING} - Product Shipping charges
{SALESTAX} - Product Sales Tax
By using keywords, you can customize the item detail text that appears with the
thumbnail and slideshow. For example, if you want the description, price and weight to
appear with each thumbnail, then input:
{DESCRIPTION}
Price: ${PRICE}
{WEIGHT}
The keywords you include in Layout mode, will be substituted with the data you input
into the Item Details table in Content mode. The {DESCRIPTION} keyword will be
replaced by the Description text you input in the Content section. This is true with any
other keyword that you choose to include. You can see the results in the Layout
window as you go along.
Text that is not enclosed in braces, will appear as normal text. So if you want to
prepend one of the keywords with a label such as Price or Weight, you can. Notice
above, how the phrase 'Price: $' can be prepended to the Price of the item. This is the
place where you would add your currency symbol (the currency symbol should NOT be
input in the Items Details table in Content mode). Prepending phrases and adding
currency symbols or units of measurement works for all the other keywords as well.
For example:
{DESCRIPTION}
Price: ${PRICE} CAD
Weight: {WEIGHT} kgs.
Part Number: {ID}
Shipping Cost: ${SHIPPING}
Plus Tax: ${SALES TAX}
The above translates into the following text on your page (using "made-up" values):
The description text exactly the way you entered it in Content mode.
Price: $5.95 CAD
Weight: 2.5 kgs.
Part Number: JT03
Shipping Cost: $2.50
Plus Tax: $1.56
Note: You can also change the order in which the keyword text appears, by simply
moving the text to a different line by cutting and pasting it to a new line.
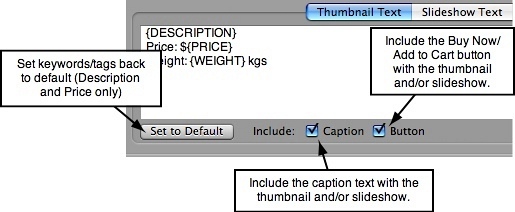
Other Customization Options for the Thumbnail and Slideshow Views:
The Thumbnail Text and Slideshow Text tabs also include three other options:
Set to Default - ShutterBug's default for the text fields is to include the description and
price keywords/tags. When you arrive at these tabs for the first time, they will already
contain these two tags by default. To include more keywords, you need to input them
yourself. If you later want to quickly remove any added keywords, you can simply hit
the Set to Default button to return your item details to only showing the Description and
Price.
Include: Caption - Check this box if you want the photo caption text to be included.
Leave it blank if you wish to turn off the caption text from appearing. Both tabs have
their own checkbox so that you can choose to have the caption appear for the
thumbnail, and not appear with the slideshow, or vise versa.
Include: Button - Check this box if you want the Buy Now (or Add to Cart) button to
be included. Leave it blank if you wish to keep the button from appearing. Both tabs
have their own checkbox so that you can choose to have the button appear for the
slideshow, and not appear with the thumbnail, or vise versa.
The Third Tab - Button HTML Code:
**FOR HTML CODERS ONLY**
The third tab, allows you to type in custom HTML code for the button. You can type in
any HTML, as well as the keywords such as {Price} and {Weight} so that these data
items will be substituted when the HTML is created. This feature was implemented for
those who know how to code in HTML and know how to add the correct code for
integrating a different type of shopping cart (other than PayPal) into their ShutterBug
site.
XtraLean does not provide tech support for HTML coding. If you need help locating
and coding the correct HTML for the customized buttons, you should contact the
maker of the shopping cart system that you are using, as well as consult the PayPal
documentation on integrating a third party cart for any additional information. If you
inadvertently change the code, hit the Set to Default button to return the code back to
its original state.
───────────────────────────────────────
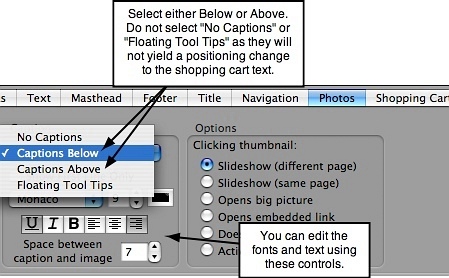
Select the Position of the Item Detail Text & Purchase Button
Positioning the Item Detail Text and editing the fonts, is done in much the same way as
positioning and editing your thumbnail and slideshow caption text. For the thumbnail
text details, the positioning and font editing options are done under the Caption section
of the Photos tab. For the slideshow text details, the positioning and font editing
options are done under the Slideshow tab.
For Thumbnail View:
There are two main positions for the Item Detail Text - Above the thumbnail or Below
the thumbnail. If the text is already in the position you want it to be in, then you need
not change anything. To change the position, click the Photos tab and then select from
the Caption drop down list to set the position to be either above or below the
thumbnail. You can also use the other settings under the Caption section to change
the Font type, style, size and colour, as well as the text alignment and spacing
between the text and the thumbnail:
When the Shopping Cart feature is enabled, the options for the caption positioning
behave as follows:
• Floating Tool Tips: will put the text and button below the thumbnail by default.
• No Caption: will put the text and button below the thumbnail by default.
• Captions Below: will put the text and button below the thumbnail.
• Captions Above: will put the text and button above the thumbnail.
The positioning and font settings can easily be changed at any time, so if you want to
tweak the fonts later or change the positioning, you can easily revisit it at another time
and make changes at any time.
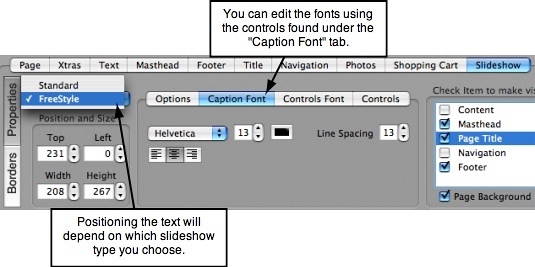
For Slideshow View:
The positioning of the item details text is based on the setting in the Slideshow tab - if
the slideshow is set to be a Standard slideshow, the detail text will be positioned in the
default Below position (below the slideshow picture). If the slideshow is set to be
FreeStyle, then you can position the text wherever you want by moving the caption box
around with your mouse. This will move the caption text, the item detail text, and the
button together as one unit (as opposed to 3 separated parts). The Caption Font
settings under the Slideshow tab is the place to edit the font size, type, colour, etc:
───────────────────────────────────────
Page Design & ShutterBug Shopping Cart Themes
Designing the look and feel of your shopping cart page template(s) is done exactly the
same as designing any other page in your site. You can learn more about using
templates, themes and the Layout tools in Chapters 6 through 9.
You can also choose a ShutterBug theme and then customize one of the templates
with the Shopping Cart feature. Additionally, there will be 3 Shopping Cart themes
designed specifically for three different, yet popular, types of store layouts which will be
completely free to registered ShutterBug users, and will be available from
ShutterBugLand.
For more discussion on ShutterBug's Shopping Cart feature, please visit our support
───────────────────────────────────────