Page 18
3.3 Photos, Captions & Comments
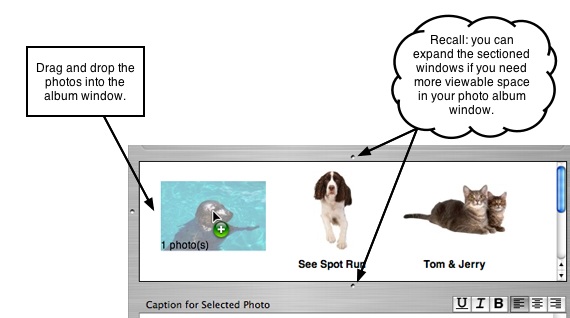
ShutterBug uses simple drag and drop functionality to let you quickly import photos
from iPhoto, iMedia Browser or from any other folder on your computer. You can drop
multiple photos all at once or a folder of photos into ShutterBug's album window. The
photos can be reordered using your mouse to drag and drop anywhere in the album
window or alternatively in the Navigation list. The import feature will also automatically
import the original file name or title as the caption (can be multi-lined) and
alphabetically sort the photos upon import. You can also import iPhoto comments if
you want. Additionally, the iPhoto integration makes importing your iPhoto albums even
easier than before.
This page discusses your photos in relation to album pages and the corresponding
interface with the album window. The behavior of photos on a Group page, as well as
the interface for group pages, are slightly different and are discussed in the Photo
Albums & Groups section. Design aspects such as thumbnail sizes, photo frames, drop
shadows, caption font colors, and other related items, are carried out in the Layout
window, or determined by the theme you choose in the Preview window. These topics
are all covered in later chapters. For now, focus on importing and organizing your
photos, and the editing features available under the Content Tab.
───────────────────────────────────────
Importing Photos
ShutterBug lets you drop entire folders at a time, a selection of multiple photos at a
time, or just a single photo. Captions and iPhoto Comments can be automatically
imported with the photos as well. The adjustable album window gives you as much or
as little workspace as you need to organize and edit your photos. ShutterBug will
automatically process your photos for you, making web preparation a breeze.
Using Drag & Drop to Import Photos:
1. Select an album page from your navigation list. The album window will appear at
the middle section of the main window and to the right of the navigation list.
2. Drag and drop individual photos or a folder of photos into the album window. Your
photos will also be available under the album page in your navigation list.
3. ShutterBug will automatically import the filename of the photo as the caption. If you
are importing photos from iPhoto, ShutterBug will automatically import either the
title of the photo as the caption, or the iPhoto comments, or both, depending on
which option you chose in your user preferences.
Note: Alternatively, you can drag and drop photos via the navigation list. Simply drop
the photos into the destination album page in your navigation list. As you do this, the
photos will also appear in the album window.
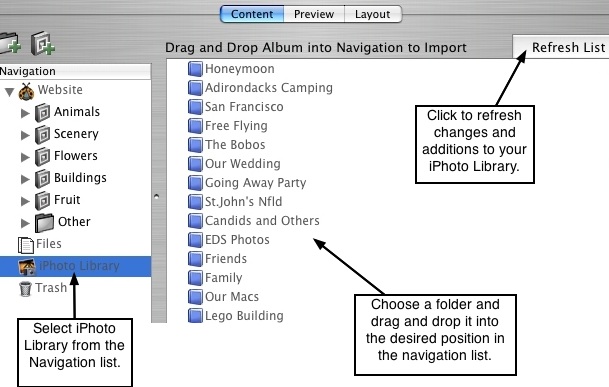
Using the Integrated iPhoto Window to Import iPhoto Albums
1. Select the iPhoto heading located at the bottom of the Navigation list.
2. A window to the right of the navigation list will appear displaying your iPhoto
albums.
3. Drag and drop an iPhoto album into the desired position in the navigation list. You
can drop it into an existing album to add the photos to an album page. Or drag and
drop it into a new position in the navigation list to automatically create a new album
page for these photos. Or you can drag and drop it on top of a Group to add the
iPhoto album to an existing group page.
4. ShutterBug will automatically import either the title of the photo as the caption, or
the iPhoto comments, or both, depending on which option you chose in your user
Refresh the Integrated iPhoto Window:
If you add new albums in iPhoto, you can hit the Refresh button to update the display
of available iPhoto albums in ShutterBug.
───────────────────────────────────────
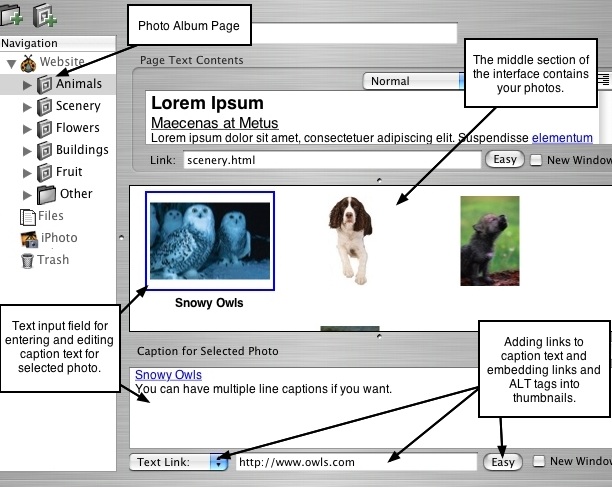
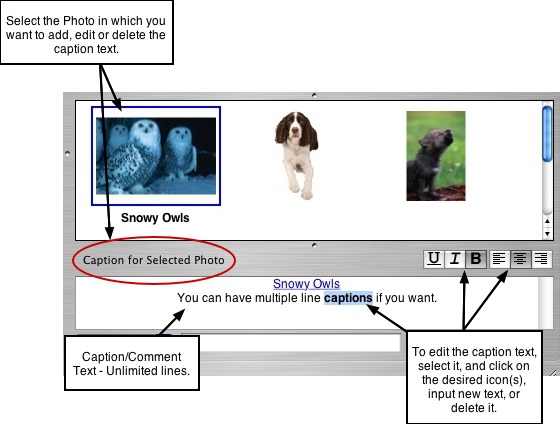
Editing & Deleting Captions and Comments
A text entry box is located just below the photo album window, which allows you to edit
or delete the caption or comment text for each photo. ShutterBug automatically imports
the filename or title as the caption and places the text in this box beneath the photos.
You can include multiple lines of text, it does not need to be limited to only one line. If
you don't want any captions to appear with your photos, no need to go through them
one by one, deleting each one individually - you can shut them off for all photos all at
once, later in the Layout window (see page 37, Photos Tab).
Aside from changing what the caption text says, the other editing options include
alignment, underline, italics, and bold. These options apply to cases where you would
like to edit only a specific word or line within a photo's caption text or edit specific
captions independent of the other captions. If you plan to apply the same changes to
all of the photo captions in your album, such as bold and center align all captions, don't
bother doing it now in the Content window. Wait until you move into the Layout window.
The caption editing tools in Layout mode will allow you to batch apply these settings,
whereas the Content window will only let you do it one photo at a time.
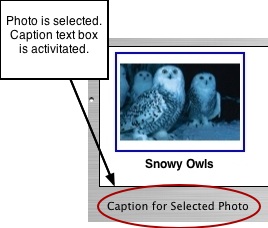
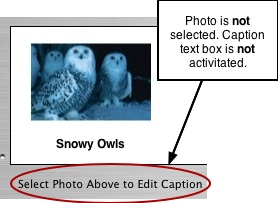
You must first select a photo before you can enter, edit, or delete the caption/comment
text.
To edit, change, or delete the caption or comment text, follow these five easy steps:
1. Select a photo from the album window. The selected photo will be highlighted with a
blue outline to let you know which photo is currently selected. The corresponding
caption or comment will appear in the caption text box below your photos. Note:
You must have a photo selected in order to activate the caption text box. If no photo
is selected, the caption text box will appear empty.
2. If you have previously deleted caption text, you can simply input new text into the
box. Likewise, you can easily change or add on to the existing text. You can enter
as much text as you want; the number of lines and characters are unlimited.
3. To align the text, click anywhere on the text and select from the left, center, and
right align icons located at the top right corner of the caption text box.
4. To underline, italicize, or bold any of the text, select and highlight the text with
your mouse. Click the appropriate icon located at the top of the caption text box.
5. To delete or change the text, select and highlight the text, and hit delete on your
keyboard, or simply enter the new text.
Notes:
• If you want to include multiple lines in your captions, but are worried about what it will
look like in thumbnail view, don't worry about that now. Go ahead and add the multiple
lines of text - the tools in the Layout window will allow you to later adjust how many
lines you want to have displayed with the thumbnails, giving you the option to display
the first line only, no caption text at all, or to display all of it. Regardless of which option
you choose, all of your caption text will appear with the slideshow view.
• Alternatively, the theme selected when in Preview mode, will have presets for the
captions which you may like and may not want to edit at all.
───────────────────────────────────────
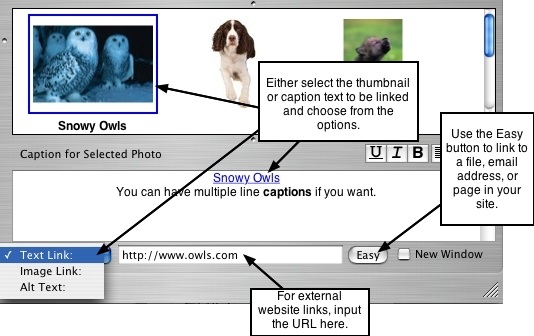
Adding Links to the Caption Text and Thumbnails
You can add links to the caption or comment text, or embed links in the photo(s), or do
both. The links can be linked to another page in your website, to an external website,
to an email address, or to an external file on the web. You can specify to have the links
open in a new browser window or open in the same browser window. Adding links here
is done the same way as it is with your page text using the Easy button. Click the photo
with the caption text that you wish to link, in order to view and activate the caption text
box.
Insert a Link into the Caption/Comment Text:
1. To insert a link into some text in your caption or comment, click anywhere on the
desired text with your mouse. If it is more than one word that you wish to link,
select and highlight all of the text that you want to link.
2. A pop up list is located just below the caption text box for selecting the type of link
you want to insert. Select Text Link:
3. To link the caption text to another page in your website, or to an email address or
an external file, click the Easy button.
4. From the Easy panel, select from the pop up list of Link to options:
Page in ShutterBug site, External File, or Email Address.
5. Then select the desired page or external file in your site to link to, or enter the
email address. Click OK to return to the main window.
6. To link the caption text to an external web page, do not use the Easy button.
Instead, enter the URL to link to, into the text input field located to the left of the
Easy button. Be sure to include the http:// prefix in the URL.
7. To make the link open in a new browser window, check the New Window
checkbox. To make it open in the same browser window, leave the checkbox blank.
Embed a Link into the Photo:
1. To embed a link into a photo, click on the desired photo to select it (the selected
photo will be highlighted with a blue outline).
2. A pop up list is located just below the caption text box for selecting the
type of link you want to insert. Select Image Link:
3. Then follow the same Steps 3-7 as outlined above in the instructions for inserting a
link into the caption text.
Note: Later on in the Layout window, you will need to set the thumbnail click action to
"opens embedded link" in order to activate the link.
───────────────────────────────────────
Adding Alt Tags to Thumbnails
Alt Tags, also known as Alt text, refers to an alternative text description that takes the
place of the photo when a search engine is searching a web page. In the case of a
page composed mainly of photo thumbnails, search engines will ignore these pages,
as there is no text to search through (modern engines no longer use META tags to
search for relevant keywords, but rather they use the text contained within the HTML
page).
Alt tags or Alt text, provide a way to embed a text description into your photo(s) that is
only "viewable" or accessible by search engines, while making it invisible to the visitors
of your website. In other words, the alt text is a hidden description of your photos that
is embedded in the HTML source of the page. This allows search engines to search
through your pages rather than dismissing them and excluding them from search
results.
ShutterBug will automatically embed the alt text into the page for you. All you have to
do is think up your description and enter it into the text field provided for each
thumbnail. To add Alt tags to your thumbnails, follow these four steps:
1. To embed some alt text into a photo, click on the desired photo to select it.
2. Below the caption text box, a pop up list with a text input field is available for
your alt text description. Select Alt Text: from the pop up list.
3. Enter the desired text that you think search engines will parse through when
returning keyword search results.
4. To enter a separate description for each photo, repeat Steps 1-3.
───────────────────────────────────────