Page 47
8.7 Add a Page Counter
Page counters require special snippets of code that need to be added to your website,
or only to a single page in your site. You must first sign up for one of the many free
page counting services available on the web. One such service is
www.statcounter.com. Once you've signed up, you'll receive a snippet of code that you
can place in an Xtra box, or alternatively you can place this snippet in the <body>
section of your website. Using the code with an Xtra box will place the counter on
selected pages only. Inserting the code into the <body> section of your site will place
the counter on every page in your site.
───────────────────────────────────────
Adding a Counter to Selected Pages
Click on the Layout tab to open the Layout window. Be sure to first select the page that
you want to add the counter to. Remember, if you want to keep the counter unique
to your current page only, add a template for the page you are working on.
Otherwise the counter will be added to all pages that use the same template.
Once you have added the counter to the current page's template, you can apply
the template to other selected pages in your site to place the counter on those
pages as well.
To add a page counter to selected pages, follow these steps:
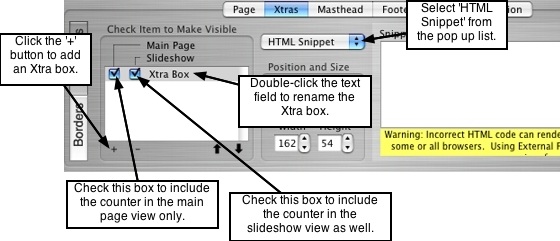
1. Select the Xtras tab and click the '+' symbol to add an Xtra box for the counter
code. The box will appear in the xtra box list window as well as in the viewer window
(default position in the top left corner).
2. Double-click the "Xtra Box" text field to rename the box to a name you can identify
easily. Do you want the page counter to be placed in your main thumbnail view only, in
the slideshow view only, or in both views? From the Xtra Box list, check the appropriate
check boxes to have the counter placed in the desired views. By default, "Main Page"
will already be selected. To keep the counter from being placed in one, or both of the
views, uncheck the corresponding check box.
3. Select HTML Snippet from the Xtra type pop up list as shown in the picture above.
The right side of the interface will display a text input field for entering the snippet of
code you received from the page counting service you signed up to.
4. Copy and paste the counter code snippet into the input field. Your template will now
have a page counter on it.
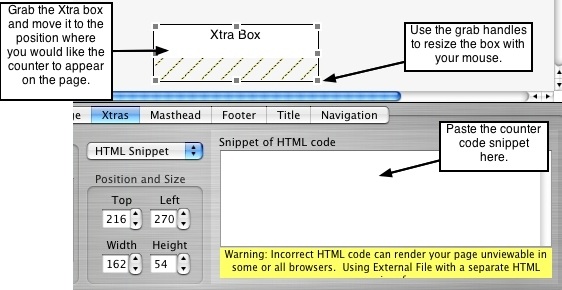
5. You can reposition and resize the Xtra box that contains the counter code, by
grabbing it with your mouse from the viewer window and dragging it to the desired
position on the page. Use the grab handles to resize the box.
6. For each page that you want the counter placed on, select the page from the page
pop up list in the top left corner of the Layout window. Then select the template that
contains the page counter snippet, to apply it to the current page open in the viewer
window. Continue to do this for each page that you would like to add the counter to.
You can add borders and margins to the Xtra box from within the Borders interface.
Some page counter services do not allow you to alter the look of the counter in any
way - if you want to add a border, you should first read the service's terms of use to
find out if it is permitted or not.
───────────────────────────────────────
Adding a Counter to Every Page in Your Site
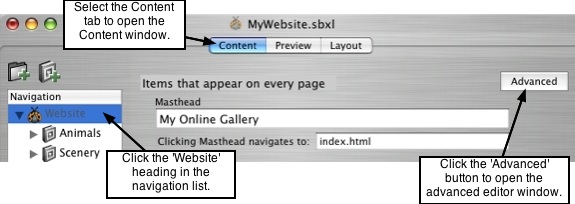
To have the page counter placed on every page in your website, you will need to use
the Advanced editor in the Content window. The code will get pasted into the body
section of each page in your website. To add a page counter to your whole site, first
select the Content tab to open the Content window. Click on the Website heading in
the navigation list. Then click the Advanced button as shown in the following picture:
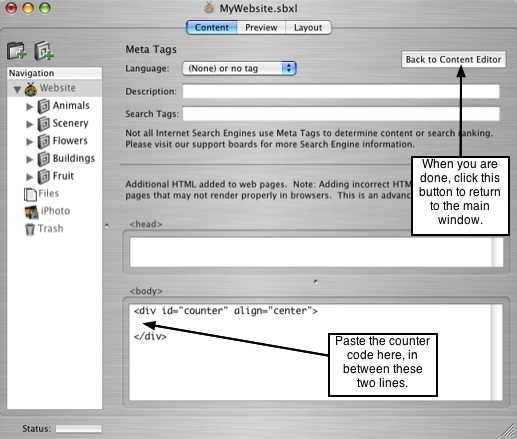
A text input field for <body> content is located at the bottom of the Advanced window.
Paste the counter code in between the <div> tags, as shown in the picture below. This
method will place a counter on every page and automatically center it at the bottom of
the page. When you are done, click the Back to Basic Editor button to return to the
main window. A page counter will now be added to every page in your site.
───────────────────────────────────────