
Page 44
8.4 Add a QuickTime or Flash File
Adding a QuickTime or Flash file require both the Content window and the Layout
window. Both types are based on external files that are located on your computer. A
QuickTime file can be a movie or sound file and supports the following
formats: .mov, .mp3, .aiff, .wav, and .mpg. A Flash file ends with the extension .swf
and can also be a movie or sound file.
ShutterBug will automatically create the necessary code to insert the QuickTime or
Flash file into your template. Both types follow the same basic steps for being added to
a template, but differ where the sizing and control properties are concerned. To add a
QuickTime or Flash file, follow the steps below. Instructions for setting the properties
for each type are outlined separately.
───────────────────────────────────────
Adding a QuickTime or Flash File
In order to add the file to a template, you must first add it to your ShutterBug project.
Adding the file to your project means it will get saved and uploaded to the web with
your site package. ShutterBug will automatically calculate the URL path for the file's
location in your site. To add a QuickTime or Flash file to your site and the selected
template, follow these steps:
1. Click the Content tab to open the Content window. Select the "Files" heading
located at the bottom of the Navigation list. This will open the Files interface.
2. Locate the desired QT or Flash file on your computer, and drag and drop it into the
window, as shown in the following picture.
3. Next, click on the Layout tab to open the Layout window. Be sure to first select the
page that you want to have the QT or Flash file added to. Remember, if you want to
keep the QT or Flash file unique to your current page only, add a template for
the page you are working on. Otherwise the Xtra file(s) will be added to all
pages that use the same template.
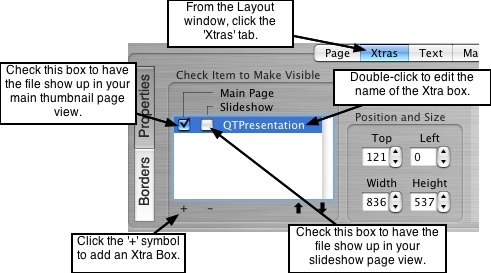
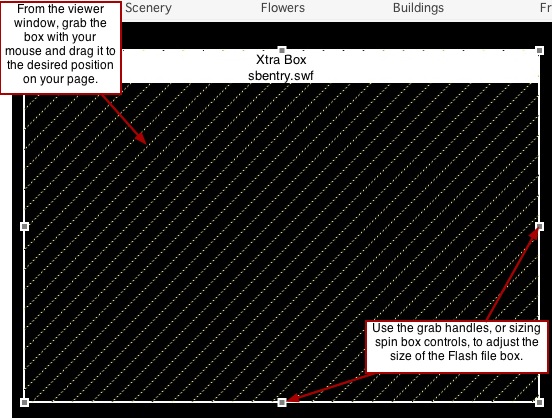
4. Select the Xtras tab and Click the '+' symbol to add an Xtra box as shown in the
picture below. The box will appear in the xtra box list window as well as in the viewer
window (default position in the top left corner).
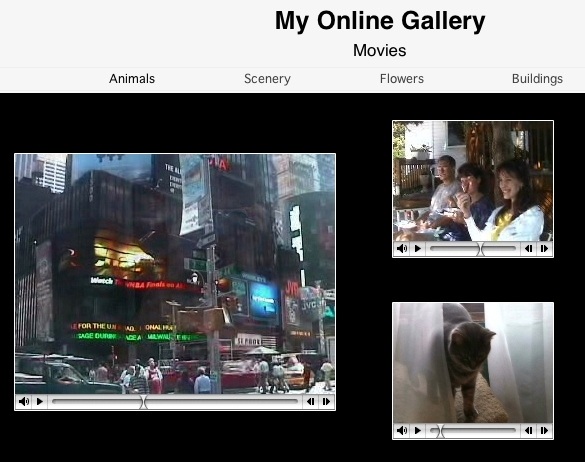
5. Double-click the "Xtra Box" text field to rename the box to a name you can identify
easily. Do you want the QT or Flash file to appear in your main thumbnail view only, in
the slideshow view only, or in both views? From the Xtra Box list, check the appropriate
check boxes to have the xtra files appear in the desired views. By default, "Main Page"
will already be selected. Uncheck the check boxes to make the xtra files invisible for
one, or both of the views.
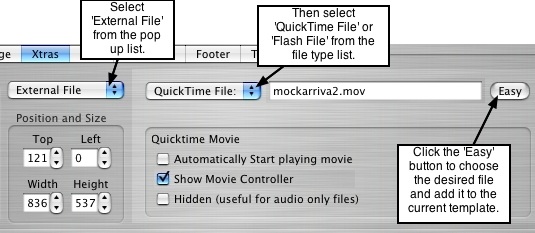
6. Select 'External File' from the pop up list. Then select QuickTime File or Flash File
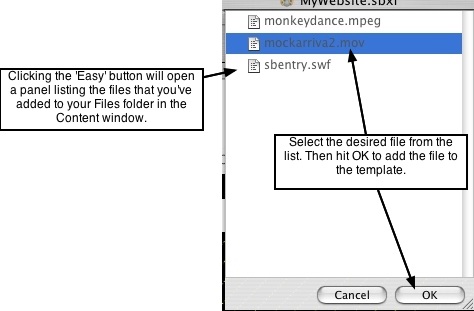
from the file type list, as shown in the picture below. Click the Easy button to open a
panel listing the files that you've added to your site - these are the files that you added
to the Files interface (in the Content window), outlined above in Steps 1 and 2. Select
the desired QT or Flash file from the list and hit the OK button.
7. Your movie or sound file will now be added to the current template. To set the
properties, including the position, size, and controls for your file, read the next sections
that follow below.
───────────────────────────────────────
QuickTime File Properties
A QuickTime file can be a video (.mov file) or a music/sound file such as
an .mp3, .mpg, .aiff, or .wav file. You can set some properties for the movie controls
and drag and drop the movie box to the desired position on your page. ShutterBug will
automatically size the Xtra Box based on the size of the QuickTime movie. Therefore
there are no sizing options available for a QT file.
There are three properties for the QuickTime file xtra:
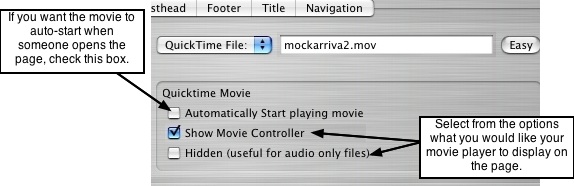
• Automatically Start playing movie - check this box to have the movie (or sound)
automatically start playing when the page is displayed.
• Show Movie Controller - check this box to display the movie controls on the bottom
of the movie player (play, pause, progress slider, rewind, and fast forward).
• Hidden - check this box to make the QuickTime movie hidden on the page. This
feature is useful for playing sounds on a page without having to show the QuickTime
player and controls.
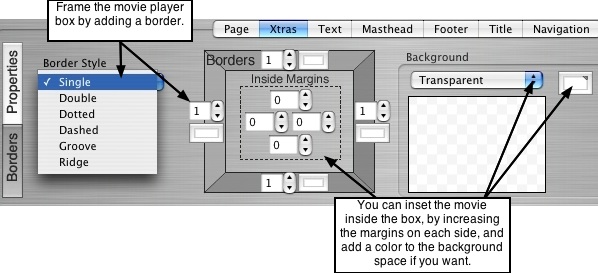
You can also add a colored border and/or margins to the Xtra box from within the
Borders interface, as shown in the following picture:
───────────────────────────────────────
Flash File Properties
A Flash file can be an animation or sound file (.swf file). You can set some properties
for the Flash file such as looping, scaling of the movie size, and drag and drop the file
to the desired position on your page. You can also add a colored border and/or
margins to the Xtra box from within the Borders interface. There are four options
available for the Flash file Xtra:
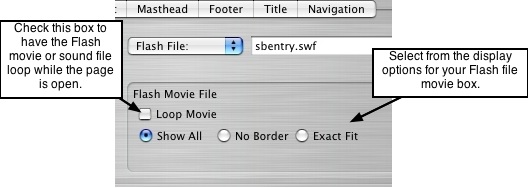
• Loop Movie - When this box is checked the Flash file will automatically rewind back
to the beginning and play the Flash animation over again.
• Show All - Click this button to make the entire movie visible in the specified area
without distortion, while maintaining the original aspect ratio of the movie. Borders
may appear on two sides of the movie.
• No Border - Click this button to scale the movie to fill the specified area, without
distortion, but possibly with some cropping, while maintaining the original aspect
ratio of the movie.
• Exact Fit - Clicking this button will make the entire movie visible in the specified
area without trying to preserve the original aspect ratio. Distortion may occur.
───────────────────────────────────────