Page 27
5.1 Exporting Your Site
ShutterBug's Export features are contained within one compact interface that
encompasses all of the export actions, allowing for organized, fast and easy exporting
of your site. The export interface is the place to enter your web host information where
it will be stored until you change it. You can also easily export changes to your site,
simply by clicking the Send button, without even having to access the Export window.
ShutterBug keeps track of your changes, so you don't have to!
The export feature is available from the Preview window (Send Changes) and from the
Main Menu, or by using the short cut keys - Command-E to send the entire stie or
Shift-Command-S to only send the changes. You will need your username, password,
web host type and server location to export your site to the web. If you are unsure of
what your information is, check with your ISP or web host provider.
Additional information on exporting to a .Mac account, WebDAV or FTP/SFTP host
specifically is covered on the next page in this chapter.
Note to ShutterBug V2.0 & V2.1 Users:
ShutterBug V2.2 and all releases thereafter, contain built-in FTP/SFTP uploading and
no longer require Cyberduck or Transmit. Please update your version of ShutterBug to
the latest version (free update).
───────────────────────────────────────
Export Your Site for the First Time
1. To export your site, hit the Send button from within the Preview window, or
File-->Export Website from the Main Menu.
2. The Export window will open inside of the main application window.
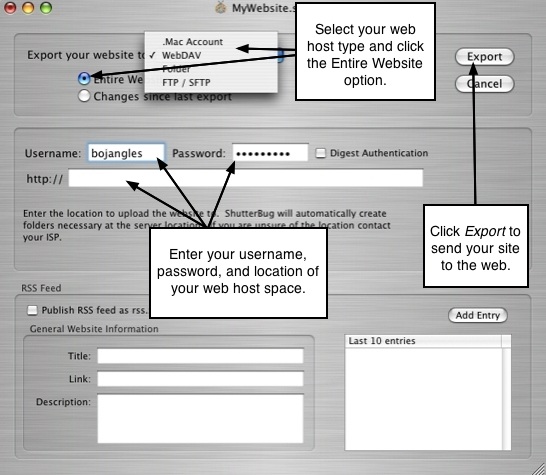
3. From the pop up list, select the type of host you want to export to: .Mac Account,
WebDAV, FTP/SFTP, or to a Folder on your computer.
4. Next, click the radio button labeled Entire Website.
5. Move down the window and enter your username, password, and the URL
location for your web host space. (For instructions on exporting to a .Mac Account,
WebDAV or FTP/SFTP host specifically, see the next page in this chapter.)
6. Hit the Export button to upload your website to your web space.
7. Hit the Cancel button to cancel the upload action.
Note: After you hit Export, ShutterBug's activity log will open while it calculates and
builds the output for your site. You can cancel the upload at anytime during the activity
log processing. When it has completed the calculations, a small ShutterBug progress
menu will appear that allows you to watch the status of the upload.
───────────────────────────────────────
Export Changes to Your Site - Incremental Upload
After the first export, ShutterBug will save and store your web host information. You
won't need to go through the Export window again unless you have to change your
web host information or need to upload to a different location. Each time you make a
change or update your site, all you have to do is hit the handy Send button from within
the Preview window or File-->Send Changes (Shift-Command-S) from the Main Menu.
ShutterBug automatically calculates your changes and uploads only those changes.
You can view the changes that are being uploaded in the small ShutterBug progress
menu that appears after you hit Send.
Notes:
• You do not have to upload the changes right away. ShutterBug will always remember
the changes and save them for upload at a later date (provided you save your file
before closing).
• If you make changes to your site, but also change the location to export to at the
same time, you will need to export the entire site for all the files to show up at the new
location.
───────────────────────────────────────
Changing Your Web Host Information
1. Go to File-->Export Website from the Main Menu or Shift-Command-S on your
keyboard, to open the Export window.
2. From the pop up list, select the new web host type: .Mac Account, WebDAV
or FTP/SFTP.
3. Go to the text input fields for your Username, Password, and URL directory
path for uploading your website to. Enter the new information.
4. To export your site to this new location, click the radio button labeled
Entire Website and then click the Export button.
5. If you aren't ready to upload to the new location but want to save the new
settings, go to the Main Menu (with the export window still open) and hit Save
or Command-S on your keyboard to save the changes in the Export window.
6. From the Export window, hit the Cancel button to exit the Export window and
return to the main application window. Your new information will be saved
and stored until you need to change it again.
───────────────────────────────────────
Exporting an Existing Project to a New Location
If you change the location to upload your site to, be sure to export the entire site, and
not just the changes. Otherwise ShutterBug will only export the changes as specified,
meaning the folder or web location you've just sent the changes to, will contain only the
changed files. When exporting to a new location for the first time, you must export the
entire site if you want all of the files to be contained in the specified location. For future
exports of updated/changed files to this same location, you only need to send the
changes and not the entire site each time.
───────────────────────────────────────