Page 29
5.3 Publishing a RSS Feed
Many people today are using RSS feeds as a tool for staying on top of daily news and
events. Now you can share updates and new additions to your website with RSS
subscribers using ShutterBug's new RSS Feed feature. Anyone with a RSS news feed
viewer or RSS browser, can use it to check for new photos, new stories, or any other
new content you've posted to your site. The RSS feed will notify subscribers when
something new has been posted at your site.
Creating & Uploading Your RSS Feed in ShutterBug
The bottom third of the Export window contains an area labeled RSS Feed, for
entering the necessary information for publishing your feed. ShutterBug will create
an .xml file that gets uploaded with your site that can be used by anyone with a RSS
viewer. People can bookmark your feed in a RSS browser and check for updates to
your site direct from the bookmarks bar. To create and publish a RSS feed for your
site, follow these quick steps:
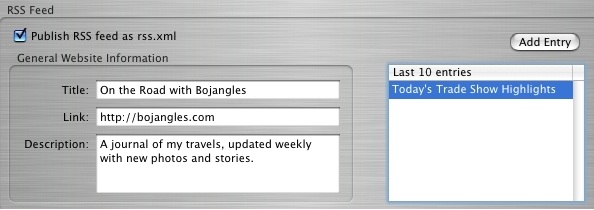
1. Check the first box labeled Publish RSS feed as rss.xml. This simply tells
ShutterBug to publish the RSS feed when you export your site. If you do not check
this box, ShutterBug will not upload the file.
2. General Website Information provides information to your viewers about your RSS
feed. In the Title box, enter the name or title of the website in which the feed
represents.
3. In the Link box, enter the URL to link the Feed to. Be sure to include the http://
prefix. This link will get embedded into the title of your feed.
4. In the Description box, enter a short description about the content contained at
your feed (some RSS viewers display the description, while others do not).
5. The text entry box on the right side allows you to add new entries to your feed.
Click the Add Entry button to create your first entry to the feed. A small panel will
slide out from the top of the main application window.
6. Enter the Title for your entry. The title serves as a headline for the entry.
7. To link the title to the updated page in your website, click on the blue pop up
button and select the page from the pop up list.
8. Type in a description for the new entry. This is the abstract that reads below the
title of your entry, providing a brief explanation about the new addition or change
to your site.
9. Click OK to return to the Export window. The entry box will show your new entry.
10. To add more entries, repeat Steps 5-9.
11. Your RSS feed will be published the next time you export your site.
Editing & Deleting RRS Entries
1. To edit an entry, double-click on the Title text in the entry box. The RSS entry panel
will slide out from the top of the window. Make the desired changes and hit OK to
return to the main Export window.
2. To delete an entry, select it from the entry box and hit Delete on your keyboard.
3. The changes to your RSS feed will be published the next time you export your site.
───────────────────────────────────────