Page 22
3.7 Adding External Files to Your Website
ShutterBug lets you easily add external files to your website by simple dragging and
dropping, and have them upload with your site the next time you export it. External files
may include files like PDF documents, Flash or QuickTime Movies, MP3s, HTML files,
as well as folders containing multiple files (i.e. forms, events, downloads, etc.) or any
other file type or folder that will be external to the pages in your website.
For example, you may want to include a link to a pdf file. With ShutterBug, there's no
need to upload the file separately and keep track of what the URL location is. Simply
drag and drop the file onto the Files interface, and then link to it using ShutterBug's
Easy button in the text content editor. The next time you upload your site, ShutterBug
will automatically upload all files contained within the Files list. Your files can also be
exported with any themes that you create helping to keep your projects organized and
moving along smoothly.
Using the Files Interface
The handy new Files window makes it easy to include external files with your website.
It replaces the need to upload files separately to the web and keeps your website
package more organized. This means you won't have to remember the URL when it
comes time to link to the file, nor will you have to store endless amounts of folders with
your site files on your computer. You can keep it all inside of your ShutterBug file.
Using the Files window is easy and quick.
To Add External Files to Your Website:
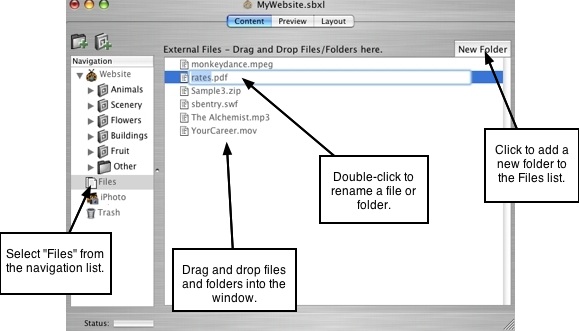
1. Go to Files located at the bottom of the navigation list below your site pages.
2. The Files interface will open on the right side of the window.
3. Locate the file or folder you want to add, on your computer, and drag and drop it
into the Files window.
4. If you add a folder, all the contents of that folder will be uploaded with your site.
You can click the Folder's disclosure triangle to view the contents.
5. Click the New Folder button to create a new folder in your list of files. Drag and
drop files into the new Folder.
6. All files in the list will be uploaded with your site upon your next export.
7. Now you can quickly use the Easy button in the Page Text Contents box to link
some page text to one of your external files. No need to determine what the URL
is - ShutterBug will quickly calculate the correct URL for you.
Rename a File Name:
You can rename the files from within the Files window. Simply double-click on the
filename to activate the text field. Enter the new name for the file (don't change the file
extension/file type). Note: if you change the filename after linking text to the file, the
link will still contain the old name. You must select the newly named file from the Easy
button window or manually input it into the Text Contents Link: input field. Otherwise
your link will be broken, as it will try to link to a file with a name (the old name) that
doesn't exist on the server.
To Delete a File or Folder From Your Files List:
To remove an item from your Files list, select it and hit Delete on your keyboard. The
file will be permanently deleted from your site. For important files, always keep a
backup copy on your hard drive or on external media in the event you accidentally
delete the wrong file.
───────────────────────────────────────