Location, Location, Location...Before you can send your images, you'll have to let ImageWell know where to send them. A button labeled 'Locations' resides at the bottom of the ImageWell window. Click this button to reveal the Locations Editor. The Locations editor lets you add, manage or delete the places you want to send your images to, and lets you set up as many locations as you want.
Select the Type of Location
ImageWell can send to iDisk (.Mac), FTP, SFTP, WebDAV or to a Folder on your computer. The first step to setting up a location is to click the '+' button to add a new location. Then choose the type of location from the drop down menu under 'Location Properties' . If you are unsure of the type of location, you'll need to contact your web host for more details.
Host Name
If you are using iDisk, ImageWell fills this field in for you. For other locations, type in the name of the server. Note: do not type in the ftp:// or http:// prefix - just type in the name. For example, ftp.myserver.com or myserver.com.
Username and Password
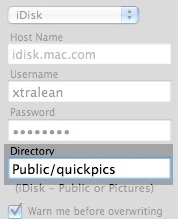
If you are using iDisk, the username will be the name without the '@mac.com' portion. For example, our username is 'xtralean' for our iDisk (not xtralean@mac.com).
For other web hosts, type in the username and password assigned to you. If your username has a '@' in it - such as your email address is your username, you might have to replace the '@' with a '#'. You'll have to try both ways as every server is different. For example, if your username is someone@someplace.com and that doesn't work, then try someone#someplace.com.
Directory
If you are using iDisk, then the Directory will either be Public or Pictures - depending on where you want to send the image. If you are not sure which one to pick, either place works fine.
For other web hosts, you'll need to consult the documentation provided to you by your web host. With some hosting companies this field can be blank, while others require you to include a folder such as 'public_html' or 'www' in order to upload the picture to your website.
*Sending to a Sub Folder*
You might not want to send the image to the root folder, but rather to a subfolder on your server. Simply add a '/' followed by the sub folder's name.
For example, let's say you want to send an image to a subfolder called 'quickpics' in the Public folder of your iDisk. Type in 'Public/quickpics' as illustrated in the screen shot to the right.
ImageWell will automatically create any folders that are required on your server.
Warn Before Overwrite
If you would like to be warned if an existing file with the same name is already on your server before ImageWell overwrites it, then check the box labeled "Warn me before...". If the same filename already exists, you'll be given the option to overwrite it or cancel the action from within a warning dialog box.
Setting Up the URL for Viewing
One of the unique features of ImageWell is the ability to automatically copy a URL of the image you just uploaded, onto the clipboard. This feature is handy for pasting the URL into your email message, into discussion board posts or if you are hand creating a HTML page.
Before you can use this feature, you'll need to type in the URL of the location you just entered, into the bottom text entry box ('URL for viewing...'). Some web hosts use the same URL for viewing as the URL for sending, while others require you to use a different URL for viewing.
If you are sending to an iDisk, ImageWell will automatically fill the URL in for you. For other hosts, you will need to type it in manually. For example, if you are sending to ftp.mydomain.com, the URL to view your website would be different - possibly www.mydomain.com. If you are unsure, check with your web host.
Now that you've added one host location, continue adding any other hosts you have, following the same steps above. ImageWell will always store all of your settings. You will never have to access the Locations editor again unless you need to make changes to the settings, or need to add or delete one of the locations.
Now, it's time to send your image - go to to Part 2.

Share Your Images With Anyone